Je assistent op je iPhone, Watch en Mac Your assistant on your iPhone, Watch and Mac
Met twee kleine opdrachten op je iPhone zet je iets in je assistent zonder de app te openen: ook vanuit het deelmenu van elke app, en via iCloud op je Apple Watch en je Mac. Je maakt ze één keer; daarna werken ze vanzelf.
Two small shortcuts on your iPhone let you add something to your assistant without opening the app: also from any app’s share menu, and through iCloud on your Apple Watch and your Mac. You make them once; after that they just work.
Zet ze op je iPhone: de snelle weg
Put them on your iPhone: the quick way
Voordat je begintBefore you start
- Lees deze pagina op je iPhone, in Safari. Alleen in Safari kun je de kant-en-klare opdrachten downloaden. Begin je in de app van je assistent? Dan brengt stap 3 je vanzelf naar Safari. Je gaat steeds heen en weer: lees hier een stap, doe hem, en kom terug voor de volgende.
- Wisselen tussen apps: veeg vanaf de onderrand van het scherm omhoog en houd je vinger even stil. Je ziet je open apps naast elkaar; tik op de app die je wilt. Elke app gaat verder waar je was.
- De app Opdrachten staat al op je iPhone. Niet te vinden? Veeg op je beginscherm omlaag en typ Opdrachten. Ooit verwijderd? Haal hem gratis terug uit de App Store.
- Je kunt niets kapotmaken. Gaat er iets mis, dan verwijder je de opdracht en begin je opnieuw.
- Staat je iPhone in het Engels? Kies dan rechtsboven EN. Dan kloppen de knopnamen en de plaatjes.
- Op de plaatjes wijst een oranje kader aan waar je tikt. Staat er een cijfer bij, dan hoort dat bij hetzelfde cijfer in de tekst.
- De snelle weg kost vijf à tien minuten. Zelf bouwen kost ongeveer tien minuten per opdracht.
- Read this page on your iPhone, in Safari. Only Safari can download the ready-made shortcuts. Starting in your assistant’s app? Then step 3 takes you to Safari by itself. You’ll go back and forth: read a step here, do it, then come back for the next one.
- Switching apps: swipe up from the bottom edge of the screen and pause. Your open apps appear side by side; tap the one you want. Each app picks up where you left off.
- The Shortcuts app is already on your iPhone. Can’t find it? Swipe down on your Home Screen and type Shortcuts. Deleted it once? Get it back for free from the App Store.
- You can’t break anything. If something goes wrong, delete the shortcut and start again.
- Is your iPhone set to Dutch? Choose NL at the top right. Then the button names and pictures match.
- In the pictures an orange frame shows where to tap. A number next to it matches the same number in the text.
- The quick way takes five to ten minutes. Building them yourself takes about ten minutes per shortcut.
Drie woorden die je zo tegenkomtThree words you’ll come across
- Opdracht
- Zo noemt je iPhone een snelkoppeling: een rijtje stappen dat je met één tik laat uitvoeren.
- Taak
- Eén stap in zo’n opdracht, bijvoorbeeld Neem audio op.
- Je sleutel
- Een geheime code die je in je assistent maakt. Daaraan ziet je assistent dat het bericht van jou komt. Met een sleutel kun je alleen iets toevoegen: niemand kan er je notities mee lezen of iets mee wissen.
- Shortcut
- A short list of steps your iPhone runs with one tap.
- Step
- One part of a shortcut, for example Record Audio. Apple calls these “actions” — not to be confused with the actions on your board.
- Your key
- A secret code you create in your assistant. It tells your assistant the message comes from you. A key can only add things: nobody can read your notes or delete anything with it.
Only if you build them yourself: you’ll also type two Dutch words, x-sleutel (sleutel means key) and tekst (text). Your assistant expects them in Dutch, so type them exactly like that. Each has a Copy button.
AanraderRecommended
De snelle weg: kant-en-klaarThe quick way: ready-made
Je voegt twee opdrachten toe die al klaarstaan. Je maakt één sleutel en plakt die twee keer. Reken op vijf à tien minuten.
You add two shortcuts that are already built. You create one key and paste it twice. Allow five to ten minutes.
Deed je dit al eens? Maak met de knop een nieuwe sleutel, voeg alleen Naar Assistent toe, en verwijder je oude Typen. Inspreken mag zijn oude sleutel houden.
Set this up before? Make a new key with the button, add only Add to Assistent, and delete your old Type. Speak can keep its old key.
-
Open de instellingen van je assistentOpen your assistant’s settings
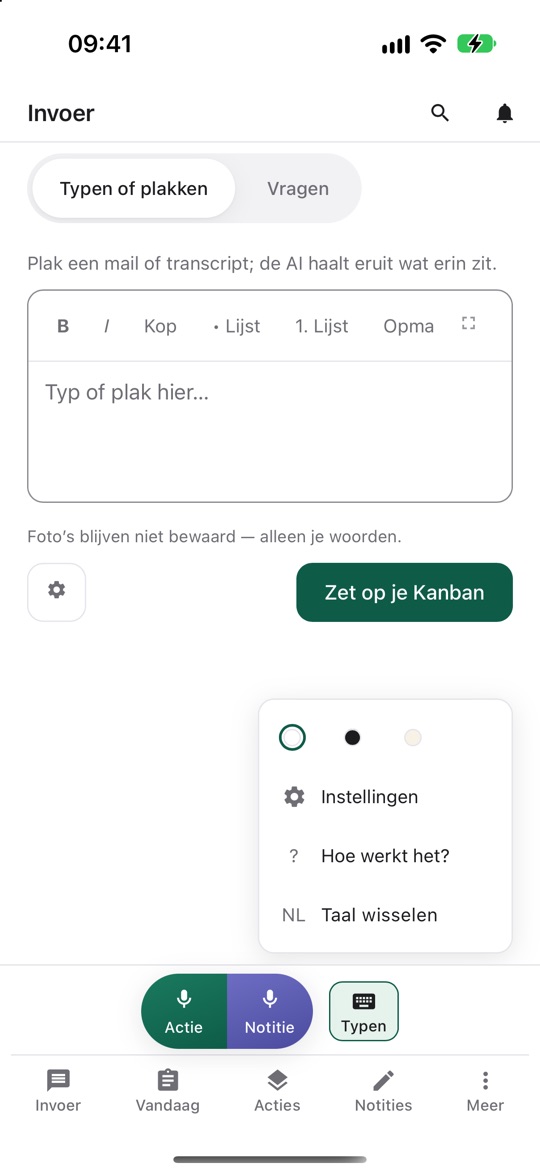
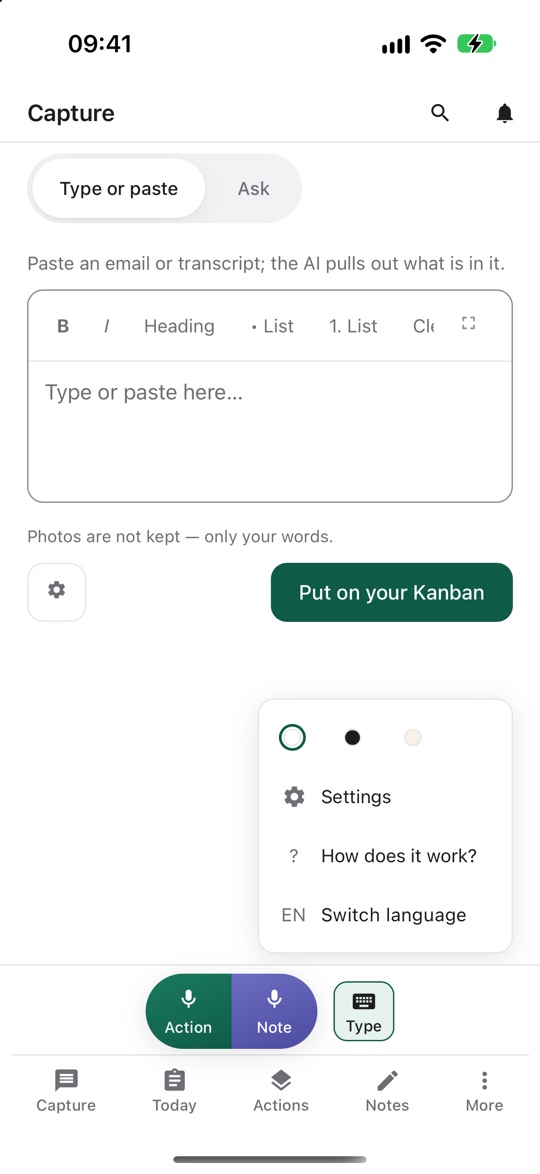
Ga naar je assistent: tik op het icoon op je beginscherm. Zie je daar deze uitleg in plaats van je assistent? Tik dan bovenaan op Naar de app. Tik rechtsonder op Meer (de drie puntjes), dan op Instellingen en daarna op Microfoon en telefoon (vlak boven Account).
Geen icoon op je beginscherm? Tik dan helemaal bovenaan deze pagina op Naar de app. Terug naar deze uitleg ga je daarna met ‹ linksonder in Safari.
Go to your assistant: tap its icon on your Home Screen. Seeing this guide there instead of your assistant? Then tap Open the app at the top. Tap More (the three dots) at the bottom right, then Settings, then Microphone & phone (just above Account).
No icon on your Home Screen? Then tap Open the app at the very top of this page. To come back to this guide afterwards, tap ‹ at the bottom left in Safari.
-
Tik op Zet de opdrachten op je iPhoneTap Put the shortcuts on your iPhone
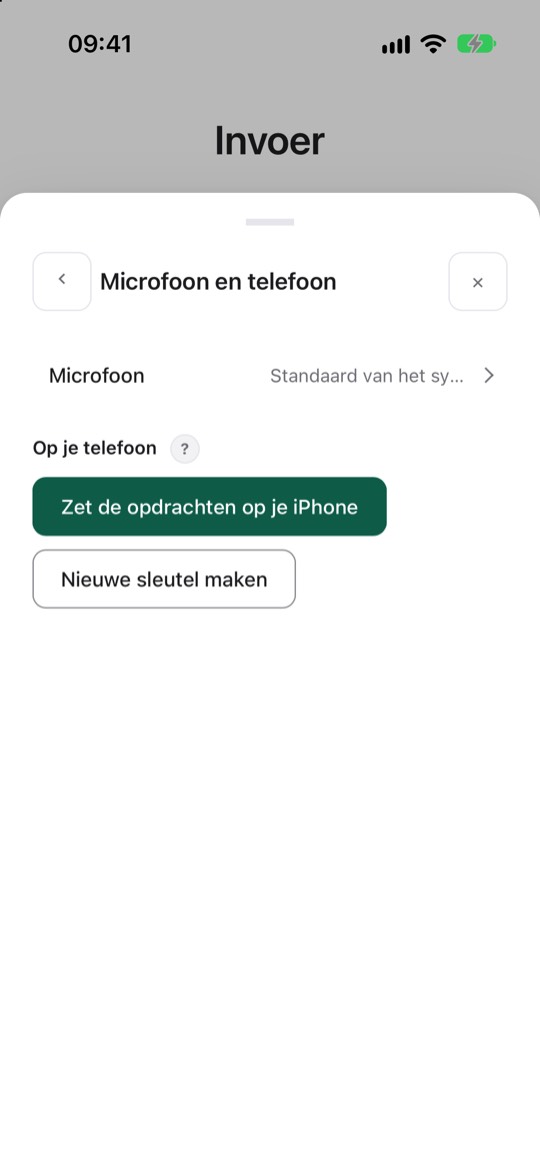
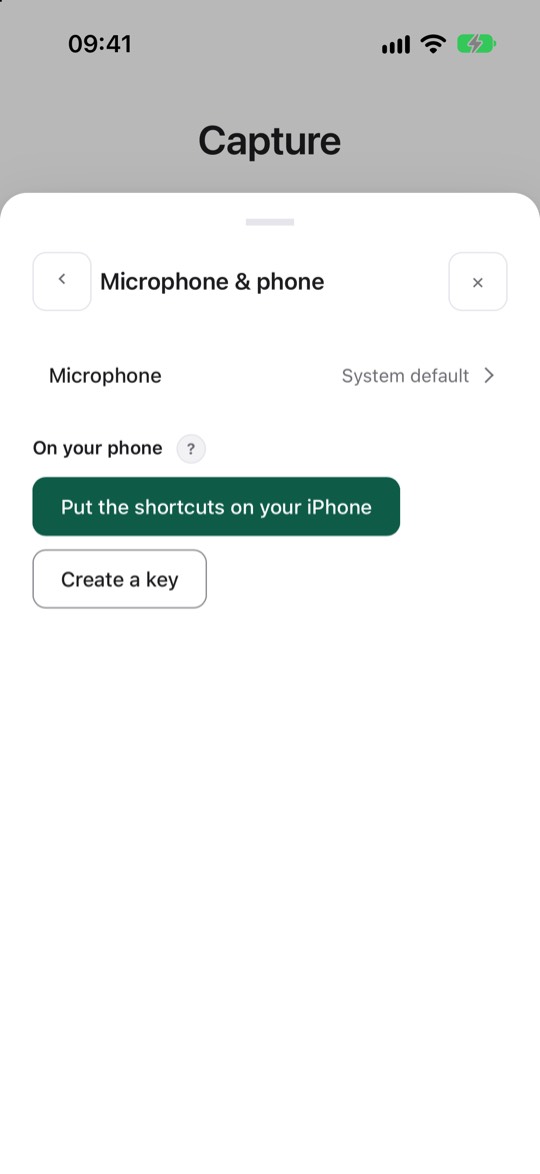
Bovenaan onder Op je telefoon staat de knop Zet de opdrachten op je iPhone. Tik erop. Je assistent maakt je sleutel en laat hem één keer zien.
At the top, under On your phone, there’s the Put the shortcuts on your iPhone button. Tap it. Your assistant creates your key and shows it once.
-
Tik op Kopieer en ga verderTap Copy and continue
Je ziet je sleutel; hij begint met
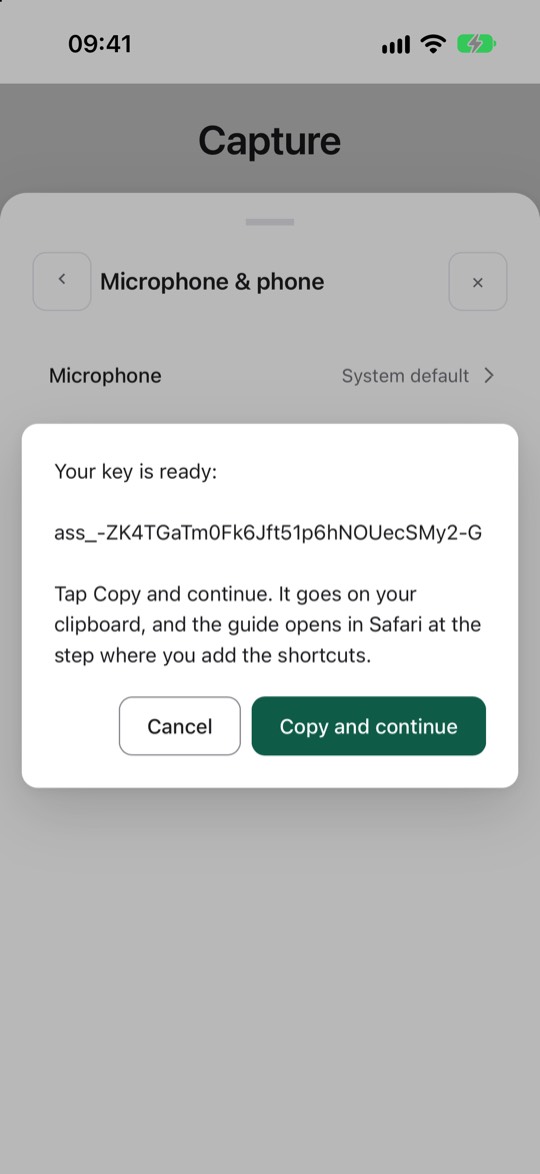
ass_. Tik op Kopieer en ga verder. De app zet hem op je klembord, en Safari opent deze uitleg bij stap 4.You’ll see your key; it starts with
ass_. Tap Copy and continue. The app puts it on your clipboard, and Safari opens this guide at step 4.Kopieer nu niets anders tot je klaar bent. Je plakt je sleutel zo twee keer, en hij staat alleen op je klembord.Don’t copy anything else until you’re done. You’ll paste your key twice in a moment, and it’s only on your clipboard.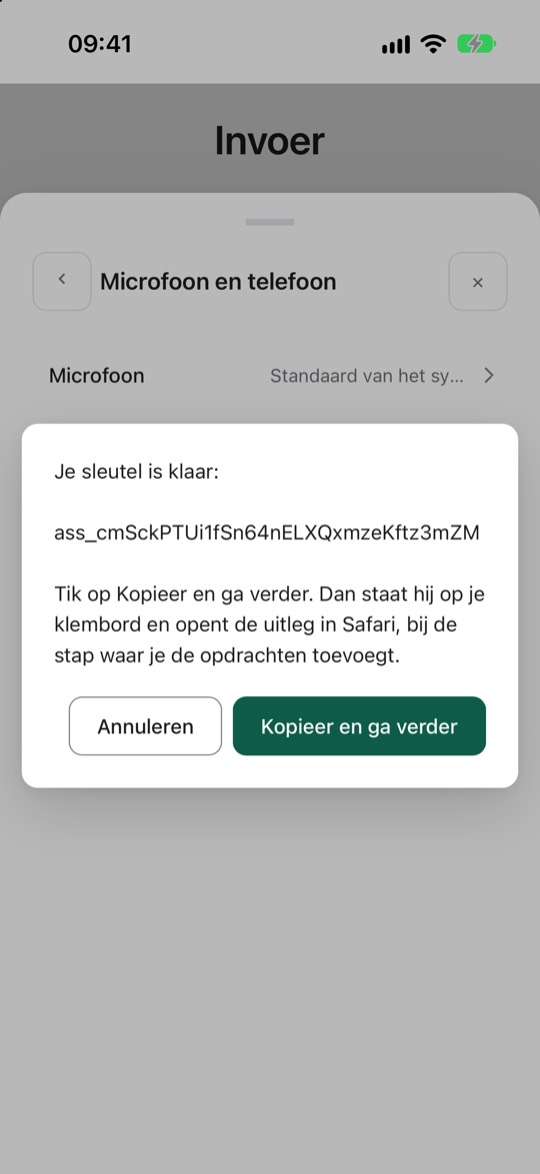
-
Haal Inspreken opGet Speak
Safari heeft deze uitleg hier geopend. Tik op deze knop:
Safari has opened this guide right here. Tap this button:
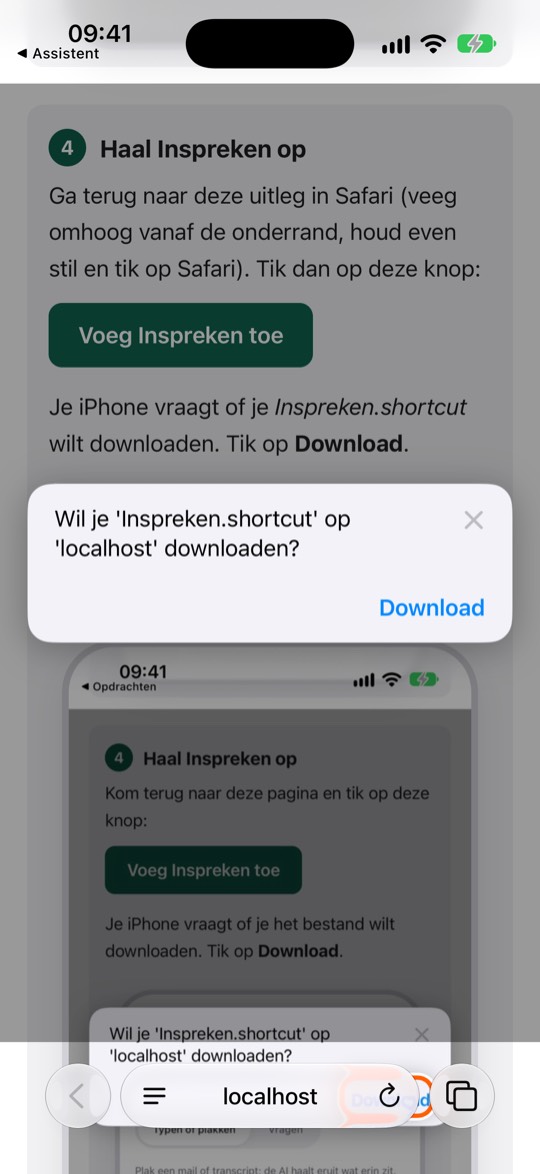
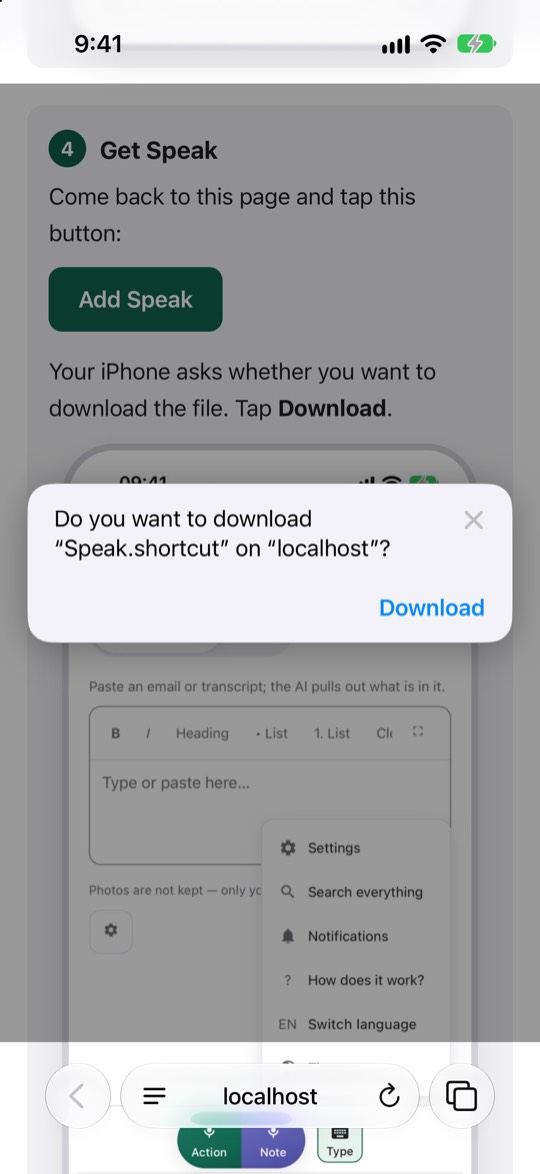
Je iPhone vraagt of je Inspreken.shortcut wilt downloaden. Tik op Download.
Your iPhone asks whether you want to download Speak.shortcut. Tap Download.
Zie je geen vraag, maar een groot bestandsicoon met Open met Opdrachten? Tik daarop en ga verder bij stap 7. Lees daarna ook Werkt het niet?, punt 3.
No question, but a big file icon with Open in “Shortcuts”? Tap that and continue at step 7. Afterwards, also read Not working?, point 3.
Je leest dit nog in de app van je assistent. Downloaden gaat alleen in Safari, dus tik op deze knop. Safari opent deze uitleg bij deze stap; je sleutel blijft op je klembord.
You’re still reading this inside your assistant’s app. Downloading only works in Safari, so tap this button. Safari opens this guide at this step; your key stays on your clipboard.
-
Open je downloadsOpen your downloads
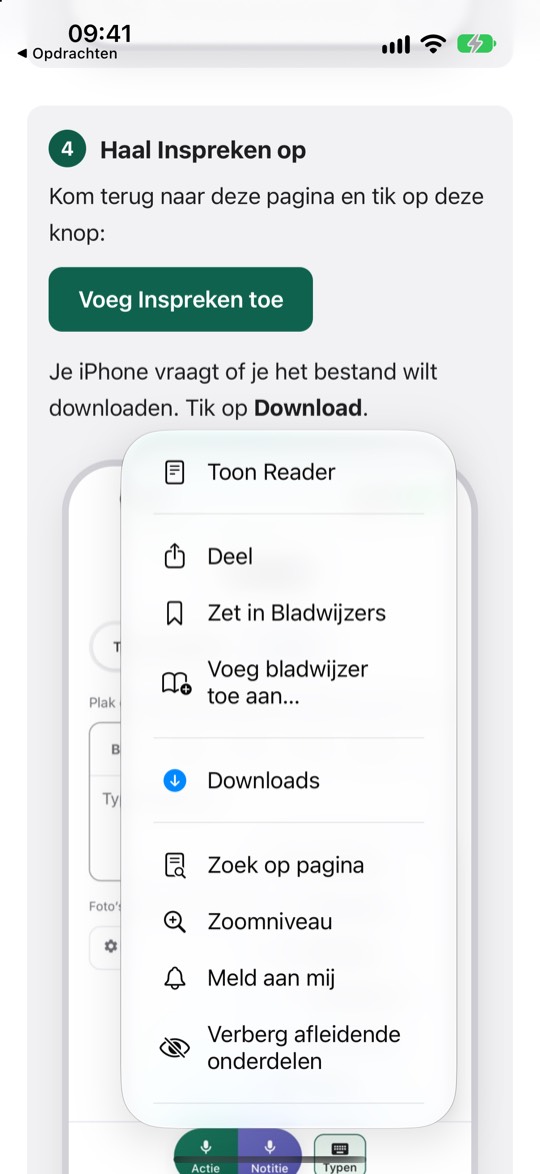
Tik in de adresbalk van Safari (meestal onderaan) op het knopje met de streepjes ≡. Zie je alleen een klein adres? Tik daar eerst op. Kies in het menu Downloads (met het blauwe pijltje).
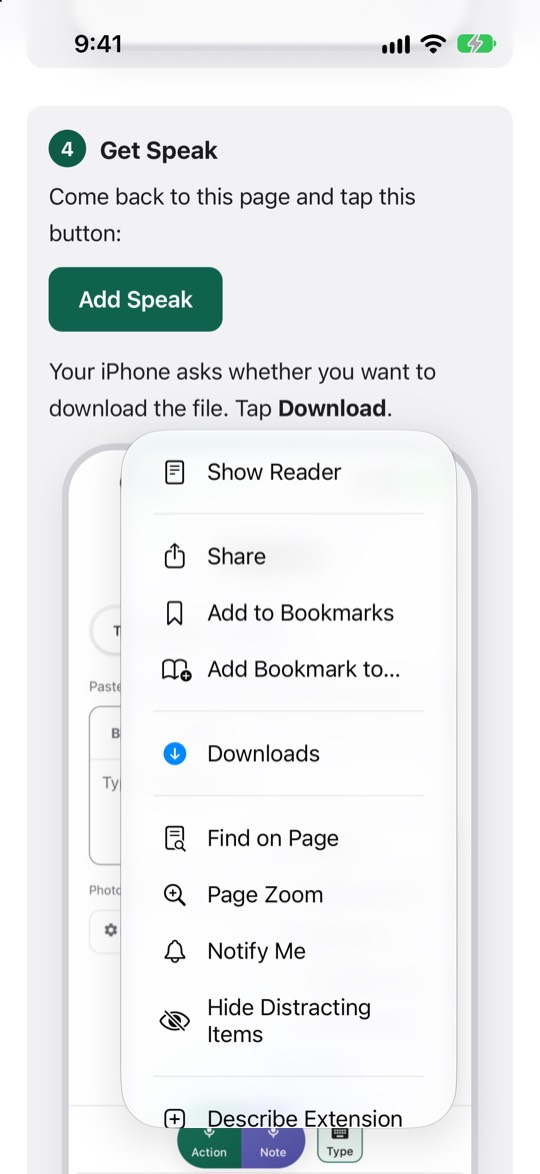
In Safari’s address bar (usually at the bottom), tap the button with the lines ≡. Only a small address showing? Tap it first. In the menu, choose Downloads (with the small blue arrow).
-
Tik op het bestandTap the file
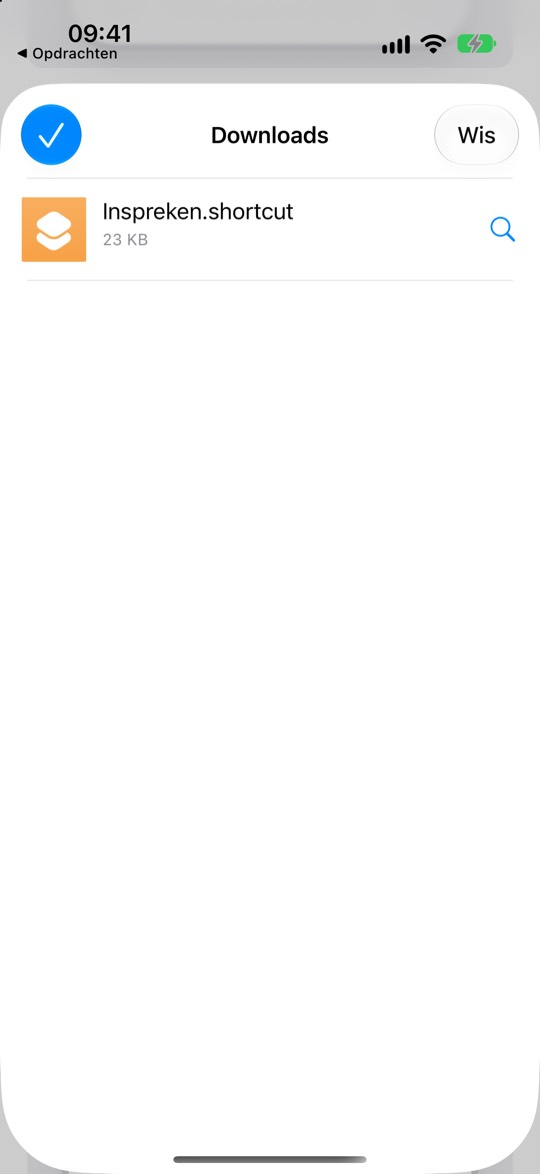
Tik op de naam Inspreken.shortcut, niet op het vergrootglas ernaast. De app Opdrachten gaat open.
Staat er ook Inspreken 2.shortcut? Dan had je hem al eens gedownload. Tik op een van beide: ze zijn hetzelfde. Heet je opdracht straks Inspreken 2, dan staat bij Werkt het niet? hoe je de naam goed zet.
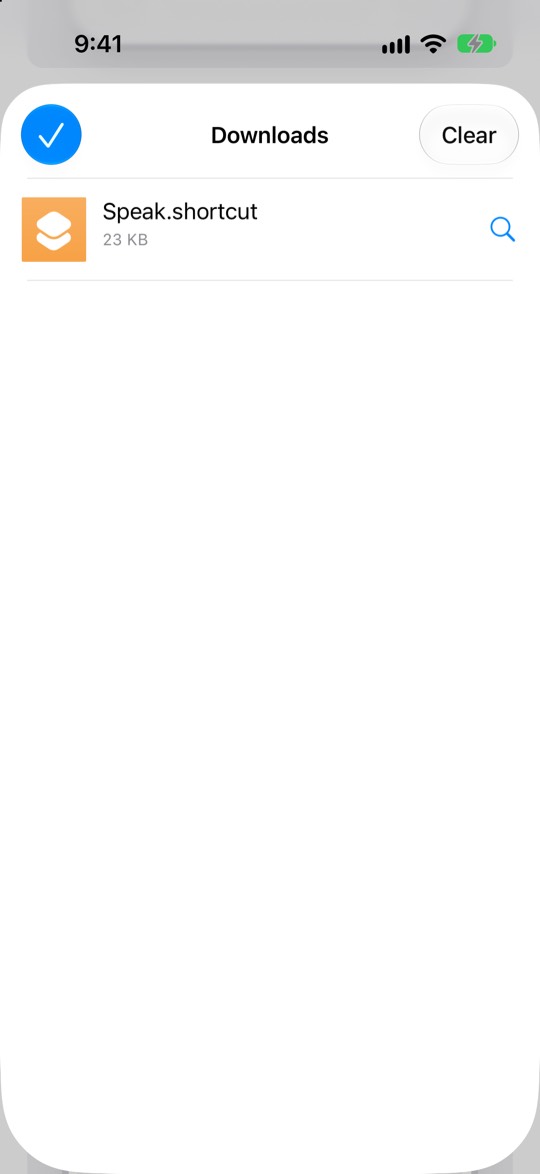
Tap the name Speak.shortcut, not the magnifying glass next to it. The Shortcuts app opens.
Is Speak 2.shortcut there too? Then you’ve downloaded it twice. Tap either one: they’re the same. If your shortcut ends up called Speak 2, Not working? shows how to fix the name.
-
Tik op Configureer opdrachtTap Set Up Shortcut
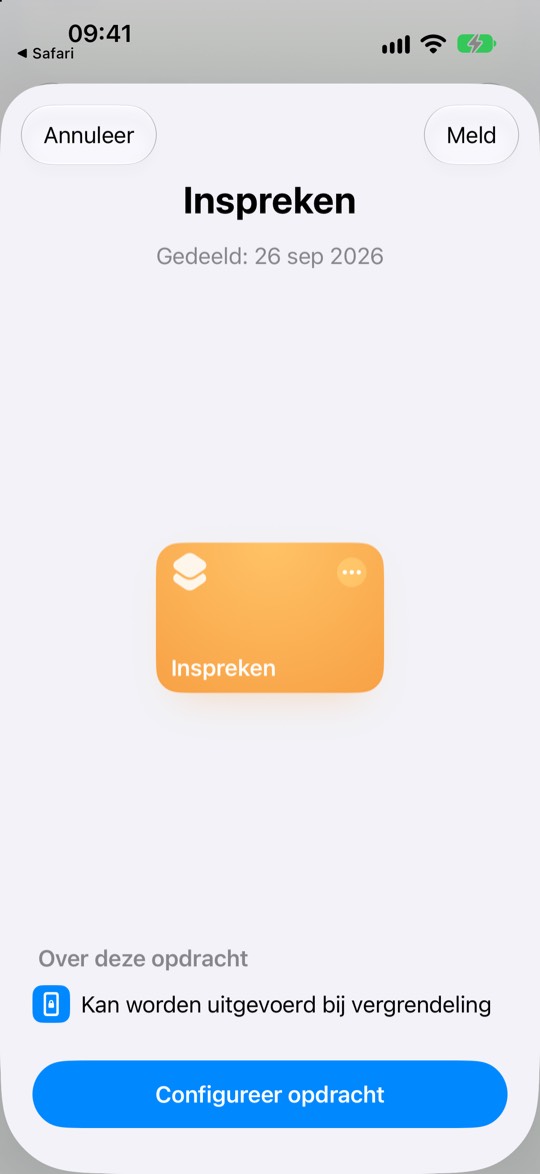
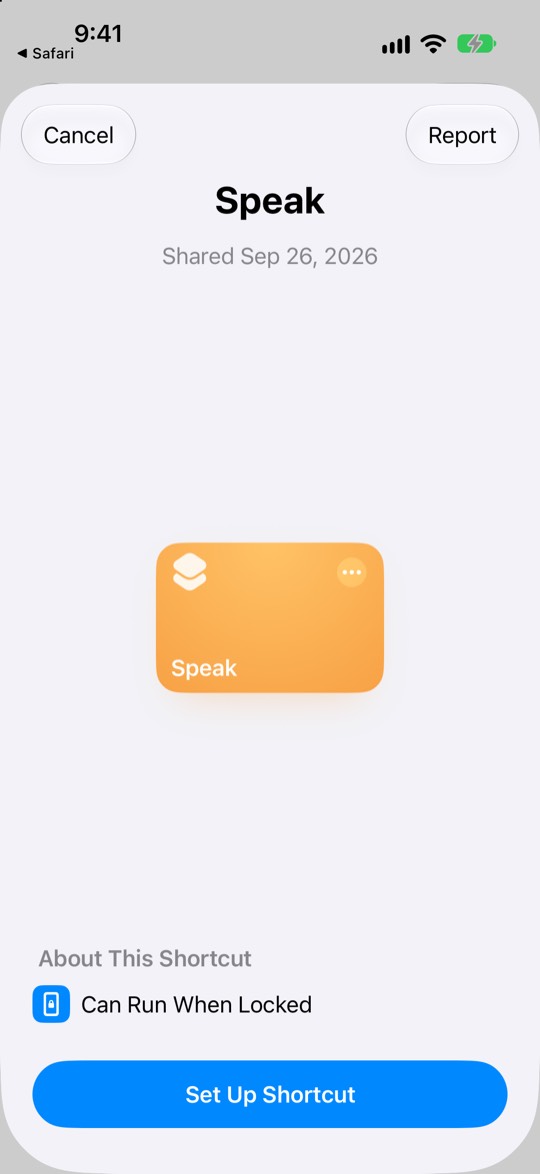
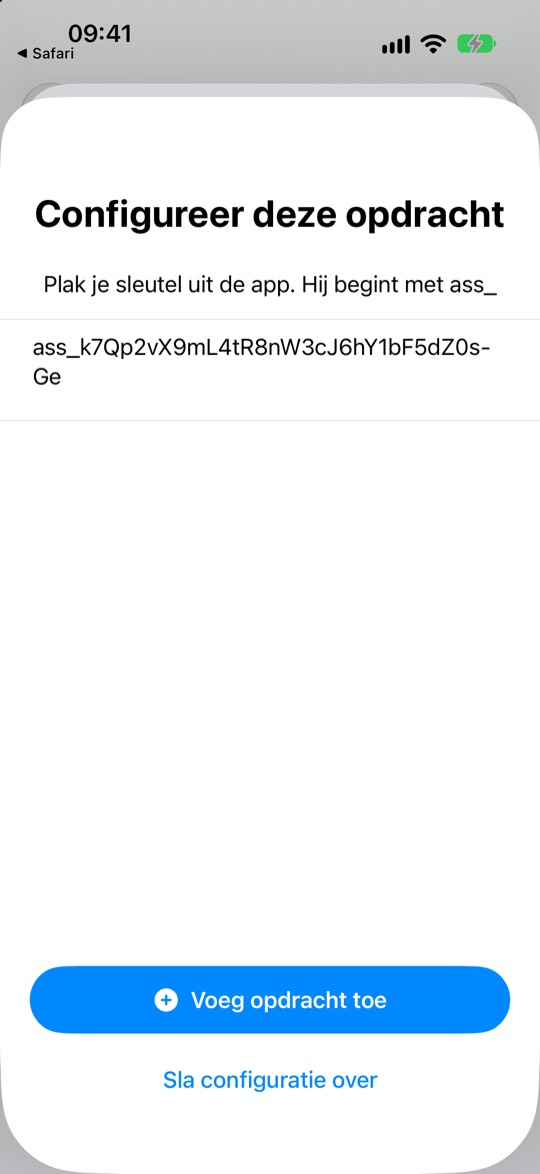
Je ziet de opdracht Inspreken. Tik onderaan op Configureer opdracht.
You’ll see the Speak shortcut. Tap Set Up Shortcut at the bottom.
-
Plak je sleutelPaste your key
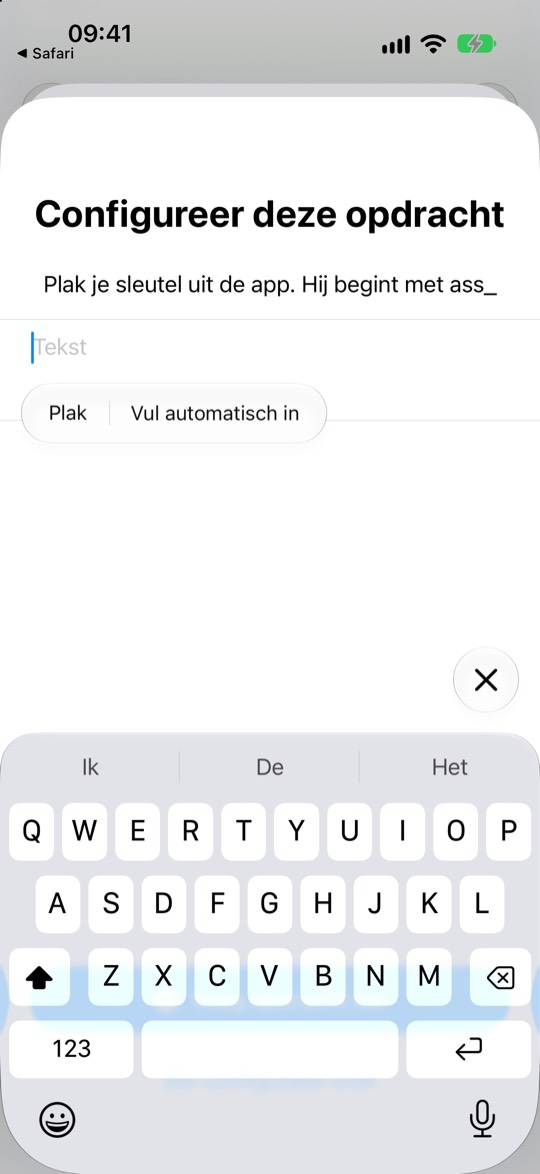
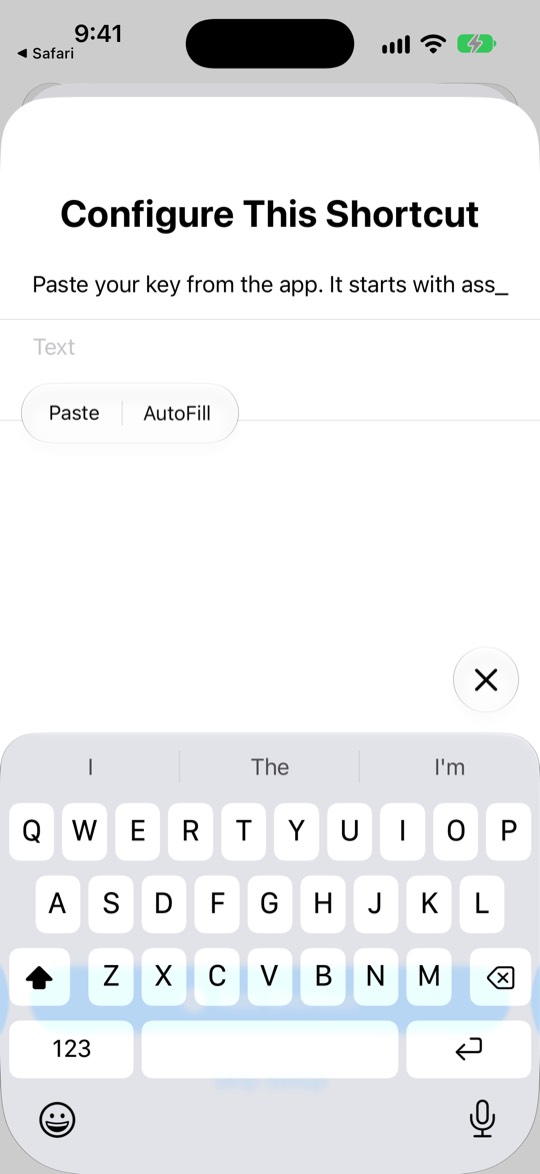
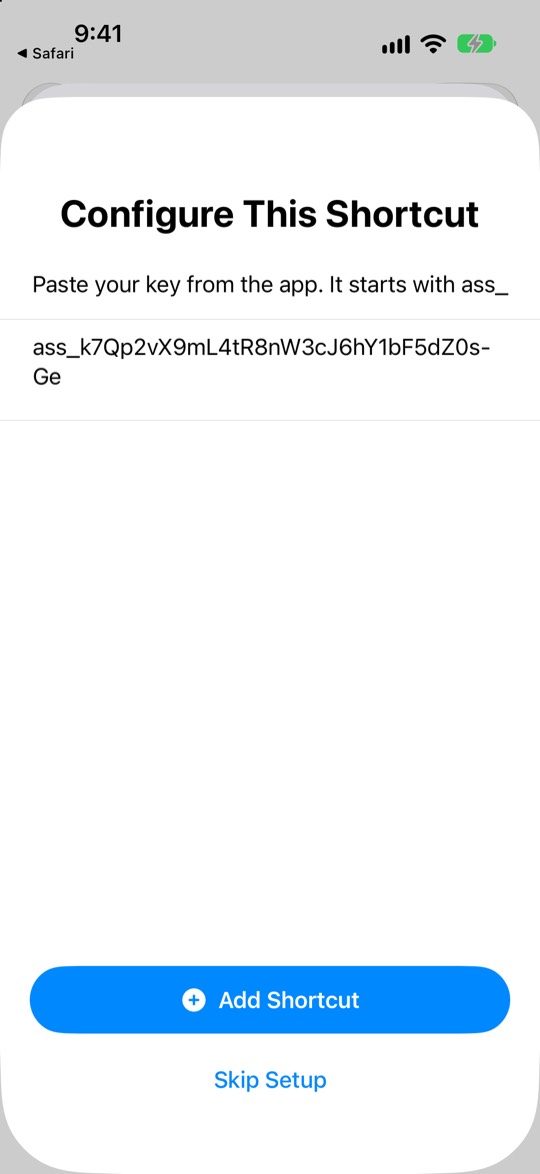
De vraag is: Plak je sleutel uit de app. Hij begint met ass_. Daaronder staat in grijs het woord Tekst. Tik daarop, tik er nóg een keer op en kies Plak.
The question says: Paste your key from the app. It starts with ass_. Below it, the word Text is shown in grey. Tap it, tap it once more and choose Paste.
In het vak staat nu iets dat begint met
ass_.The box now shows something starting with
ass_.Staat er iets anders in het vak, of zie je geen Plak? Dan staat je sleutel niet meer op je klembord. Laat dit scherm open. Maak in je assistent een nieuwe sleutel (stap 2 en 3; Safari gaat dan weer open, dat is goed), ga terug naar Opdrachten, houd ⌫ ingedrukt tot het vak leeg is en plak opnieuw.
Does the box show something else, or is there no Paste? Then your key is no longer on your clipboard. Leave this screen open. Create a new key in your assistant (steps 2 and 3; Safari opens again, that’s fine), go back to Shortcuts, hold ⌫ until the box is empty, and paste again.
-
Tik op Voeg opdracht toeTap Add Shortcut
Je toetsenbord staat nog open en verbergt de knop. Tik op het ronde kruisje ✕ rechts boven je toetsenbord: dat sluit alleen het toetsenbord, je sleutel blijft staan. Tik daarna onderaan op de blauwe knop Voeg opdracht toe.
Your keyboard is still open and hides the button. Tap the round ✕ just above your keyboard, on the right: it only closes the keyboard, your key stays. Then tap the blue Add Shortcut button at the bottom.
Kom je daarna in een scherm met bovenaan Inspreken en onderaan het vak Beschrijf een wijziging? Typ daar niets en tik linksboven op ‹.
Do you then see a screen with Speak at the top and a Describe a change box at the bottom? Don’t type anything there; tap ‹ at the top left.
Inspreken staat nu in je lijst met opdrachten.
Speak is now in your list of shortcuts.
-
Doe hetzelfde voor Naar AssistentDo the same for Add to Assistent
Ga terug naar deze uitleg: tik helemaal linksboven op het kleine ◀ Safari (of veeg omhoog vanaf de onderrand en tik op Safari). Tik dan op deze knop:
Go back to this guide: tap the small ◀ Safari at the very top left (or swipe up from the bottom edge and tap Safari). Then tap this button:
Tik op Download. Doe daarna stap 5 tot en met 9 opnieuw, en tik bij stap 6 op Naar Assistent.shortcut. Je sleutel staat nog op je klembord.
Tap Download. Then do steps 5 to 9 again, and at step 6 tap Add to Assistent.shortcut. Your key is still on your clipboard.
Je leest dit in de app van je assistent. Downloaden gaat alleen in Safari: tik op deze knop en ga daar verder bij deze stap.
You’re reading this inside your assistant’s app. Downloading only works in Safari: tap this button and carry on there at this step.
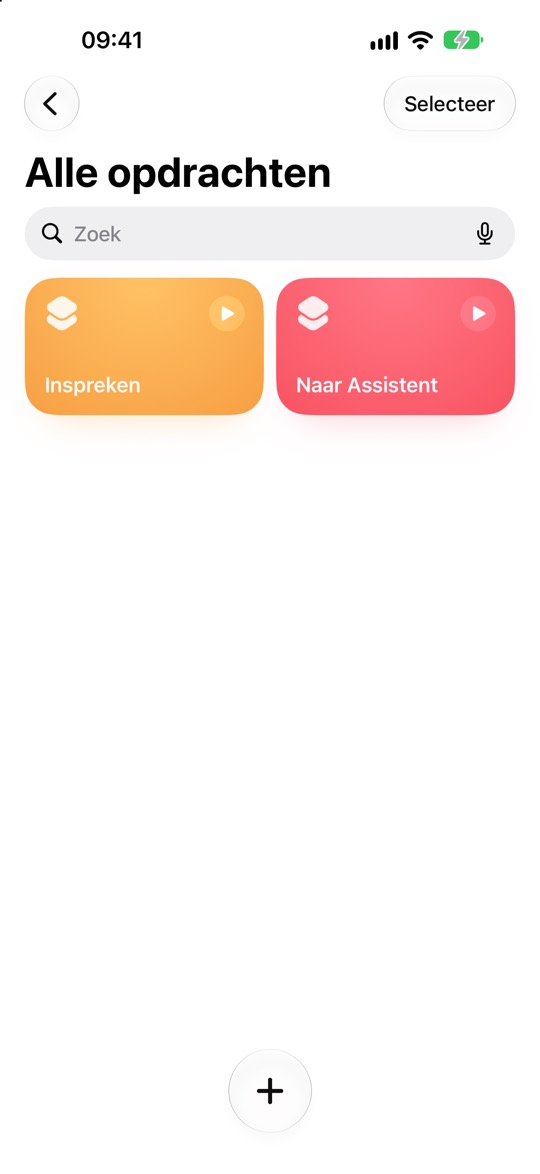
In je lijst staan nu Inspreken en Naar Assistent.
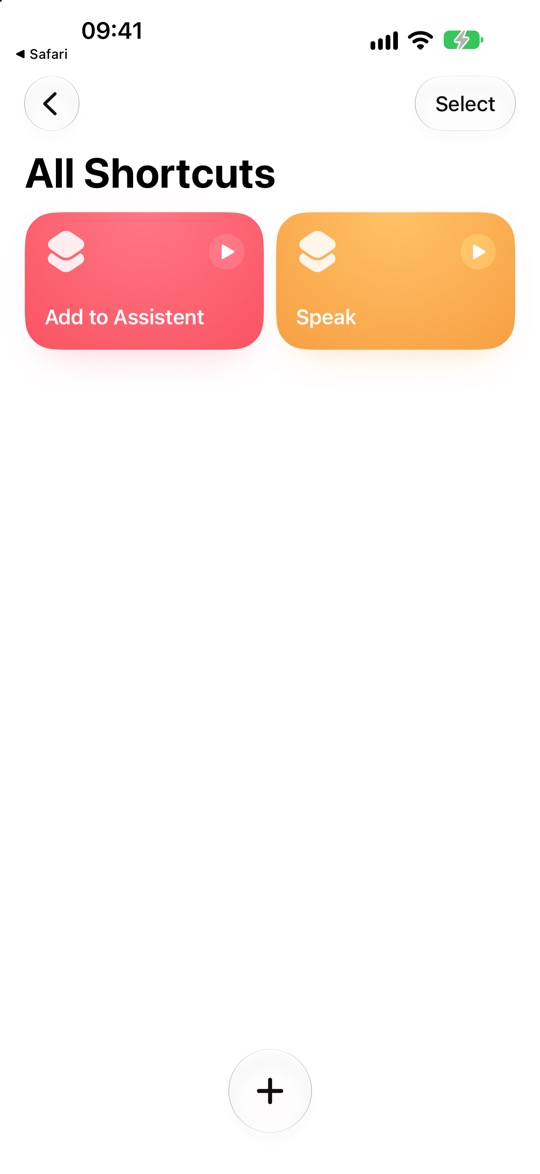
Your list now has Speak and Add to Assistent.
-
Zet Inspreken op de ActieknopPut Speak on the Action Button
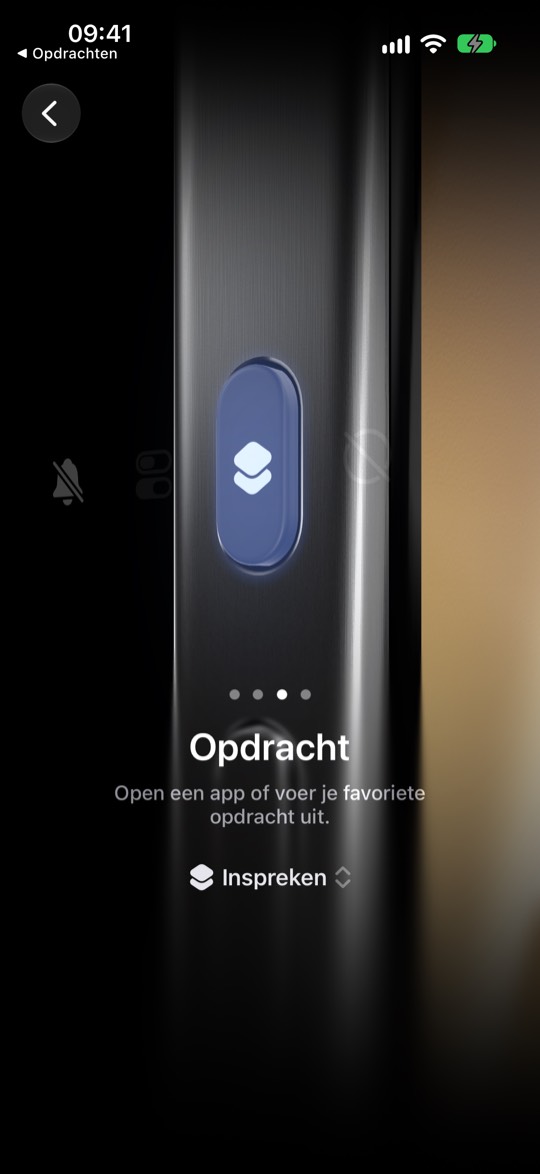
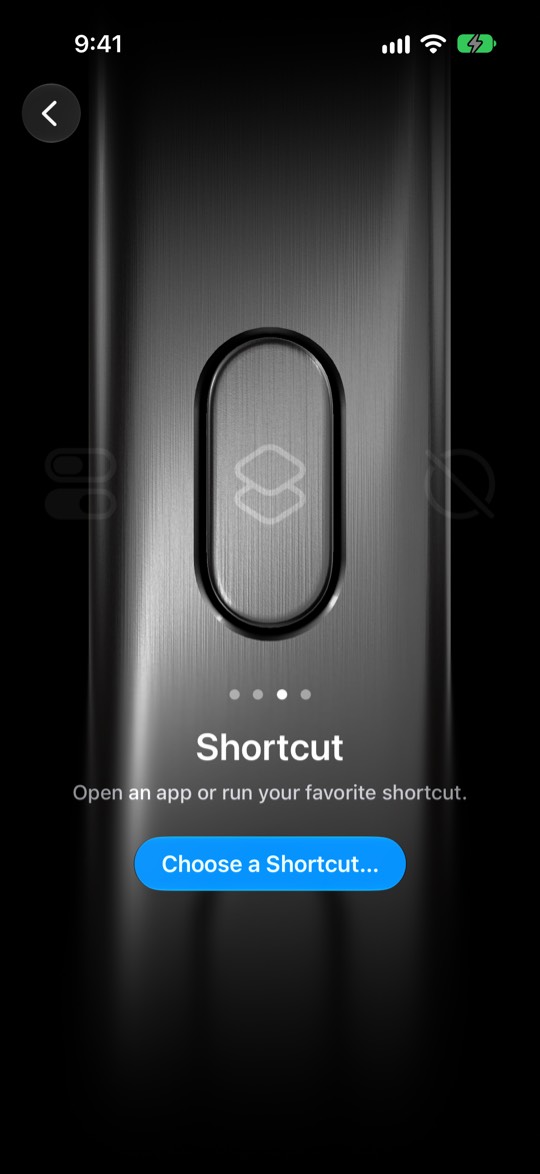
Open de app Instellingen van je iPhone (het grijze tandwiel), scrol een stukje omlaag en tik op Actieknop. Veeg met je vinger naar links tot je Opdracht ziet. Tik op Kies een opdracht… (of op de naam die er al staat) en kies Inspreken.
Open your iPhone’s Settings app (the grey gear), scroll down a little and tap Action Button. Swipe left until you see Shortcut. Tap Choose a Shortcut… (or the name that’s already there) and pick Speak.
Geen Actieknop? Zie Geen Actieknop op je iPhone?
No Action Button? See No Action Button on your iPhone?
-
Zet Naar Assistent op je beginschermPut Add to Assistent on your Home Screen
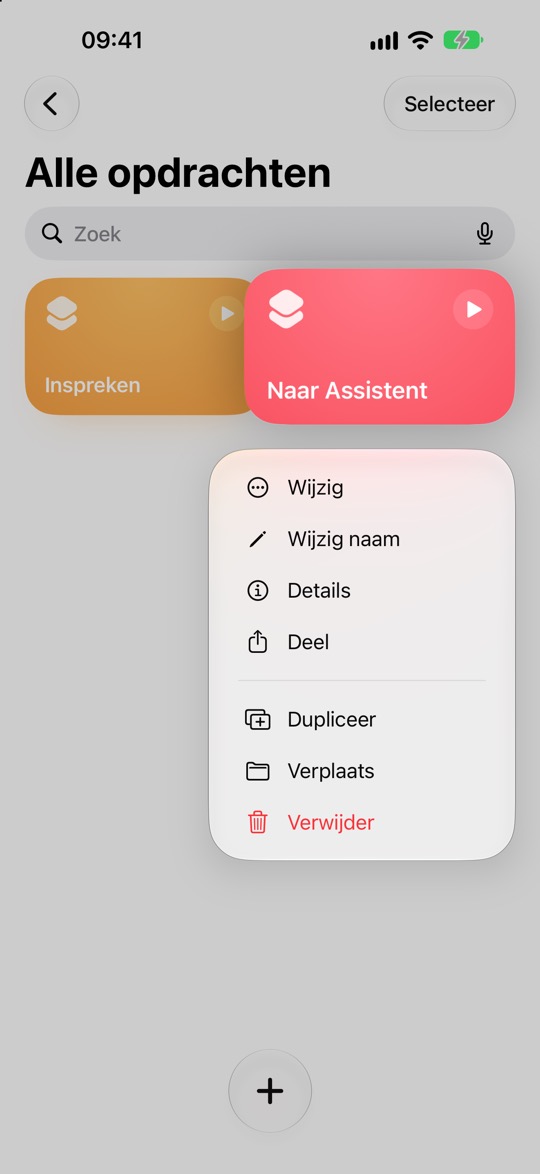
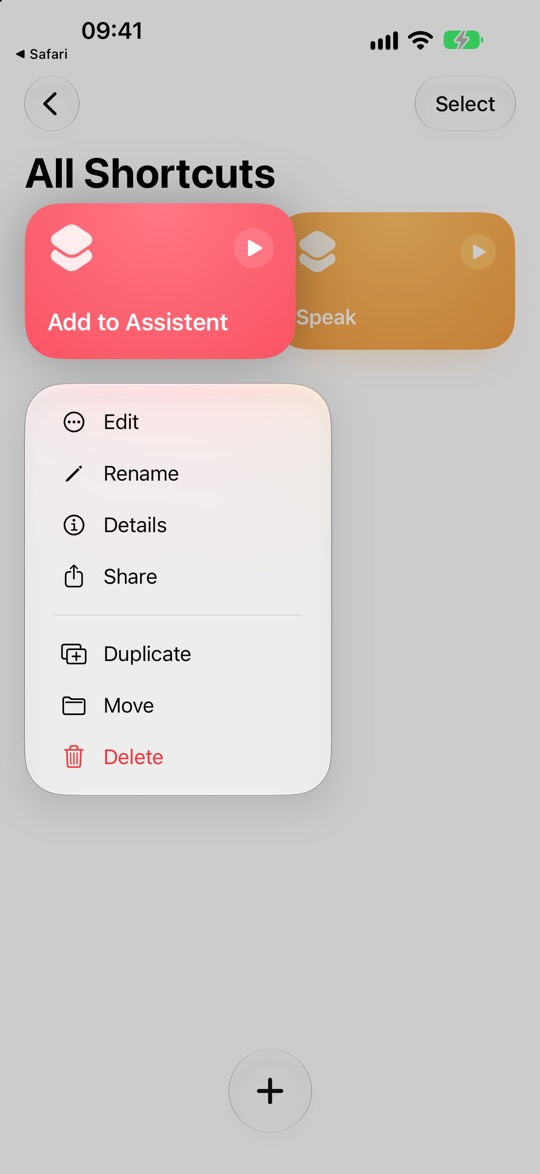
Ga terug naar Opdrachten: veeg omhoog vanaf de onderrand en tik op Opdrachten. Houd je vinger op de tegel Naar Assistent tot er een menu verschijnt, en kies Details. Tik bovenaan op Zet op beginscherm en daarna rechtsboven op het blauwe vinkje ✓.
Go back to Shortcuts: swipe up from the bottom edge and tap Shortcuts. Press and hold the Add to Assistent tile until a menu appears, and choose Details. Tap Add to Home Screen at the top, then the blue check mark ✓ at the top right.
Tikte je te kort en vraagt Naar Assistent wat je kwijt wilt? Tik op Annuleer en houd je vinger wat langer op de tegel.
Tapped too briefly, and Add to Assistent asks what’s on your mind? Tap Cancel and hold your finger on the tile a little longer.
-
Probeer ze uitTry them
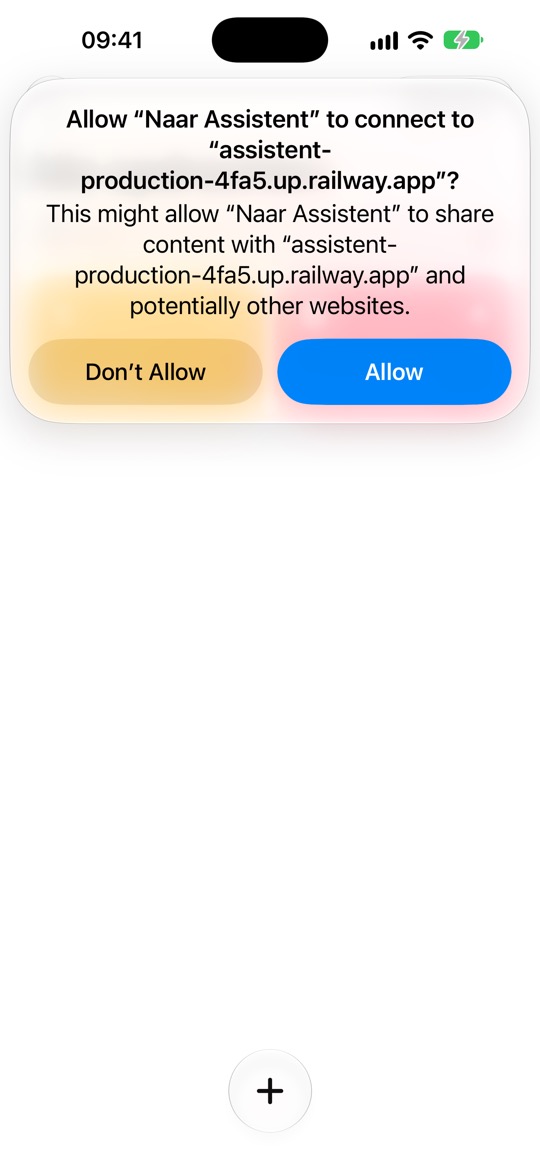
Tik op je beginscherm op Naar Assistent, typ Morgen melk kopen en tik op Gereed. De eerste keer vraagt je iPhone of Naar Assistent verbinding mag maken met assistent-production-4fa5.up.railway.app, het adres van je assistent. Tik op Sta toe.
On your Home Screen, tap Add to Assistent, enter Buy milk tomorrow and tap Done. The first time, your iPhone asks whether Add to Assistent may connect to assistent-production-4fa5.up.railway.app, your assistant’s address. Tap Allow.
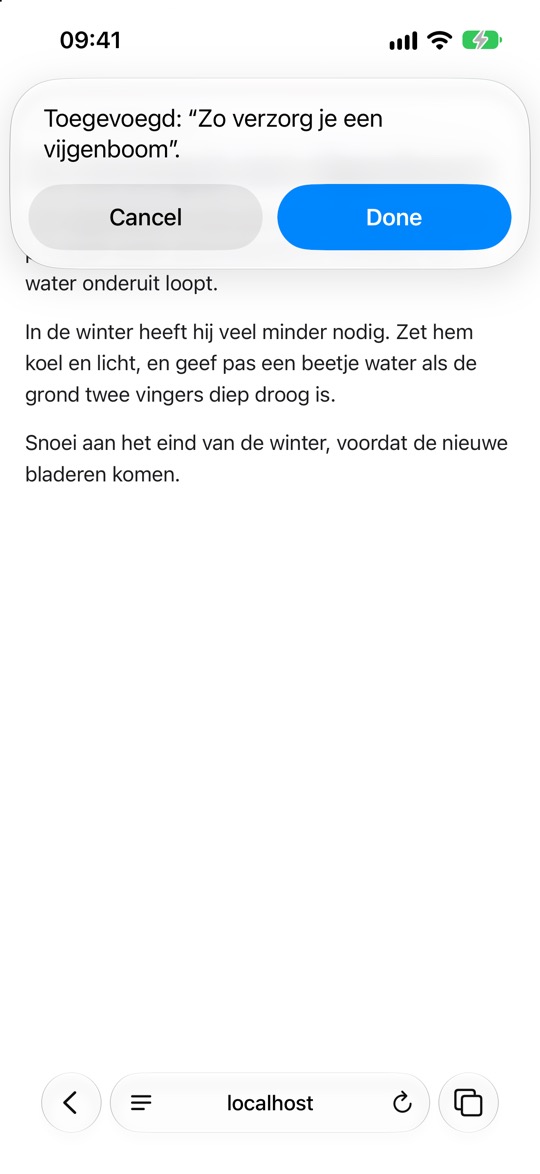
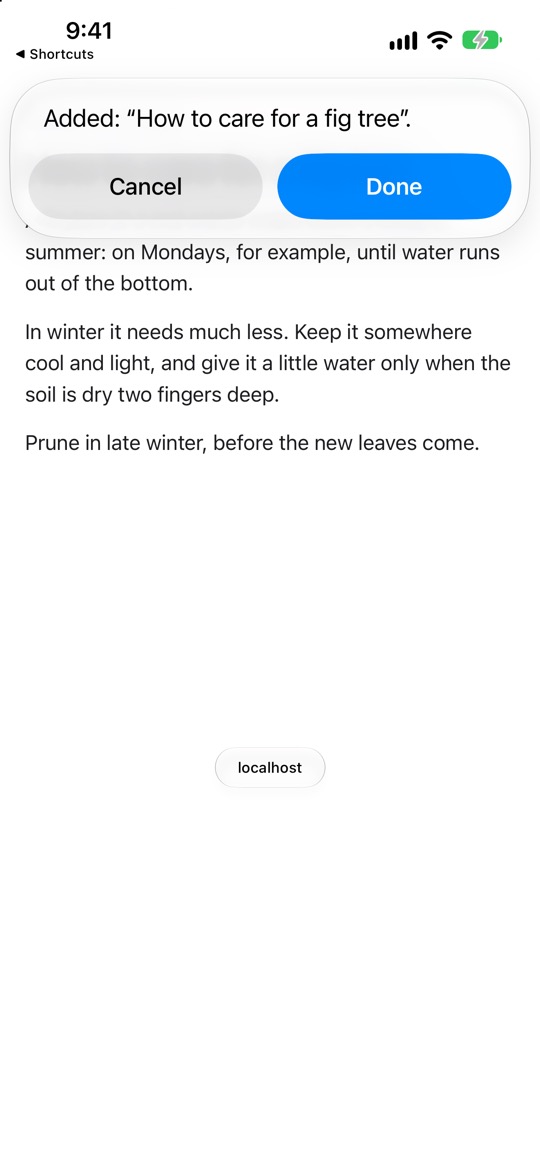
Bovenin laat Naar Assistent zien wat je assistent terugzegt, bijvoorbeeld Toegevoegd: “Morgen melk kopen”. Tik op Gereed.
At the top, Add to Assistent shows what your assistant says back, for example Added: “Buy milk tomorrow”. Tap Done.
Er staat ook iets over “andere websites”. Dat zegt je iPhone bij elke opdracht die iets verstuurt; deze stuurt alleen naar je assistent.
It also mentions “other websites”. Your iPhone says that for every shortcut that sends something; this one only sends to your assistant.
Probeer daarna Inspreken, met je iPhone ontgrendeld: alleen dan kan hij om toestemming vragen. Houd de Actieknop ingedrukt. De eerste keer vraagt je iPhone eerst of Opdrachten je microfoon mag gebruiken: tik op Sta toe. Zeg dan Morgen de tandarts bellen en tik op het scherm. Daarna vraagt hij of Inspreken verbinding mag maken: tik weer op Sta toe.
Then try Speak, with your iPhone unlocked: only then can it ask for permission. Press and hold the Action Button. The first time, your iPhone first asks whether Shortcuts may use your microphone: tap Allow. Then say Call the dentist tomorrow and tap the screen. After that it asks whether Speak may connect: tap Allow again.
Na het opnemen zegt Inspreken Ontvangen. Je opname wordt verwerkt.
After recording, Speak says Received. Your recording is being processed.
Klaar. Open je assistent: na een paar seconden staan ze allebei bij je acties. Gooi deze proefacties daarna weg. Staat er niets? Kijk bij Werkt het niet?
Done. Open your assistant: after a few seconds both are among your actions. Delete these test actions afterwards. Nothing there? See Not working?
Delen vanuit elke appShare from any app
Een pagina of een stukje tekst in je assistent, zonder kopiëren en plakken. Hiervoor heb je Naar Assistent nodig uit de snelle weg.
A page or some text into your assistant, without copying and pasting. You need Add to Assistent from the quick way for this.
-
Tik op DeelTap Share
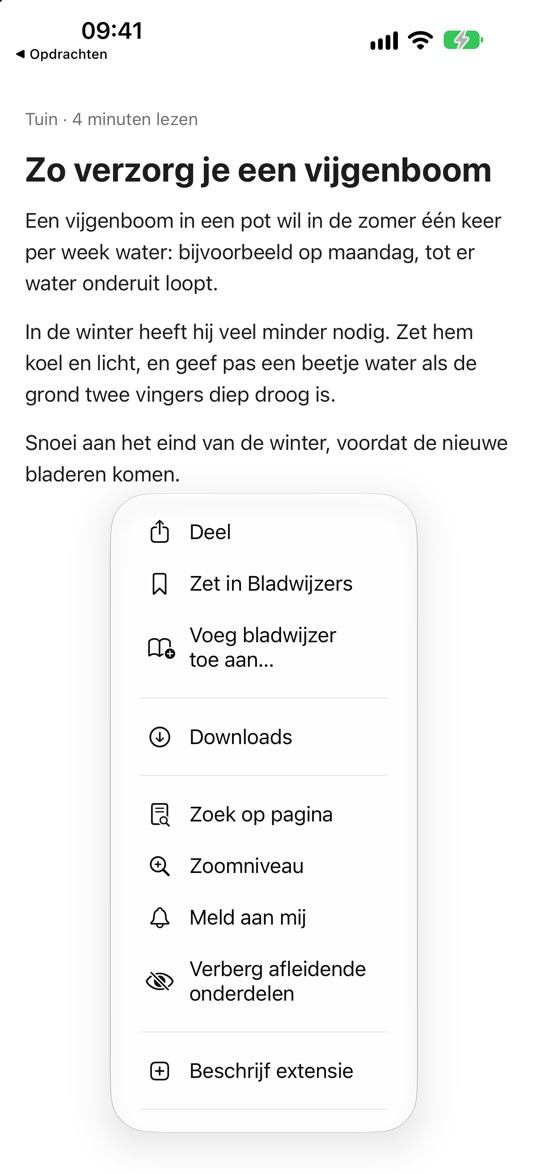
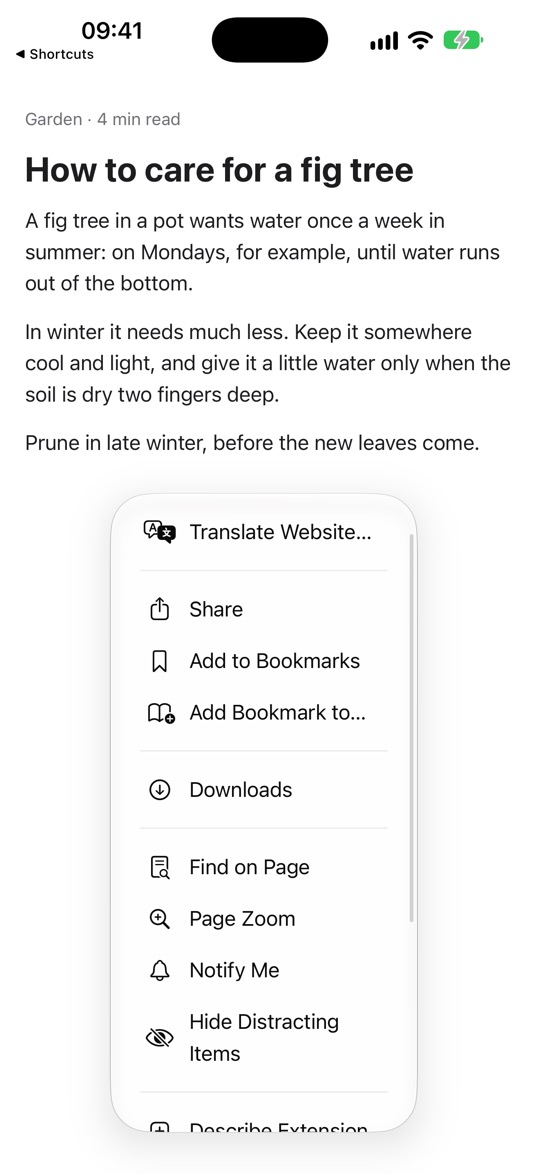
Open een pagina in Safari en tik in de adresbalk op het knopje met de streepjes ≡, dan op Deel. In Mail, Outlook of Notities: selecteer een stukje tekst en tik op Deel… in het menu dat verschijnt (staat hij er niet in, tik dan eerst rechts op ›).
Open a page in Safari, tap the lines button ≡ in the address bar, then Share. In Mail, Outlook or Notes: select some text and tap Share… in the menu that appears (not there? Tap › on its right first).
-
Tik op Naar AssistentTap Add to Assistent
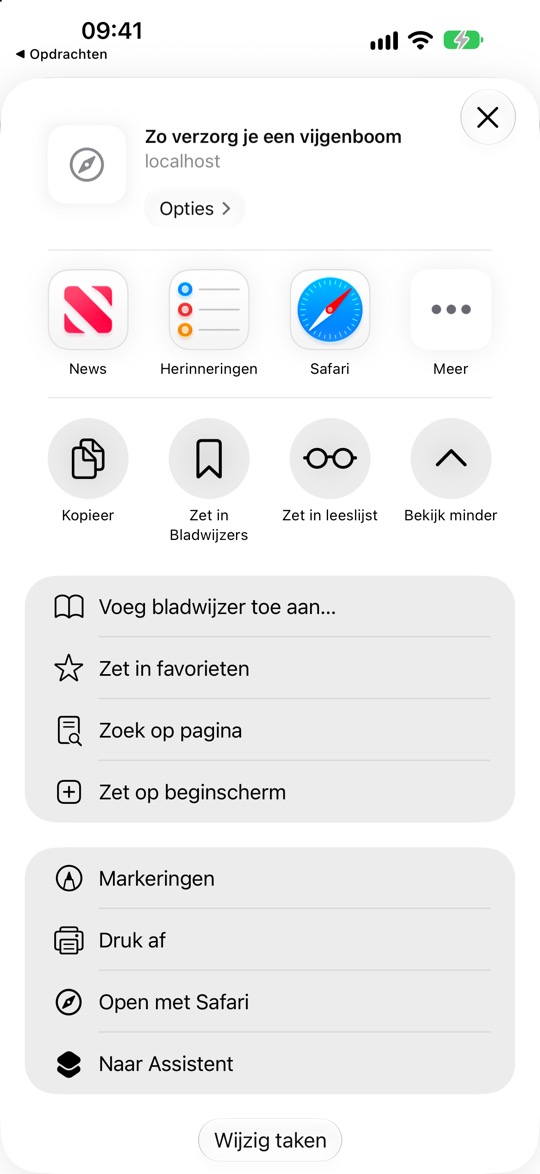
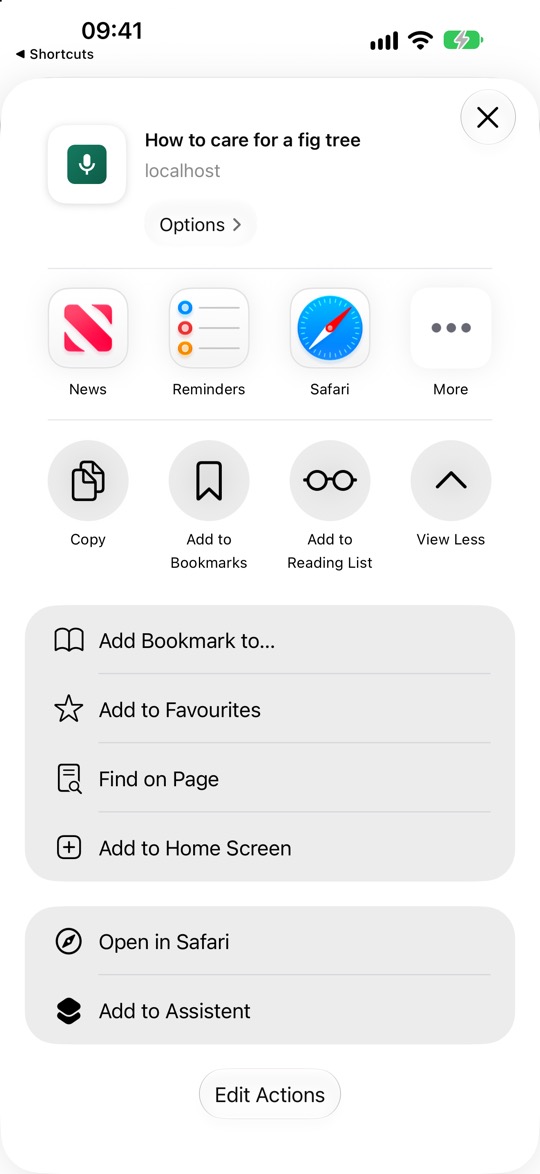
Tik rechts op de ronde knop Toon meer en scrol omlaag: onderaan staat Naar Assistent. Tik erop.
Tap the round View More button on the right and scroll down: Add to Assistent is near the bottom. Tap it.
Wil je hem voortaan meteen zien? Tik helemaal onderaan op Wijzig taken, tik op de groene ⊕ bij Naar Assistent en dan rechtsboven op het blauwe vinkje ✓. Dan staat hij in de rij ronde knoppen, naast Kopieer.
Want it within reach from now on? Tap Edit Actions at the very bottom, tap the green ⊕ next to Add to Assistent, then the blue check mark ✓ at the top right. It then sits in the row of round buttons, next to Copy.
-
Typ erbij en tik op GereedAdd to it and tap Done
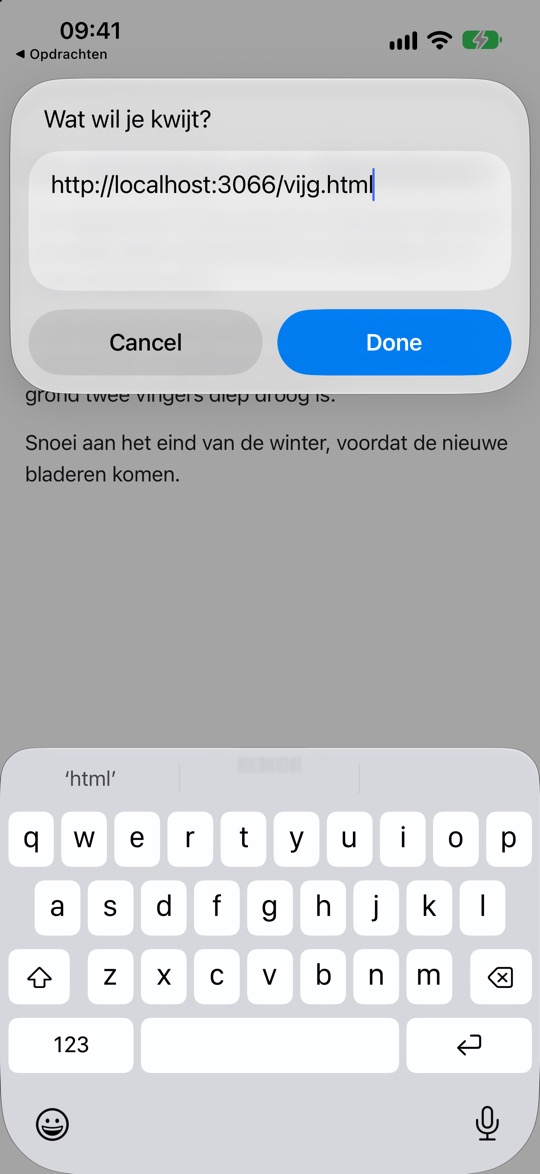
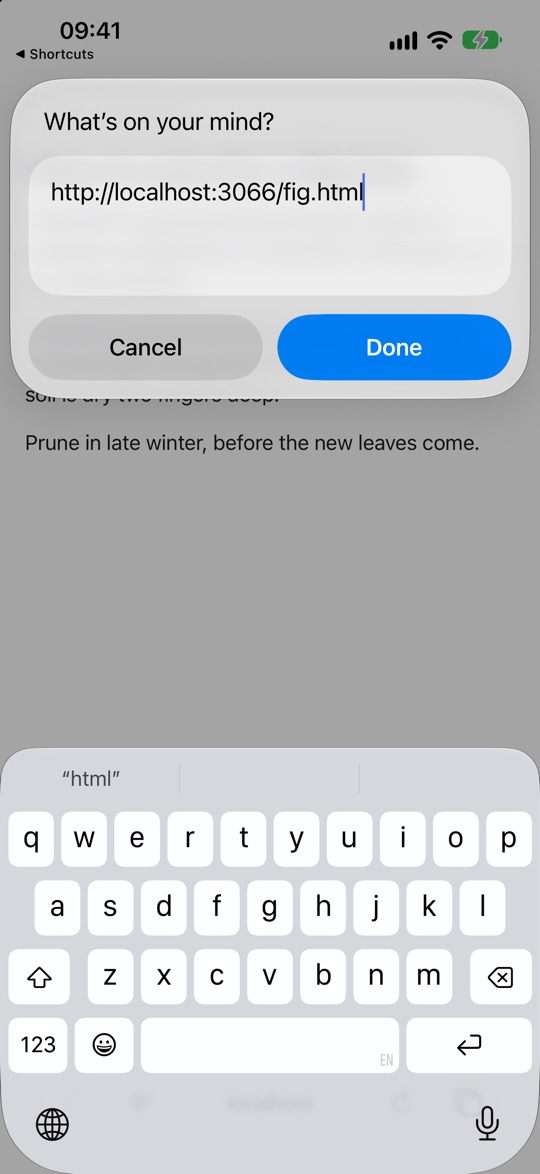
Je ziet Wat wil je kwijt? met daarin wat je deelde: bij een pagina haar adres, bij tekst die tekst. Typ er iets bij als je wilt (voor vrijdag) en tik op Gereed.
You’ll see What’s on your mind? with what you shared: for a page its address, for text that text. Add something if you like (for Friday) and tap Done.
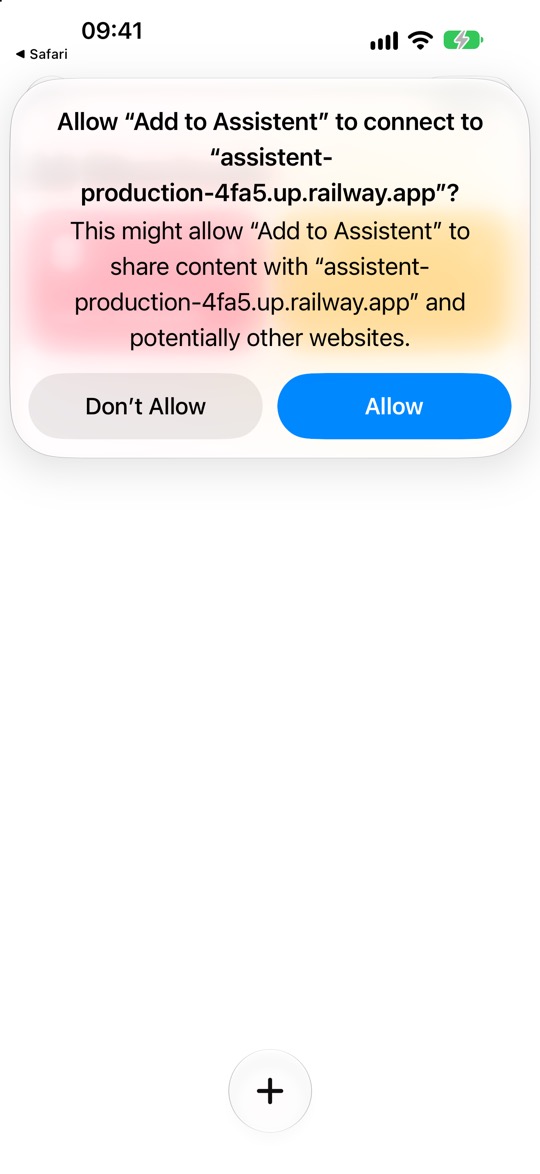
De eerste keer vraagt je iPhone of Naar Assistent een onderdeel mag versturen naar het adres van je assistent. Tik op Sta altijd toe: dan vraagt hij het niet bij elke pagina opnieuw.
The first time, your iPhone asks whether Add to Assistent may send an item to your assistant’s address. Tap Always Allow, so it doesn’t ask again for every page.
-
Lees wat je assistent deedSee what your assistant did
Bovenin zegt je assistent wat hij deed, bijvoorbeeld Toegevoegd: “…”. Tik op Gereed. Bij een webpagina staat het adres in wat je assistent toevoegde.
At the top, your assistant says what it did, for example Added: “…”. Tap Done. For a web page, the address is in what your assistant added.
Op je Apple WatchOn your Apple Watch
Naar Assistent komt via iCloud vanzelf op je Watch. Op je Watch spreek je in en zet je Watch het om in tekst; Inspreken staat niet op de Watch, want een Watch kan geen opname versturen.
Add to Assistent comes to your Watch through iCloud by itself. On your Watch you speak and your Watch turns it into text; Speak is not on the Watch, because a Watch can’t send a recording.
-
Zet hem aan voor je WatchTurn it on for your Watch
Op je iPhone: open Opdrachten, houd Naar Assistent vast → Details. Staat Toon op Apple Watch aan? Zo niet, zet hem aan.
On your iPhone: open Shortcuts, press and hold Add to Assistent → Details. Is Show on Apple Watch on? If not, turn it on.
-
Probeer hem eerst op je iPhoneTry it on your iPhone first
Probeer hem eerst één keer op je iPhone en tik op Sta toe als hij om toegang tot je assistent vraagt.
Try it once on your iPhone first, and tap Allow when it asks to connect to your assistant.
-
Spreek in op je WatchSpeak on your Watch
Op je Watch: open Opdrachten en tik op Naar Assistent. Tik op de microfoon, zeg wat je kwijt wilt, tik op Gereed. Het antwoord verschijnt op je Watch.
On your Watch: open Shortcuts and tap Add to Assistent. Tap the microphone, say what’s on your mind, tap Done. The answer appears on your Watch.
-
Sneller: je wijzerplaat of SiriQuicker: your watch face or Siri
Zet hem als complicatie op je wijzerplaat (wijzerplaat vasthouden → Wijzig → een vakje → Opdrachten → Naar Assistent), of zeg tegen Siri “Naar Assistent”. Verstaat Siri de naam niet? Geef de opdracht op je iPhone een naam die Siri wel verstaat.
Add it as a complication (press and hold the watch face → Edit → a slot → Shortcuts → Add to Assistent), or say “Add to Assistent” to Siri. Siri doesn’t catch the name? Rename the shortcut on your iPhone to something it does.
Op je MacOn your Mac
Dezelfde opdracht, in de menubalk en onder je rechtermuisknop: selecteer tekst in elke app en stuur hem naar je assistent.
The same shortcut, in the menu bar and under your right-click: select text in any app and send it to your assistant.
-
Zet hem op je MacGet it on your Mac
Staat Naar Assistent al op je iPhone? Dan komt hij vanzelf op je Mac als iCloud-synchronisatie aanstaat in de instellingen van Opdrachten, op beide. Geen iPhone? Klik op Haal Naar Assistent op, open het bestand en plak een sleutel uit je assistent (Instellingen → Microfoon en telefoon → Nieuwe sleutel maken).
Already have Add to Assistent on your iPhone? It comes to your Mac by itself when iCloud Sync is on in Shortcuts’ settings, on both. No iPhone? Click Get Add to Assistent, open the file and paste a key from your assistant (Settings → Microphone & phone → Create a key).
Je leest dit in de app van je assistent. Downloaden gaat alleen in Safari: tik op deze knop en ga daar verder bij deze stap.
You’re reading this inside your assistant’s app. Downloading only works in Safari: tap this button and carry on there at this step.
-
Zet hem in je menubalk en onder je rechtermuisknopPut it in your menu bar and under your right-click
Open Opdrachten op je Mac, dubbelklik Naar Assistent en klik rechtsboven op ⓘ (Details). Zet aan: Maak vast in menubalk, en Gebruik als snelle taak met Voorzieningen-menu. Klik op Voeg toetscombinatie toe en druk ⌃⌥⌘A.
Open Shortcuts on your Mac, double-click Add to Assistent and click ⓘ (Details) at the top right. Turn on Pin in Menu Bar, and Use as Quick Action with Services Menu. Click Add Keyboard Shortcut and press ⌃⌥⌘A.
-
Probeer hetTry it
Selecteer tekst in een willekeurige app en druk ⌃⌥⌘A (of klik met rechts → Voorzieningen → Naar Assistent). De eerste keer vraagt je Mac of hij verbinding mag maken: kies Sta altijd toe.
Select some text in any app and press ⌃⌥⌘A (or right-click → Services → Add to Assistent). The first time, your Mac asks whether it may connect: choose Always Allow.
-
Inspreken op je MacSpeaking on your Mac
Druk in het tekstvak op de dicteertoets (🎤, of twee keer fn). Gebeurt er niets bij ⌃⌥⌘A? Dan gebruikt een andere app die combinatie: kies in stap m2 een andere.
In the text box, press the dictation key (🎤, or fn twice). Nothing happens on ⌃⌥⌘A? Another app uses it: pick a different one in step m2.
Liever zelf bouwen?Prefer to build them yourself?
Heb je de snelle weg gedaan? Dan ben je klaar en heb je dit deel niet nodig. Wil je zien hoe het werkt, of lukte de snelle weg niet? Hieronder bouw je dezelfde twee opdrachten zelf, stap voor stap. Heeft de snelle weg al een Inspreken toegevoegd? Verwijder die dan eerst (tegel vasthouden → Verwijder), anders heb je er twee met dezelfde naam. Naar Assistent mag blijven: hij doet wat Typen doet, en kan ook delen.
Did the quick way work? Then you’re done and don’t need this part. Want to see how it works, or did the quick way not work for you? Below, you build the same two shortcuts yourself, step by step. Did the quick way already add a Speak? Delete it first (press and hold the tile → Delete), so you don’t end up with two with the same name. Add to Assistent can stay: it does what Type does, and can share too.
Zelf bouwen · opdracht 1Build it yourself · shortcut 1
InsprekenSpeak
Een opdracht met twee taken: eerst neemt hij op, daarna stuurt hij de opname naar je assistent.
A shortcut with two steps: first it records, then it sends the recording to your assistant.
-
Open Opdrachten en tik op +Open Shortcuts and tap +
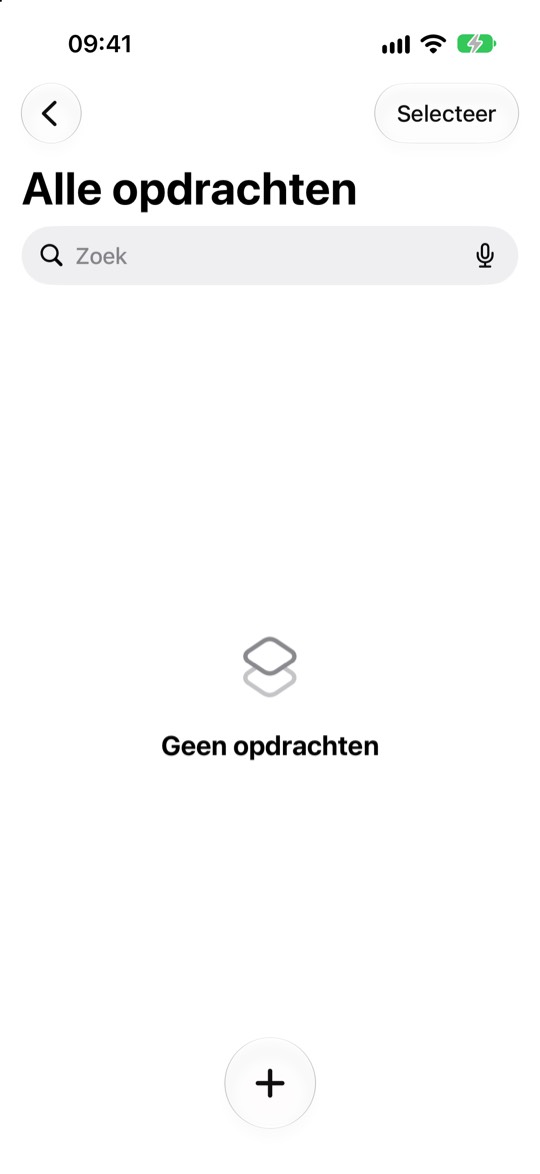
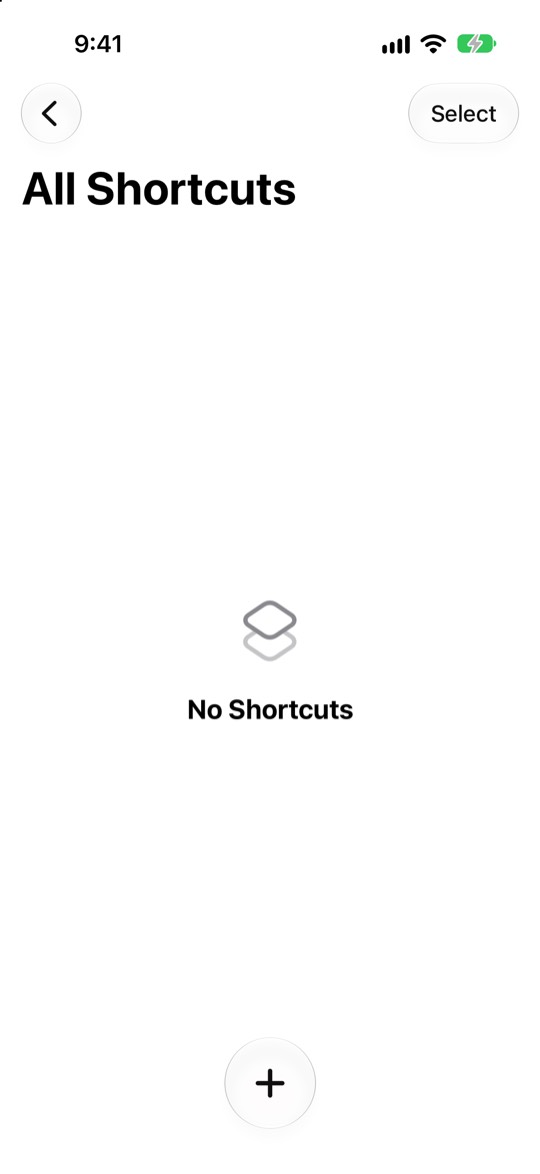
Open de app Opdrachten. Tik onderaan in het midden op +.
Open the Shortcuts app. Tap + at the bottom, in the middle.
-
Geef hem de naam InsprekenName it Speak
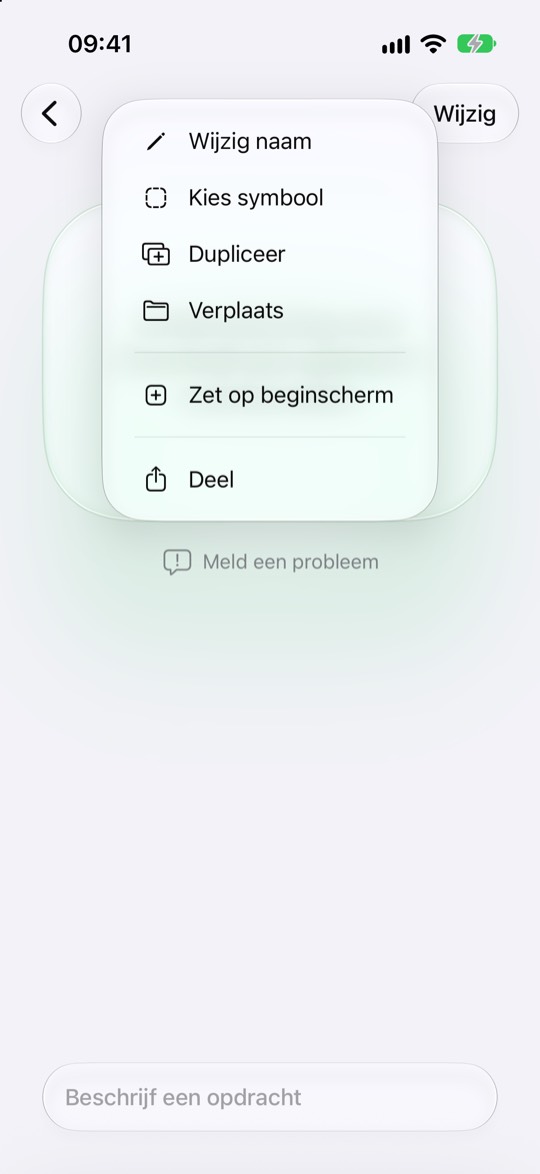
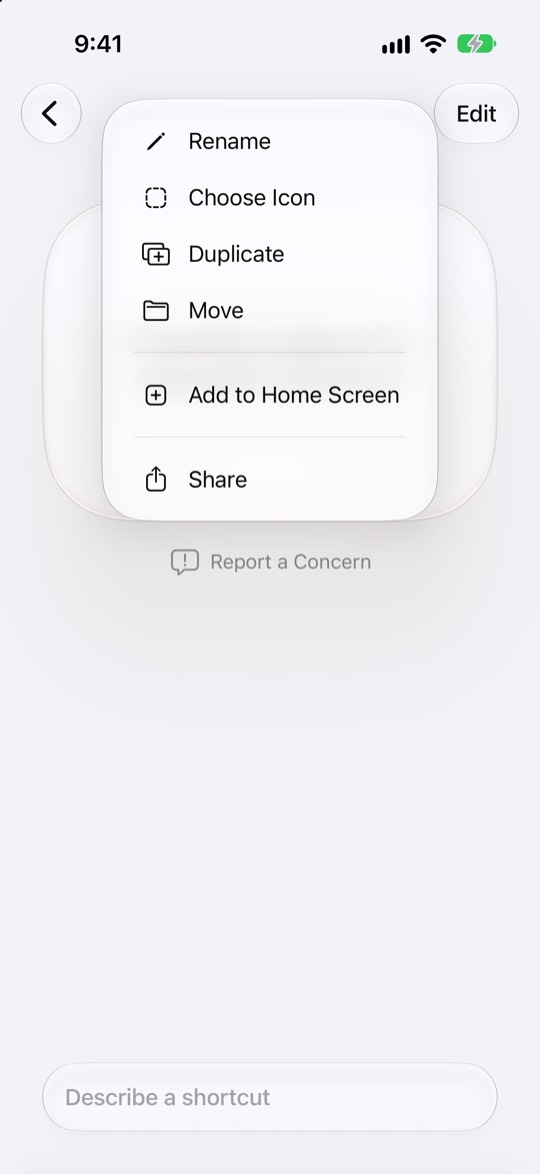
Tik bovenaan op de naam Opdracht (met het pijltje ⌄). Kies Wijzig naam, typ Inspreken en tik rechtsonder op je toetsenbord op het blauwe vinkje ✓.
Tap the name New Shortcut at the top (with the small arrow ⌄). Choose Rename, type Speak and tap the blue check mark ✓ at the bottom right of your keyboard.
-
Tik op WijzigTap Edit
Zie je onderin al een zoekveld met Zoek? Dan sla je deze stap over.
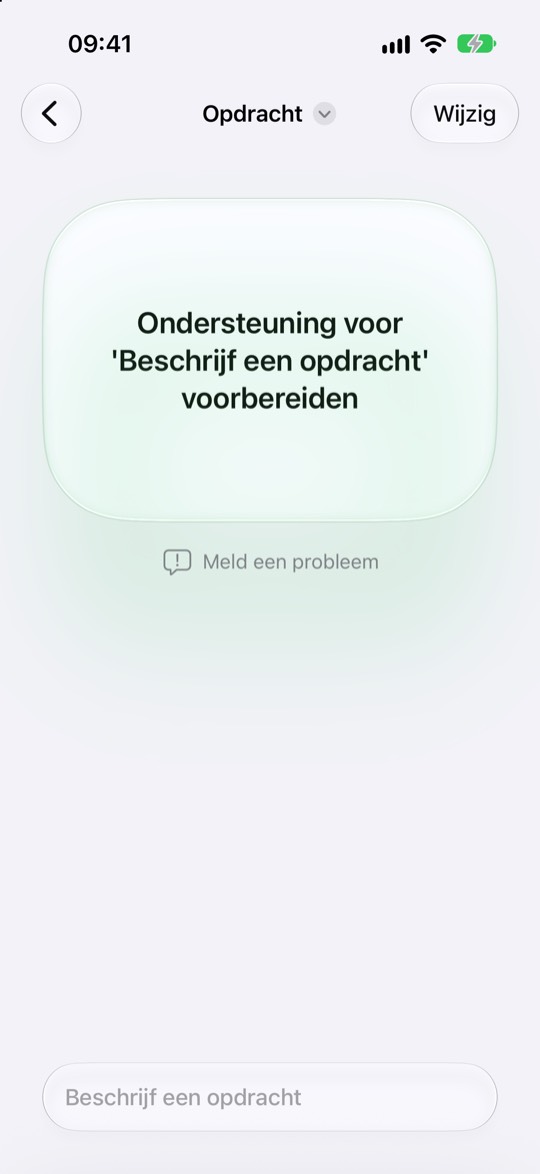
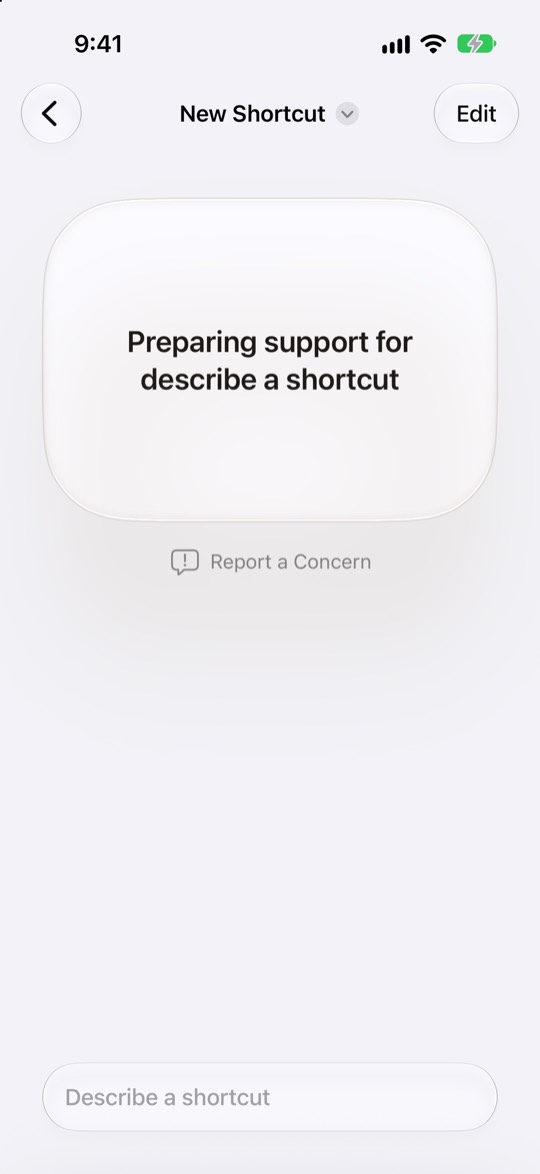
Staat er onderin Beschrijf een opdracht? Dat is een AI-hulp van Apple, en die slaan we over. Typ daar niets en tik rechtsboven op Wijzig.
Already see a search field that says Search at the bottom? Then skip this step.
Does it say Describe a shortcut at the bottom? That’s an AI helper from Apple, and we’ll skip it. Don’t type anything there; tap Edit at the top right.
Nu schuift er een lijst omhoog met bovenin een zoekveld Zoek. (Op het plaatje staat nog de oude naam; bij jou staat er al Inspreken.)
A list slides up with a search field that says Search. (The picture still shows the old name; yours already says Speak.)
-
Voeg de taak Neem audio op toeAdd the Record Audio step
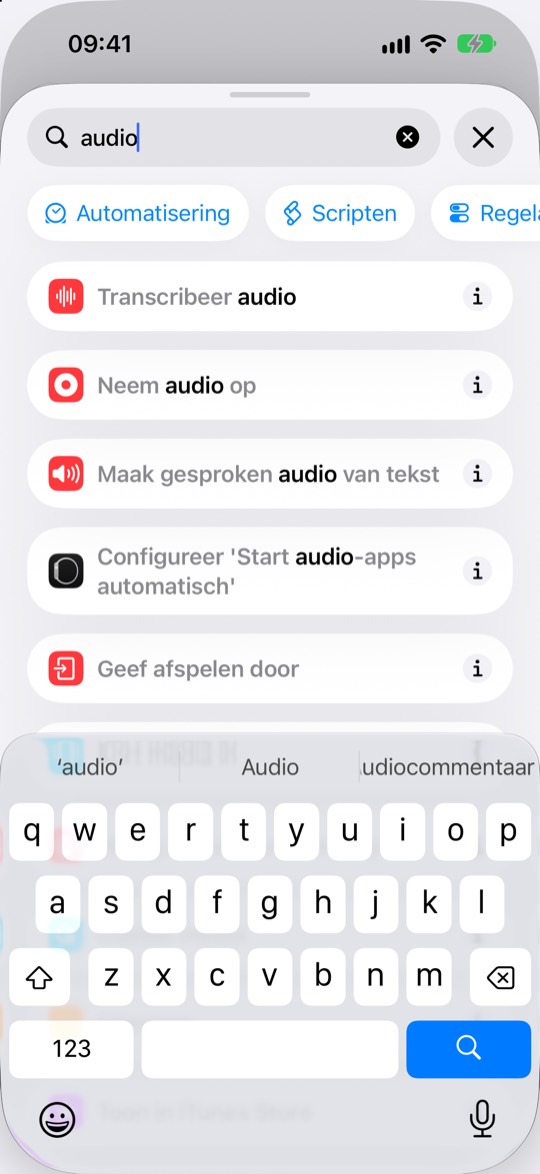
Tik op Zoek en typ audio. Tik op Neem audio op: de tweede regel in de lijst.
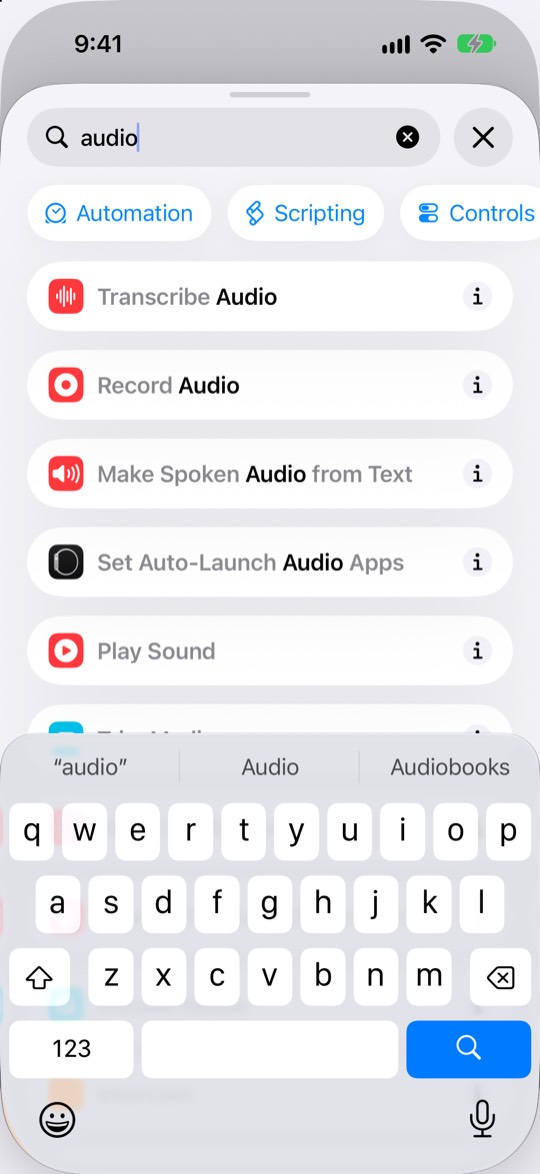
Tap Search and type audio. Tap Record Audio: the second row in the list.
Kies niet Transcribeer audio, de regel erboven. Dan luistert je iPhone zelf, en die verstaat je minder goed dan je assistent.
Don’t pick Transcribe Audio, the row above it. Then your iPhone does the listening, and it understands you less well than your assistant.
-
Laat hem meteen beginnenMake it start recording right away
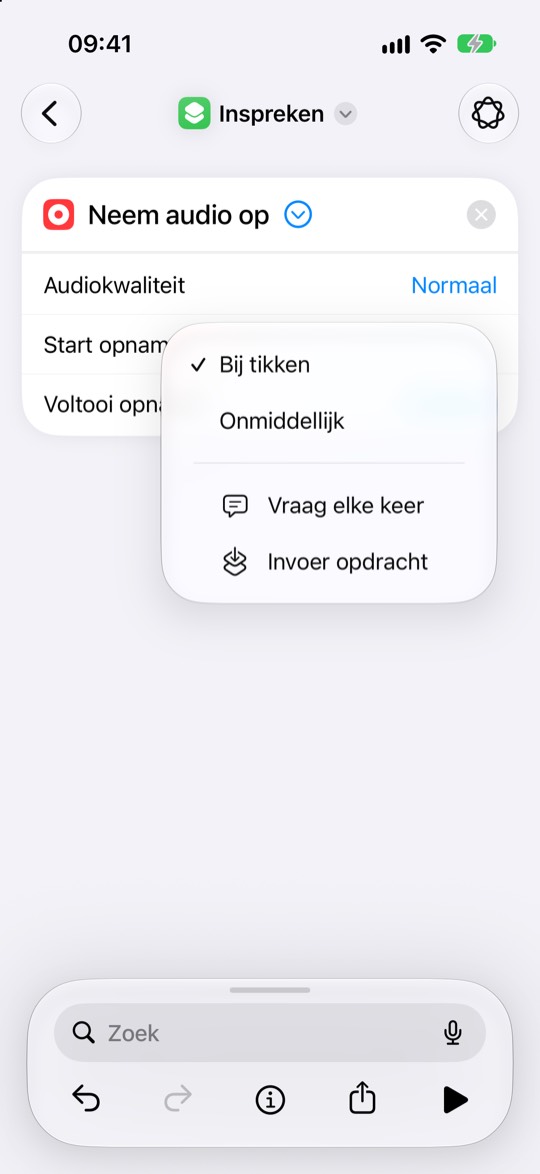
Tik op het blauwe rondje met het pijltje › naast Neem audio op. Het pijltje draait omlaag en er komen drie regels bij. Tik achter Start opname op Bij tikken en kies Onmiddellijk.
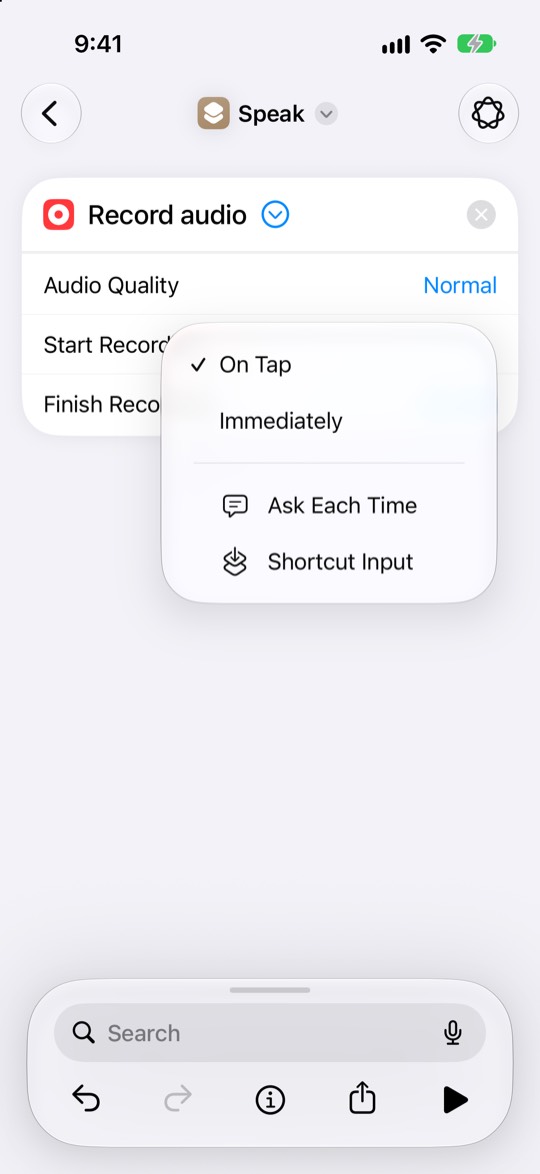
Tap the blue circle with the arrow › next to Record audio. The arrow turns down and three rows appear. Tap On Tap next to Start Recording and choose Immediately.
Laat de andere twee staan: Audiokwaliteit op Normaal, en Voltooi opname op Bij tikken. Dat laatste betekent: als je klaar bent met praten, tik je op het scherm.
Leave the other two as they are: Audio Quality on Normal, and Finish Recording on On Tap. That last one means: when you’re done talking, you tap the screen.
Stopt hij vanzelf als je stil bent? Nee, die keuze heeft je iPhone niet bij opnemen. Wil je helemaal niet tikken, kies dan achter Voltooi opname Na periode en een vaste tijd, bijvoorbeeld 30 seconden.
Does it stop by itself when you go quiet? No, your iPhone doesn’t offer that for recordings. If you’d rather not tap at all, set Finish Recording to After Time with a fixed length, for example 30 seconds.
-
Voeg de taak Haal inhoud van URL op toeAdd the Get Contents of URL step
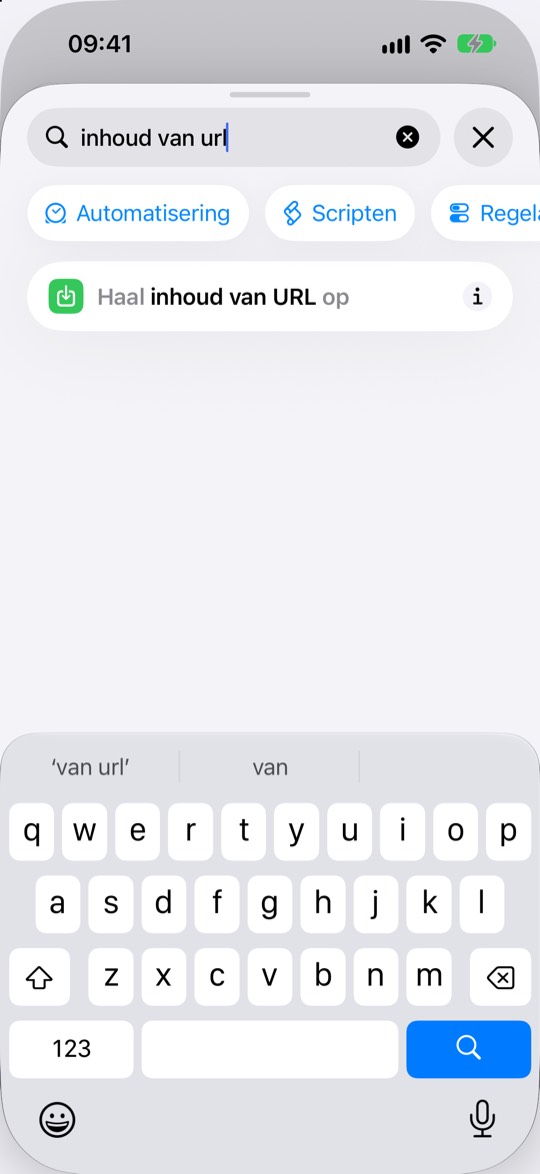
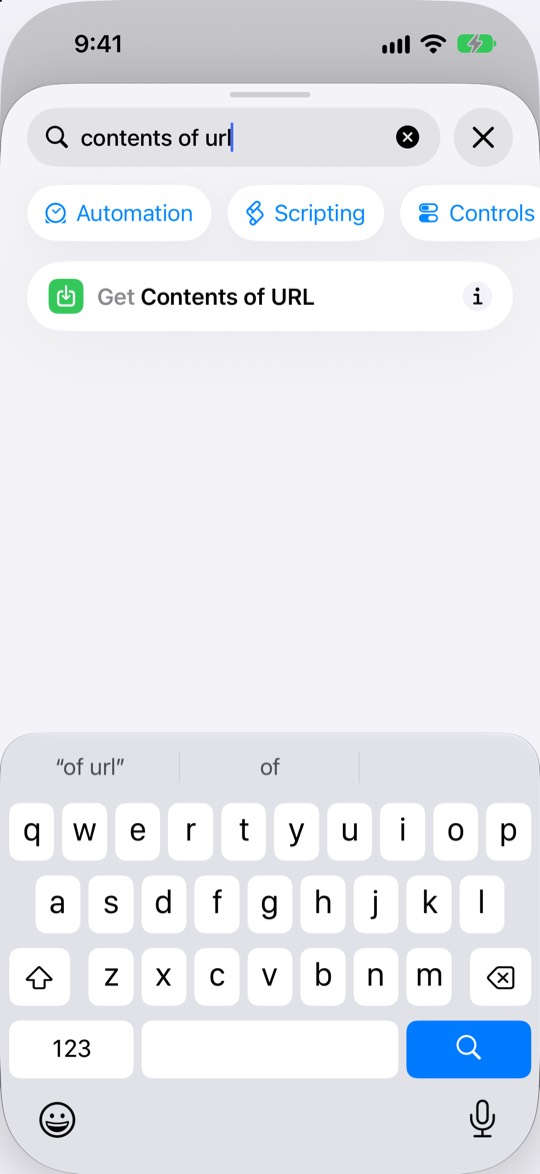
Tik weer onderin op Zoek en typ inhoud van url. Tik op Haal inhoud van URL op. Hij komt onder de eerste taak te staan.
Tap Search at the bottom again and type contents of url. Tap Get Contents of URL. It lands below the first step.
Typ je alleen URL, dan krijg je een lange lijst waarin de goede taak niet bovenaan staat.
If you type just URL, you get a long list where the right step isn’t at the top.
-
Plak het adresPaste the address
Tik hieronder op Kopieer:
Tap Copy below:
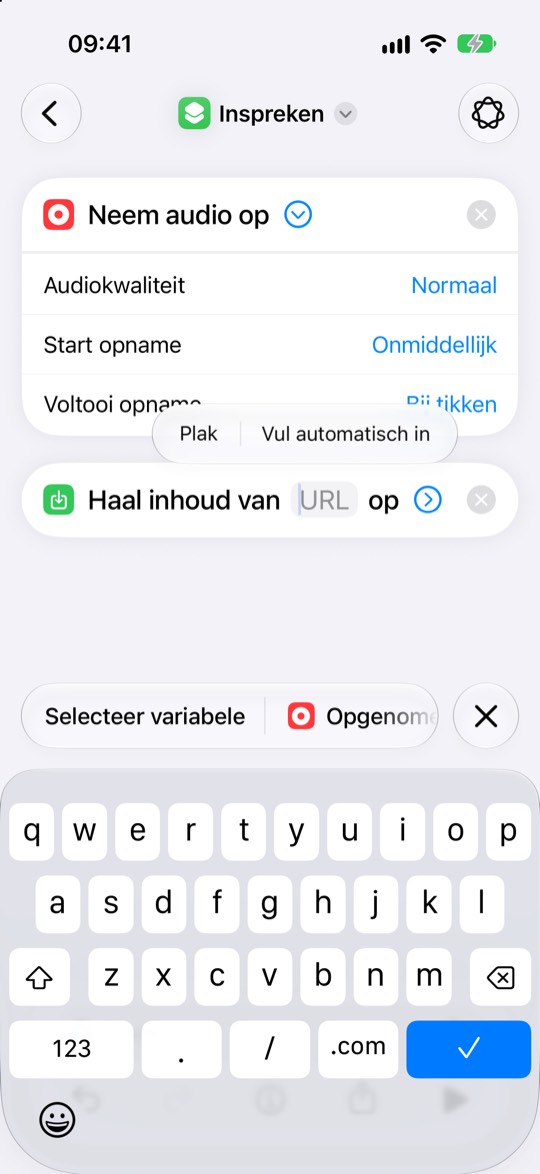
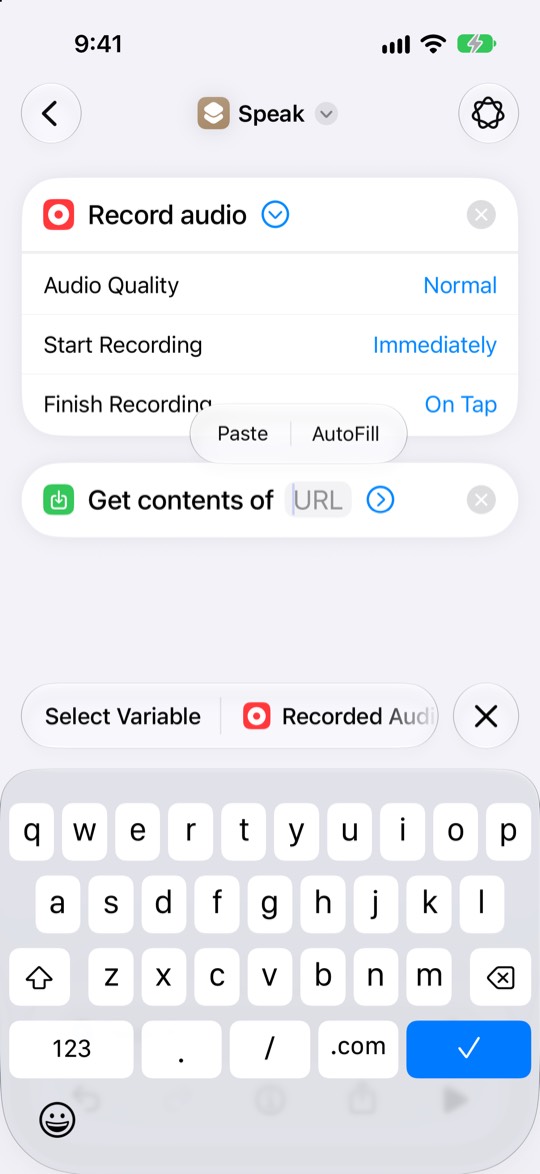
https://assistent-production-4fa5.up.railway.app/api/transcribe?snel=1Ga terug naar Opdrachten. Tik op het lichtblauwe woord URL: het toetsenbord komt omhoog. Tik er nóg een keer op en kies Plak. Sluit het toetsenbord met het blauwe vinkje ✓.
Go back to Shortcuts. Tap the light-blue word URL: the keyboard comes up. Tap it once more and choose Paste. Close the keyboard with the blue check mark ✓.
Boven het toetsenbord staat een balk met Selecteer variabele en Opgenomen audio. Tik daar niet op, en ook niet op Vul automatisch in. Kies Plak.
Above the keyboard there’s a bar with Select Variable and Recorded Audio. Don’t tap those, or AutoFill. Choose Paste.
-
Zet Methode op POSTSet Method to POST
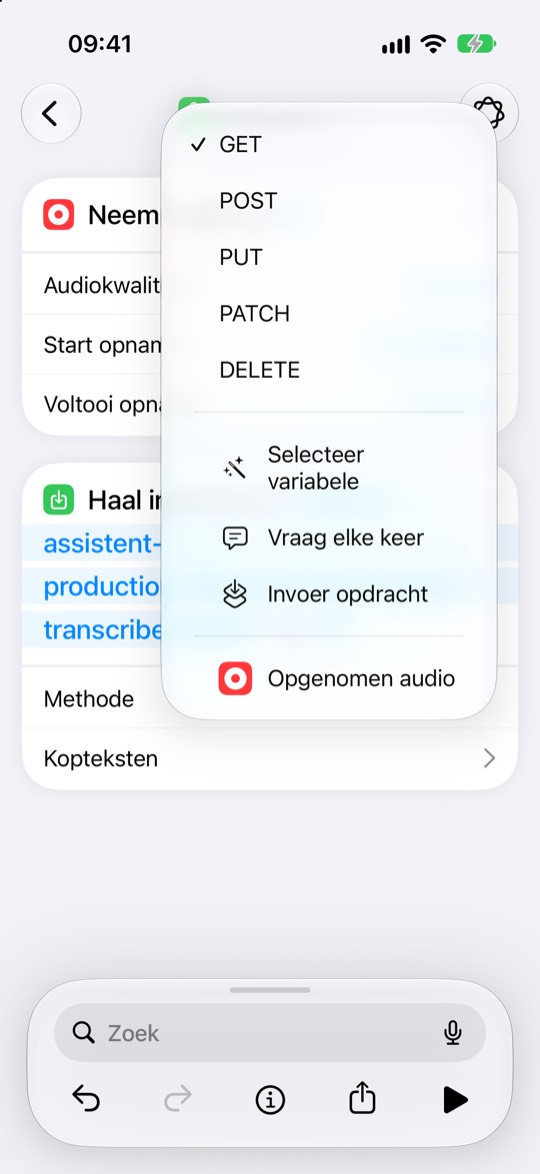
Tik op het blauwe rondje met het pijltje ›, helemaal aan het eind van het adres. Er komen regels bij. Tik achter Methode op GET en kies POST.
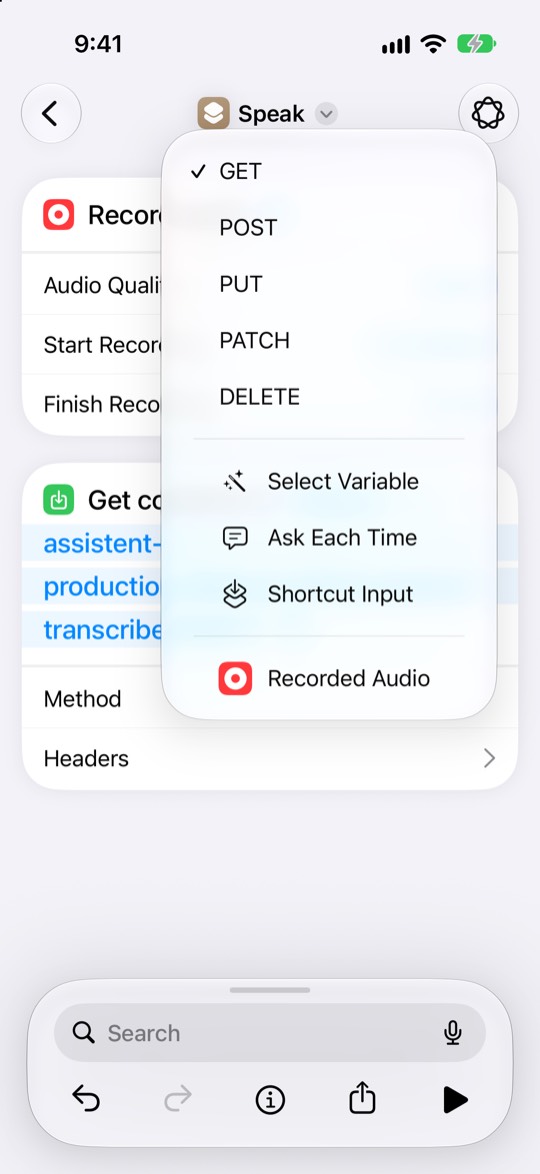
Tap the blue circle with the arrow ›, right at the end of the address. More rows appear. Tap GET next to Method and choose POST.
POST betekent: “stuur iets op”. Met GET komt er niets aan.
POST means “send something”. With GET, nothing arrives.
-
Stuur de opname meeSend the recording along
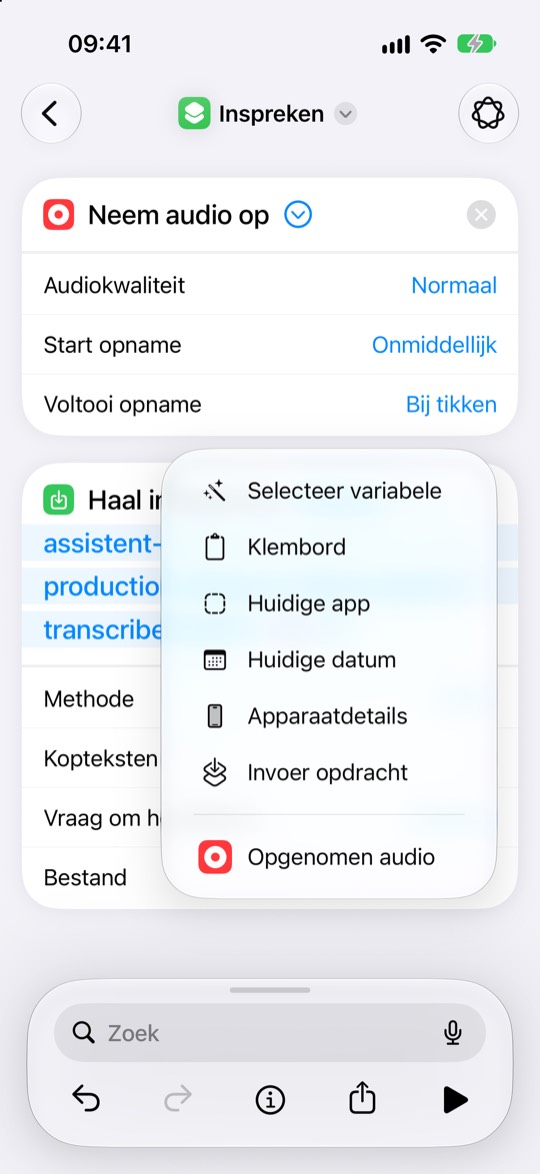
Er is een regel Vraag om hoofdtekst bijgekomen. Tik achter die regel op JSON en kies Bestand.
A row called Request Body has appeared. Tap JSON next to it and choose File.
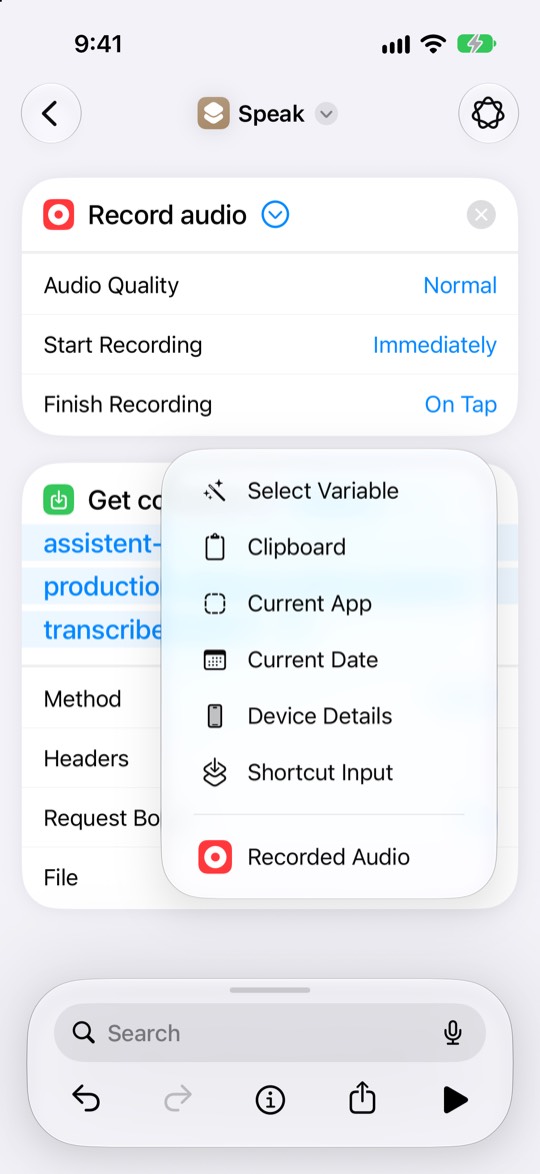
Tik daarna achter Bestand op Kies variabele en kies onderaan Opgenomen audio (met het rode rondje).
Then tap Choose Variable next to File and pick Recorded Audio at the bottom (with the red circle).
-
Maak plek voor je sleutelMake room for your key
Tik op Kopteksten en dan op Voeg nieuwe koptekst toe. Er komt een regel met twee vakjes.
Tap Headers, then Add new header. A row with two boxes appears.
Tik in het linkervak 1 en typ precies dit, met een kleine x en een streepje:
Tap the left box 1 and type exactly this, with a small x and a dash (sleutel is Dutch for key; keep it in Dutch):
x-sleutelLaat het rechtervak 2 nog leeg. Daar komt zo je sleutel in.
Leave the right box 2 empty for now. Your key goes there in a moment.
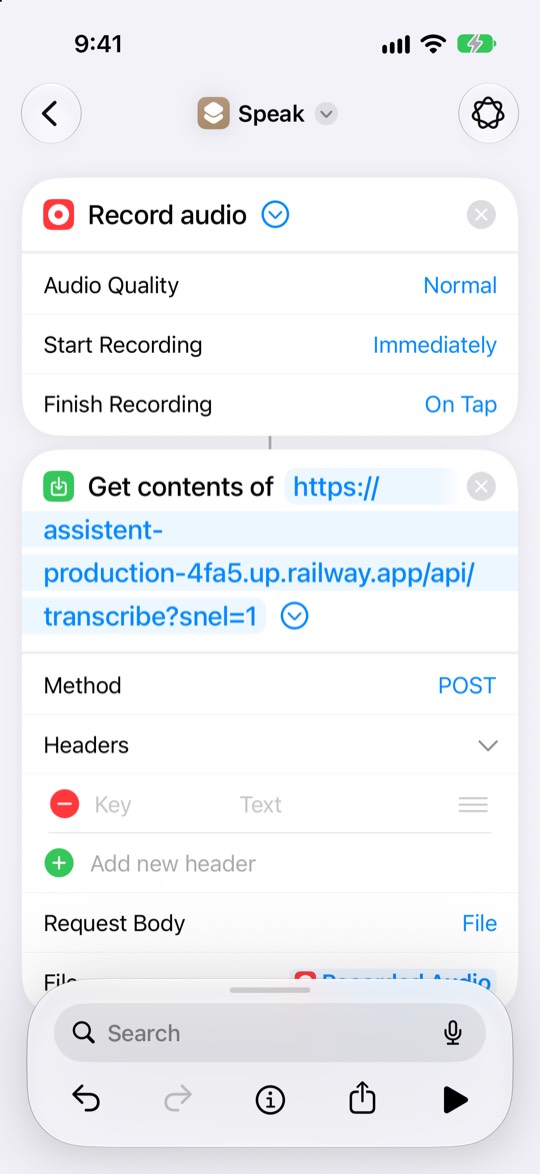
Let op: in het linkervak staat in grijs “Sleutel”. Toch hoort je sleutel daar níét. Links komt altijdx-sleutel. Je sleutel komt rechts, in het vak waar “Tekst” staat.Watch out: the left box says “Key” in grey. Your key does not go there. The left box always getsx-sleutel. Your key goes on the right, in the box that says “Text”.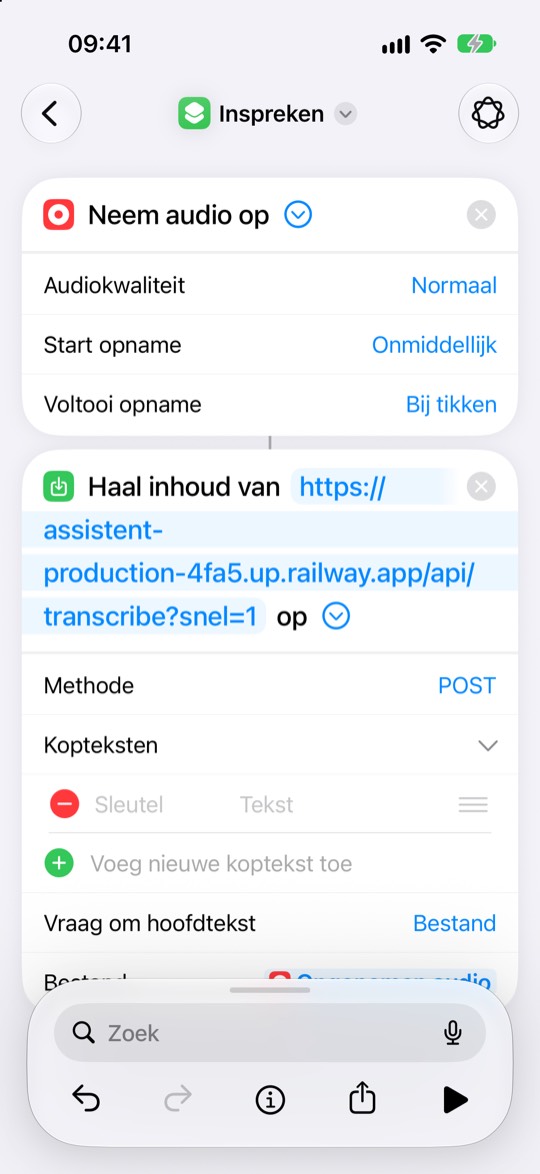
-
Open de instellingen van je assistentOpen your assistant’s settings
Ga naar je assistent: tik op het icoon op je beginscherm. Zie je daar deze uitleg in plaats van je assistent? Tik dan bovenaan op Naar de app. Tik rechtsonder op Meer (de drie puntjes) en dan op Instellingen.
Geen icoon op je beginscherm? Tik dan helemaal bovenaan deze pagina op Naar de app. Terug naar deze uitleg ga je daarna met ‹ linksonder in Safari.
Go to your assistant: tap its icon on your Home Screen. Seeing this guide there instead of your assistant? Then tap Open the app at the top. Tap More (the three dots) at the bottom right, then Settings.
No icon on your Home Screen? Then tap Open the app at the very top of this page. To come back to this guide afterwards, tap ‹ at the bottom left in Safari.
-
Maak een sleutelCreate a key
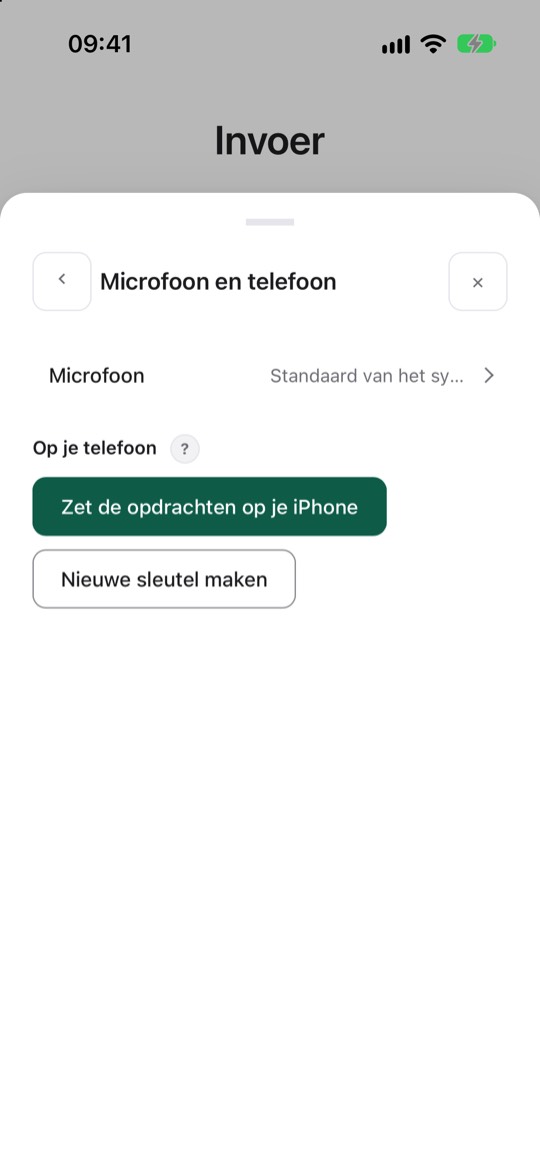
Tik op Microfoon en telefoon (vlak boven Account). Onder Op je telefoon tik je op Nieuwe sleutel maken, niet op de knop erboven: die is voor de snelle weg.
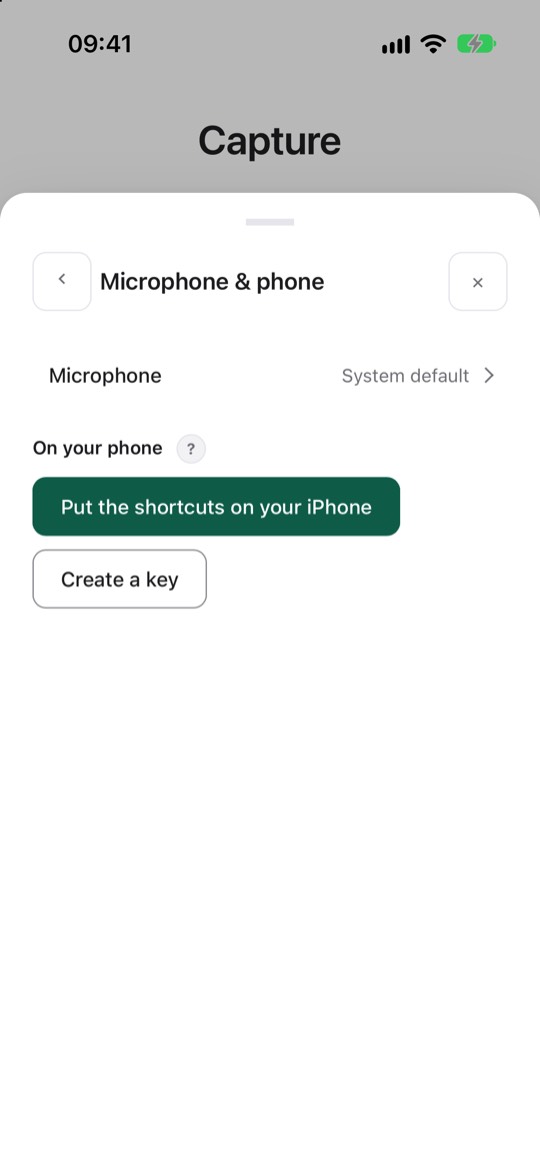
Tap Microphone & phone (just above Account). Under On your phone, tap Create a key, not the button above it: that one is for the quick way.
De app vraagt waar je hem gaat gebruiken. Er staat al iPhone; typ er Inspreken overheen en tik op Toevoegen (of rechtsonder op je toetsenbord op het blauwe vinkje ✓).
The app asks where you’ll use it. It already says iPhone; type Speak over it and tap Add (or the blue check mark ✓ at the bottom right of your keyboard).
-
Kopieer je sleutelCopy your key
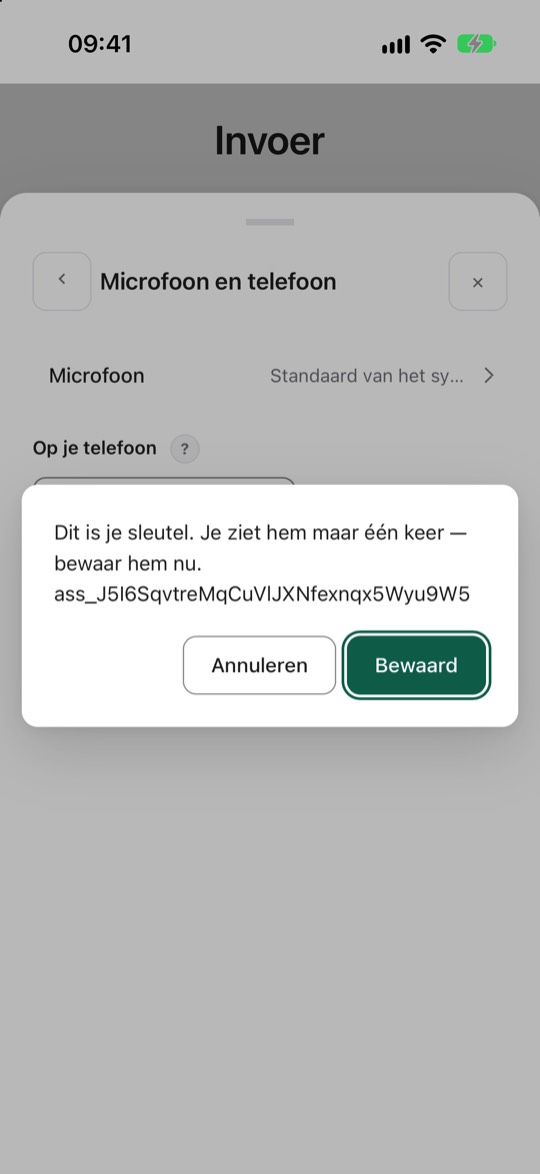
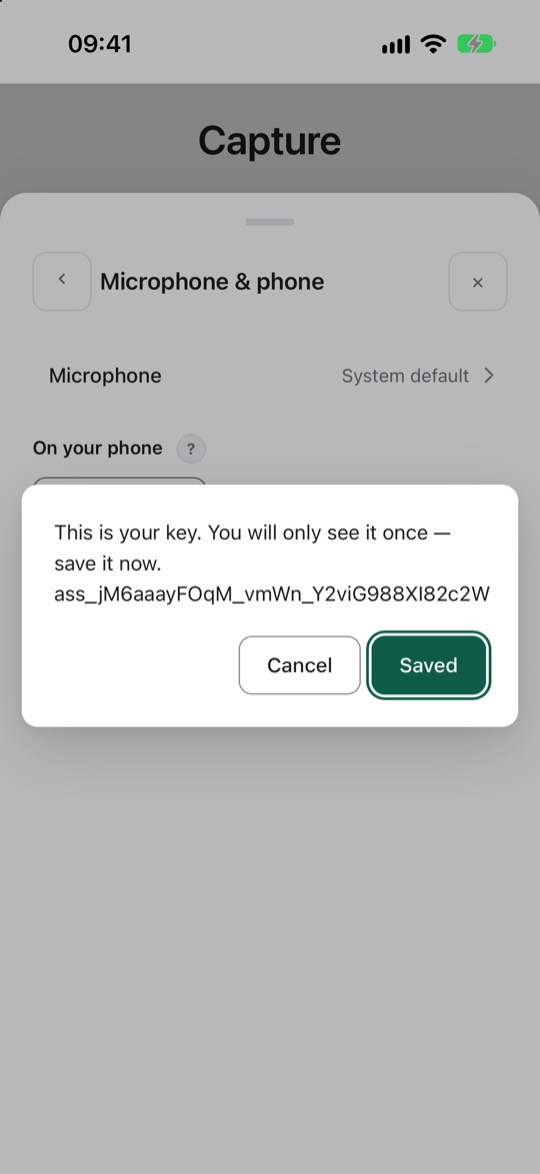
Je ziet je sleutel; hij begint met
ass_. Tik op Bewaard. Daarmee kopieert de app hem voor je, en even staat De sleutel staat op je klembord. in beeld.You’ll see your key; it starts with
ass_. Tap Saved. The app then copies it for you, and the message The key is on your clipboard. appears for a moment.In het venster staat “bewaar hem nu”: dat doe je door op Bewaard te tikken, opschrijven hoeft niet. Je ziet hem maar één keer. Gaat er iets mis, maak dan een nieuwe.
The window says “save it now”: tapping Saved does that, no need to write it down. You only see it once. If something goes wrong, create a new one.
-
Plak je sleutel in het rechtervakPaste your key into the right box
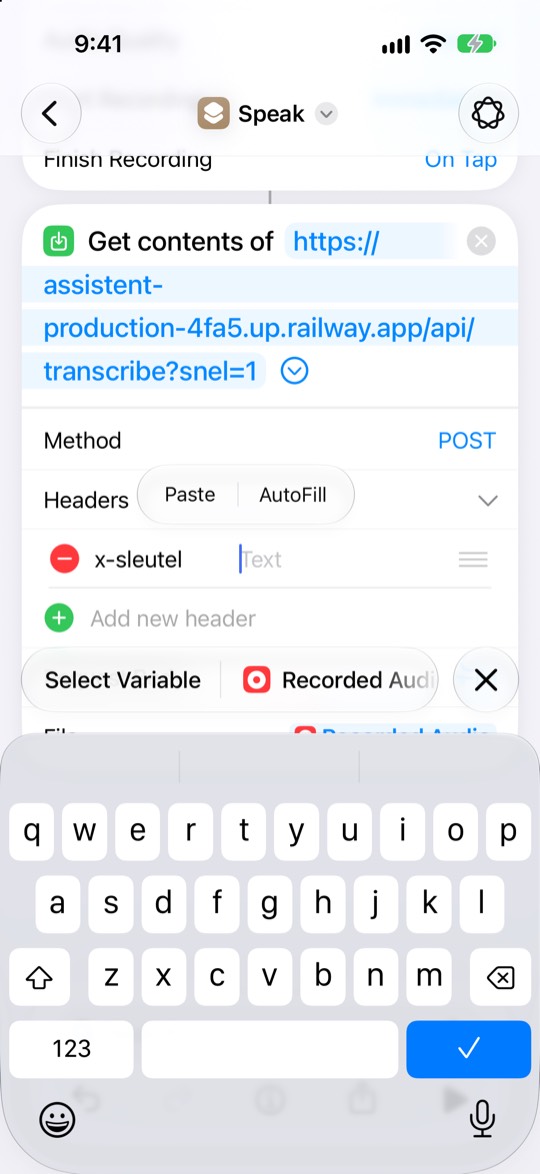
Ga terug naar Opdrachten. Tik in het rechtervak (waar “Tekst” staat), tik er nóg een keer op en kies Plak. Tik niet op de balk boven het toetsenbord. Sluit het toetsenbord met ✓.
Go back to Shortcuts. Tap the right box (the one that says “Text”), tap it once more and choose Paste. Don’t tap the bar above the keyboard. Close the keyboard with ✓.
Rechts staat nu iets dat begint met
ass_.The right box now shows something starting with
ass_.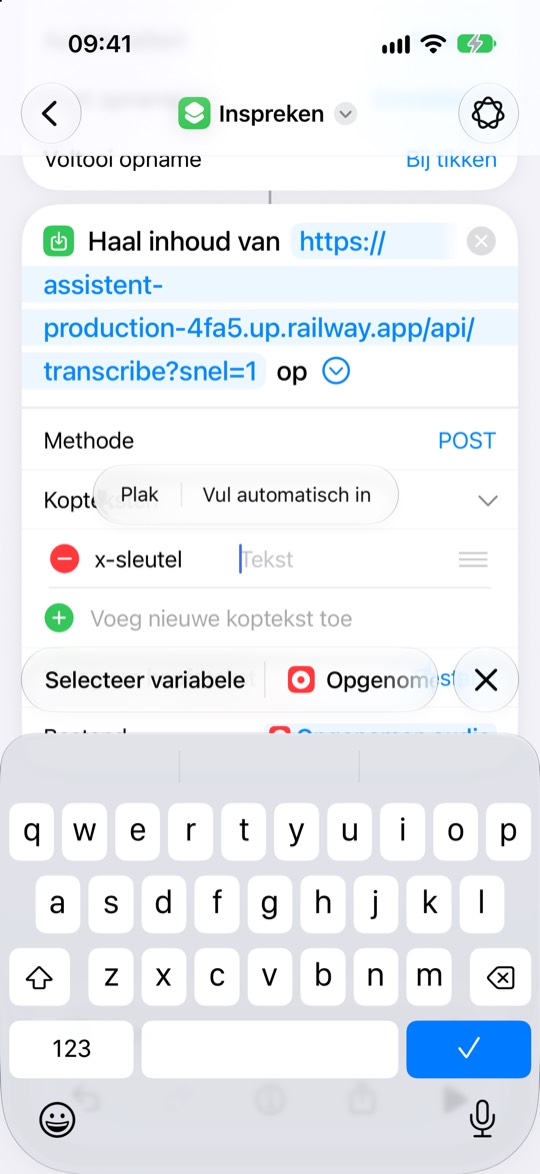
-
Kijk hem naCheck it
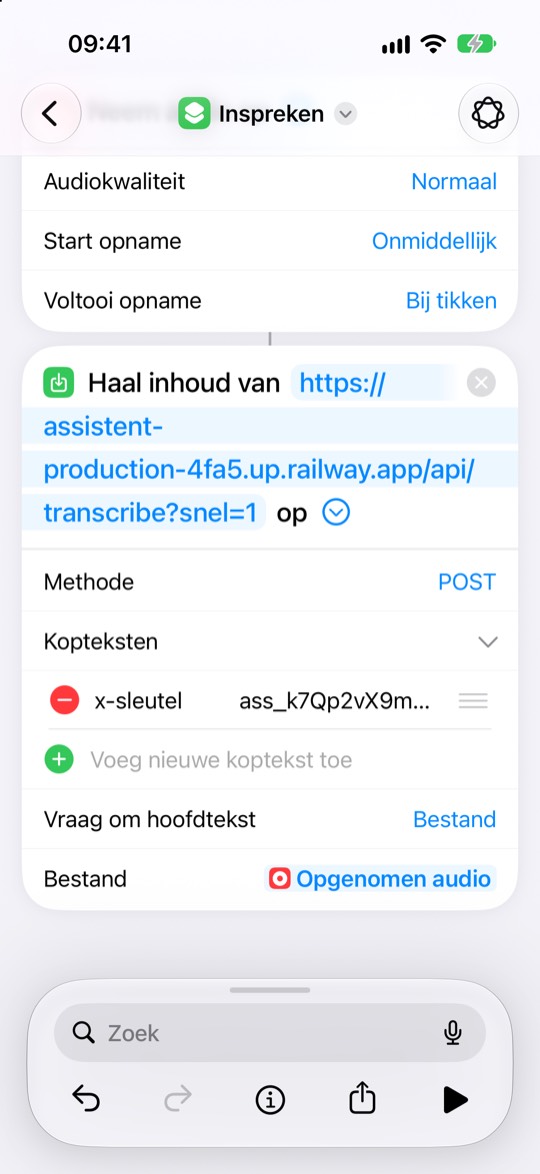
Zo hoort je opdracht eruit te zien:
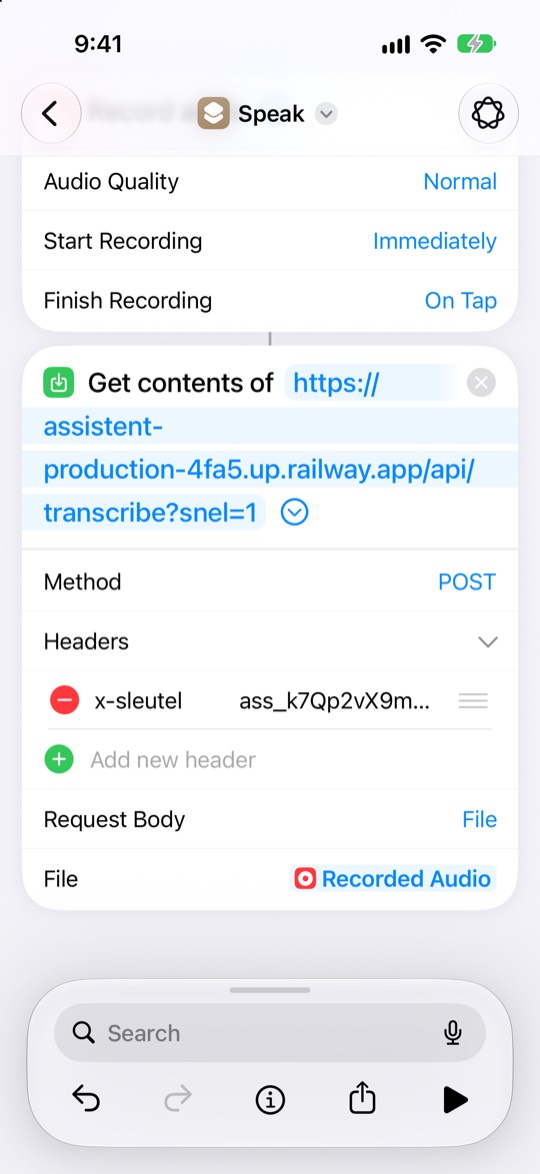
This is what your shortcut should look like:
- Neem audio op staat bovenaan, met Onmiddellijk en Bij tikken.
- Daaronder Haal inhoud van met het adres dat eindigt op
/api/transcribe?snel=1. - Methode is POST.
- Onder Kopteksten: links
x-sleutel, rechts je sleutel. - Vraag om hoofdtekst is Bestand, met Opgenomen audio.
- Record audio is at the top, with Immediately and On Tap.
- Below it, Get contents of with the address ending in
/api/transcribe?snel=1. - Method is POST.
- Under Headers:
x-sleutelon the left, your key on the right. - Request Body is File, with Recorded Audio.
Opslaan hoeft niet: Opdrachten bewaart alles meteen.
No need to save: Shortcuts keeps everything as you go.
-
Probeer hem uitTry it
Tik rechtsonder op ▶. Doe de eerste keer hier in Opdrachten, met je iPhone ontgrendeld. Dan kan je iPhone je om toestemming vragen.
Tap ▶ at the bottom right. Do the first run here in Shortcuts, with your iPhone unlocked. That way your iPhone can ask for permission.
- Vraagt je iPhone of Opdrachten je microfoon mag gebruiken? Tik op Sta toe.
- Hij neemt nu op. Zeg bijvoorbeeld “Morgen de tandarts bellen” en tik op het scherm.
- Daarna vraagt je iPhone of Inspreken verbinding mag maken met assistent-production-4fa5.up.railway.app. Dat is het adres van je assistent. Tik op Sta toe.
- Does your iPhone ask whether Shortcuts may use your microphone? Tap Allow.
- It’s now recording. Say something like “Call the dentist tomorrow” and tap the screen.
- Then your iPhone asks whether Speak may connect to assistent-production-4fa5.up.railway.app. That’s your assistant’s address. Tap Allow.
Open je assistent: na een paar seconden staat Tandarts bellen bij je acties.
Open your assistant: after a few seconds, Call the dentist is among your actions.
Elke proef levert een actie op. Gooi je proefacties daarna weg. Staat er niets? Kijk bij Werkt het niet?
Every test run adds an action. Delete your test actions afterwards. Nothing there? See Not working?
-
Open de instellingen van je iPhoneOpen your iPhone’s Settings
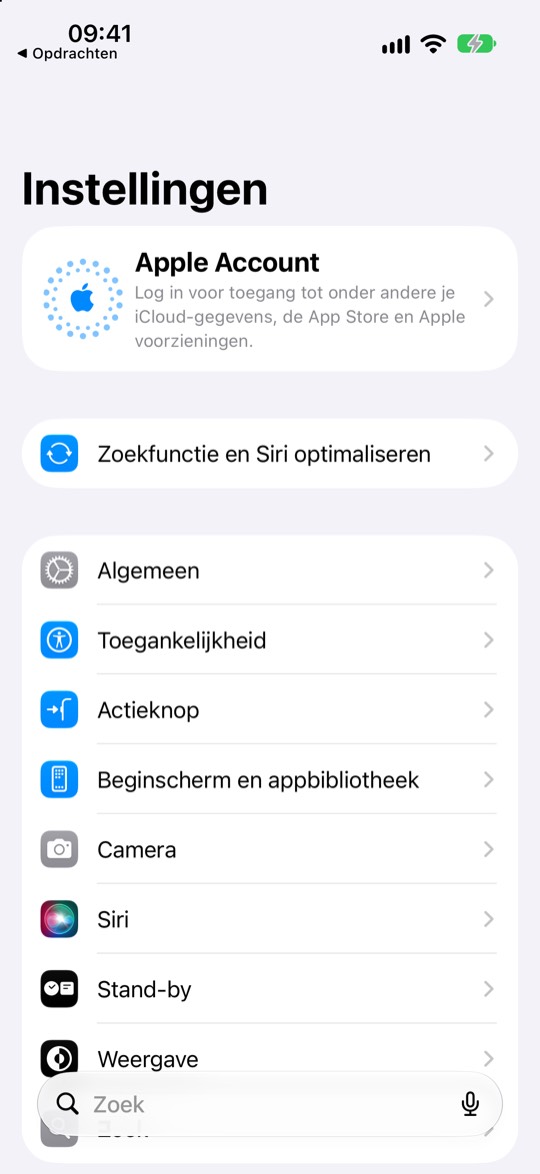
Open de app Instellingen van je iPhone (het grijze tandwiel). Scrol een stukje omlaag en tik op Actieknop.
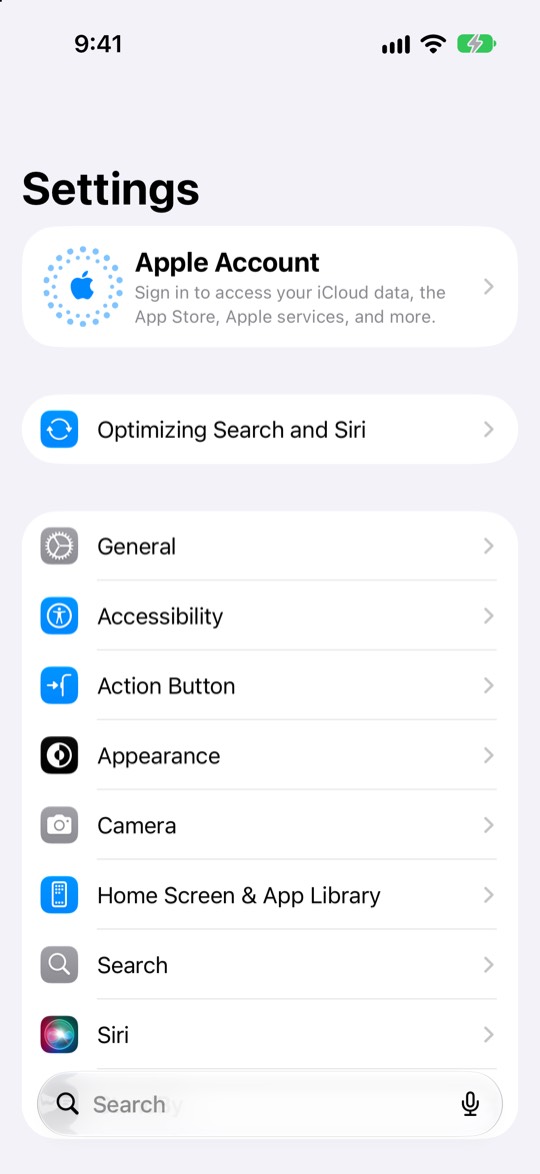
Open your iPhone’s Settings app (the grey gear). Scroll down a little and tap Action Button.
-
Kies Inspreken voor de ActieknopChoose Speak for the Action Button
Veeg met je vinger naar links, een paar keer, tot je Opdracht ziet. Tik op Kies een opdracht… (of op de naam die er al staat) en kies Inspreken.
Swipe left a few times until you see Shortcut. Tap Choose a Shortcut… (or the name that’s already there) and pick Speak.
Klaar. Houd voortaan de Actieknop even ingedrukt tot de opname start, laat los en praat. Tik op het scherm als je klaar bent.
Done. From now on, press and hold the Action Button until recording starts, let go and talk. Tap the screen when you’re finished.
Geen Actieknop op je iPhone?No Action Button on your iPhone?
De Actieknop zit op de iPhone 15 Pro en 15 Pro Max, alle iPhones 16 en 17 (ook de 16e, 17e en iPhone Air) en de iPhone 18 Pro en 18 Pro Max. Twijfel je? Staat er in Instellingen een regel Actieknop, dan heb je hem. Zo niet, dan kan het ook zo:
- Twee keer op de achterkant tikken. Instellingen → Toegankelijkheid → Aanraken → Tik op achterkant → Dubbel tikken → kies Inspreken.
- Een icoon op je beginscherm, net als bij Naar Assistent: doe stap 12 van de snelle weg met de tegel Inspreken. Zelf gebouwd? Dan kan het ook zoals in Typen, stap 14.
The Action Button is on the iPhone 15 Pro and 15 Pro Max, every iPhone 16 and 17 (including the 16e, 17e and iPhone Air) and the iPhone 18 Pro and 18 Pro Max. Not sure? If Settings has an Action Button row, you have one. If not, you can also:
- Double-tap the back of your iPhone. Settings → Accessibility → Touch → Back Tap → Double Tap → pick Speak.
- Put an icon on your Home Screen, just like for Add to Assistent: do step 12 of the quick way with the Speak tile. Built it yourself? Then Type, step 14 works too.
Zelf bouwen · opdracht 2Build it yourself · shortcut 2
TypenType
Ook twee taken: eerst vraagt hij wat je wilt opschrijven, daarna stuurt hij dat naar je assistent.
Also two steps: first it asks what you want to write down, then it sends that to your assistant.
-
Maak een nieuwe opdracht: TypenCreate a new shortcut: Type
Dit gaat net als stap 1 tot en met 3 van Inspreken:
This works just like steps 1 to 3 of Speak:
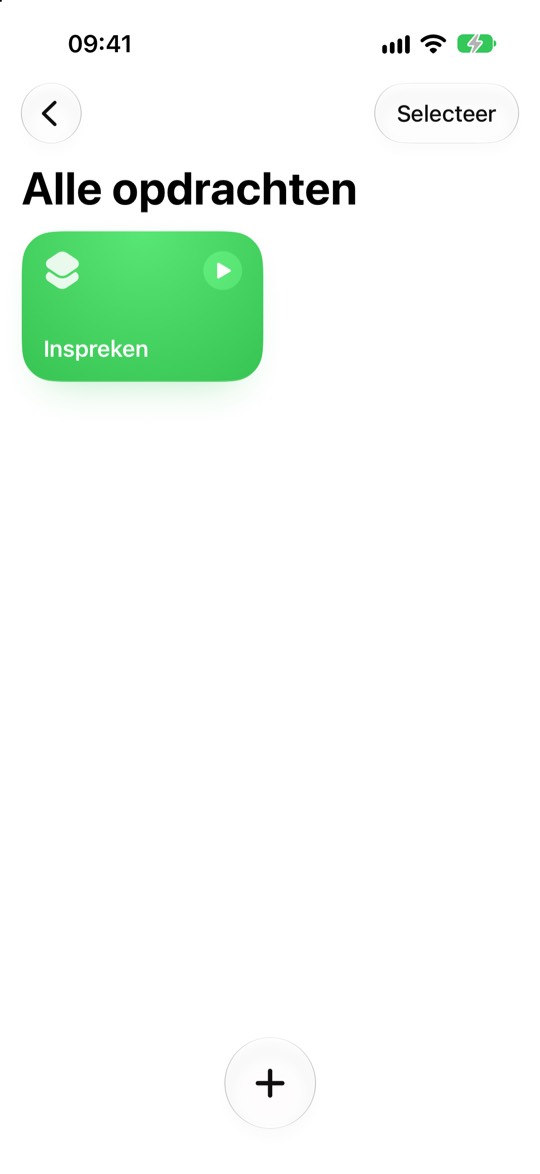
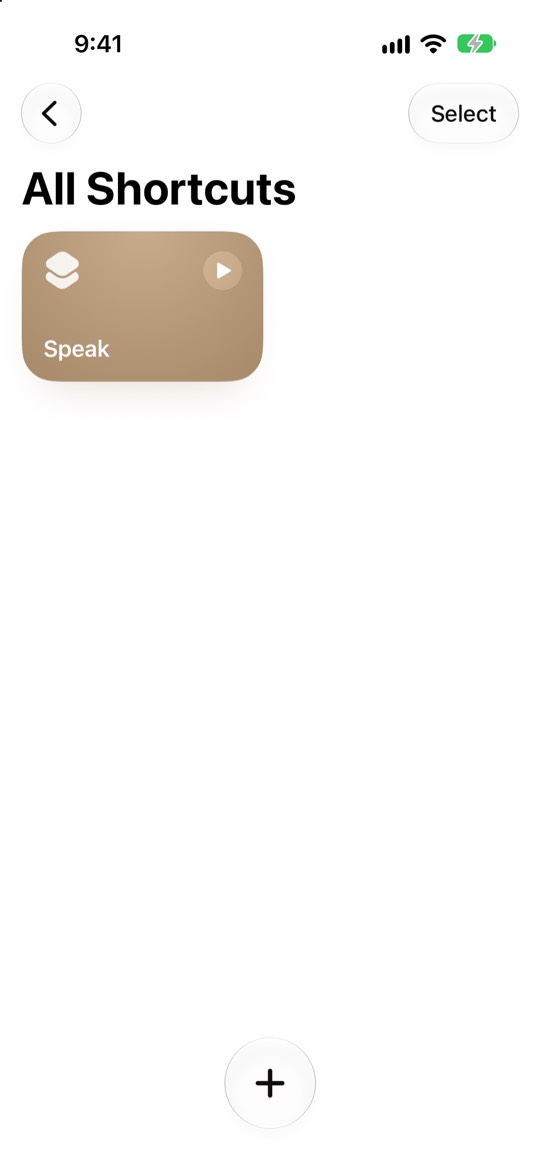
- Open Opdrachten. Tik linksboven op ‹ tot er bovenaan Alle opdrachten staat. Laat de tegel Inspreken met rust.
- Tik onderaan in het midden op +.
- Tik bovenaan op de naam Opdracht, kies Wijzig naam, typ Typen en tik op het blauwe vinkje ✓.
- Staat er onderin Beschrijf een opdracht? Tik rechtsboven op Wijzig.
- Open Shortcuts. Tap ‹ at the top left until it says All Shortcuts at the top. Leave the Speak tile alone.
- Tap + at the bottom, in the middle.
- Tap the name New Shortcut at the top, choose Rename, type Type and tap the blue check mark ✓.
- Does it say Describe a shortcut at the bottom? Tap Edit at the top right.
-
Voeg de taak Vraag om invoer toeAdd the Ask for Input step
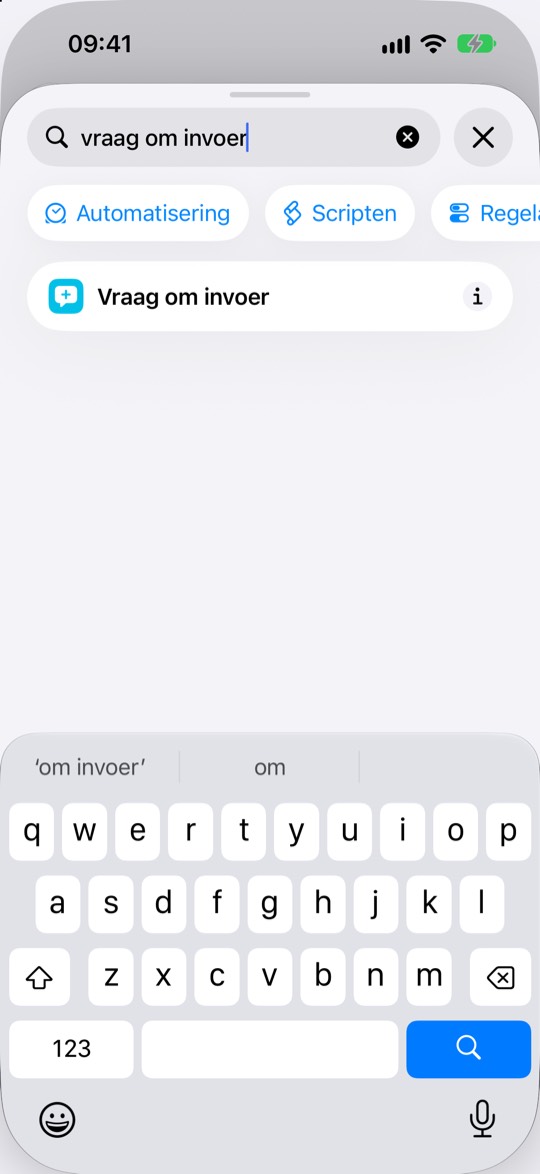
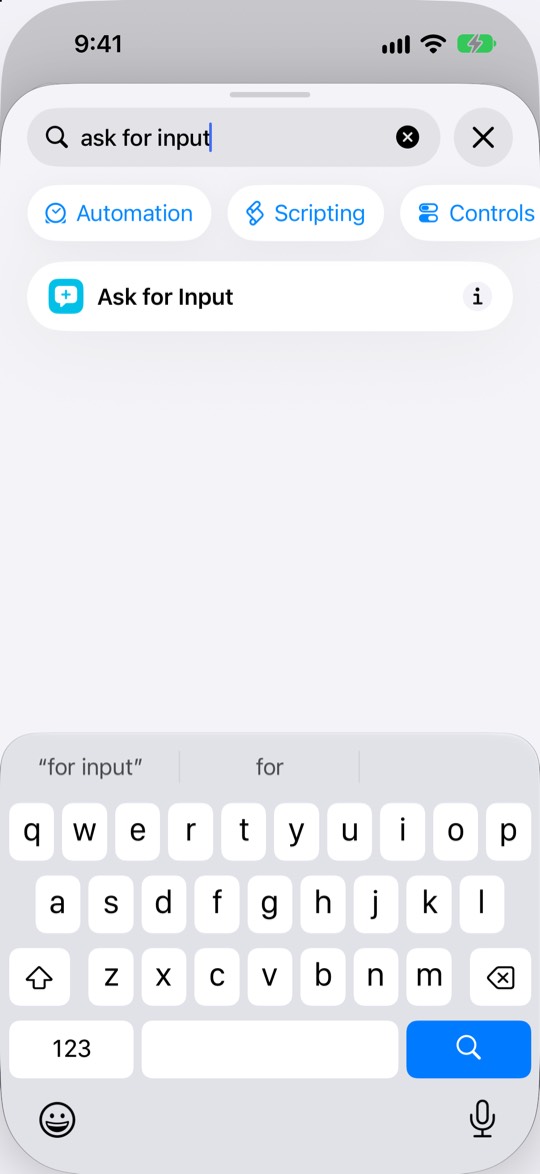
Tik op Zoek, typ vraag om invoer en tik op Vraag om invoer.
Tap Search, type ask for input and tap Ask for Input.
-
Schrijf de vraag die je straks zietWrite the question you’ll see
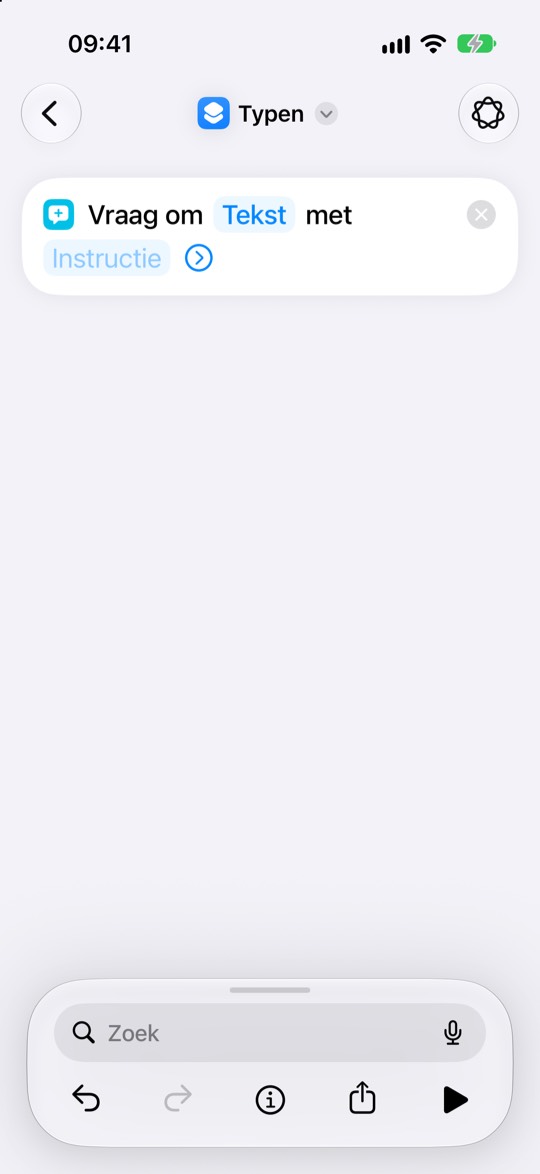
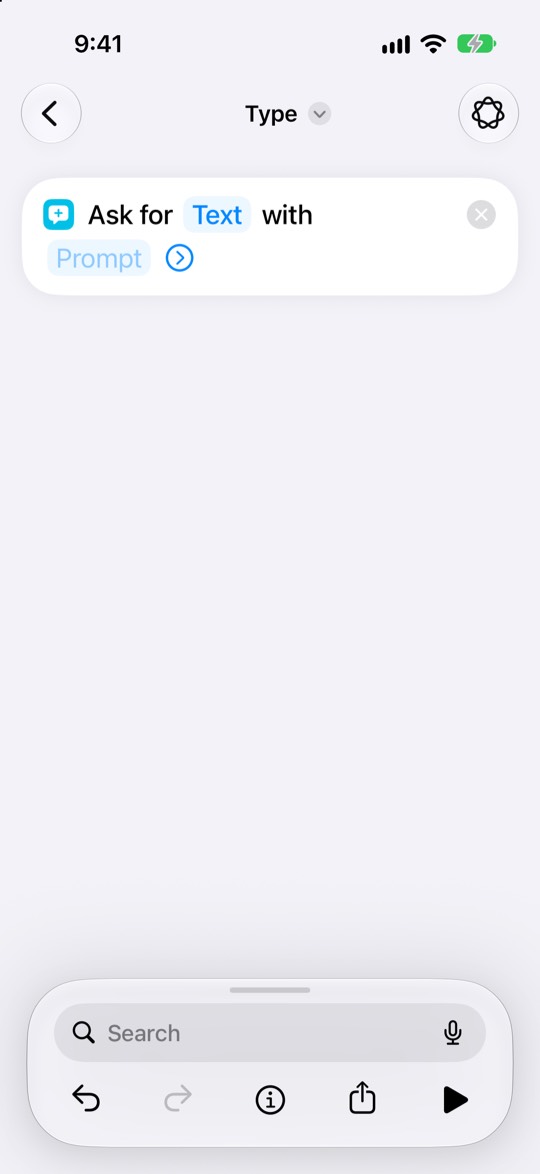
De taak heet nu Vraag om Tekst met Instructie. Laat Tekst staan. Tik op het lichtblauwe woord Instructie en typ bijvoorbeeld Wat wil je kwijt? Sluit het toetsenbord met ✓.
The step now reads Ask for Text with Prompt. Leave Text as it is. Tap the light-blue word Prompt and type, for example, What’s on your mind? Close the keyboard with ✓.
-
Voeg de taak Haal inhoud van URL op toeAdd the Get Contents of URL step
Tik op Zoek, typ inhoud van url en tik op Haal inhoud van URL op.
Tap Search, type contents of url and tap Get Contents of URL.
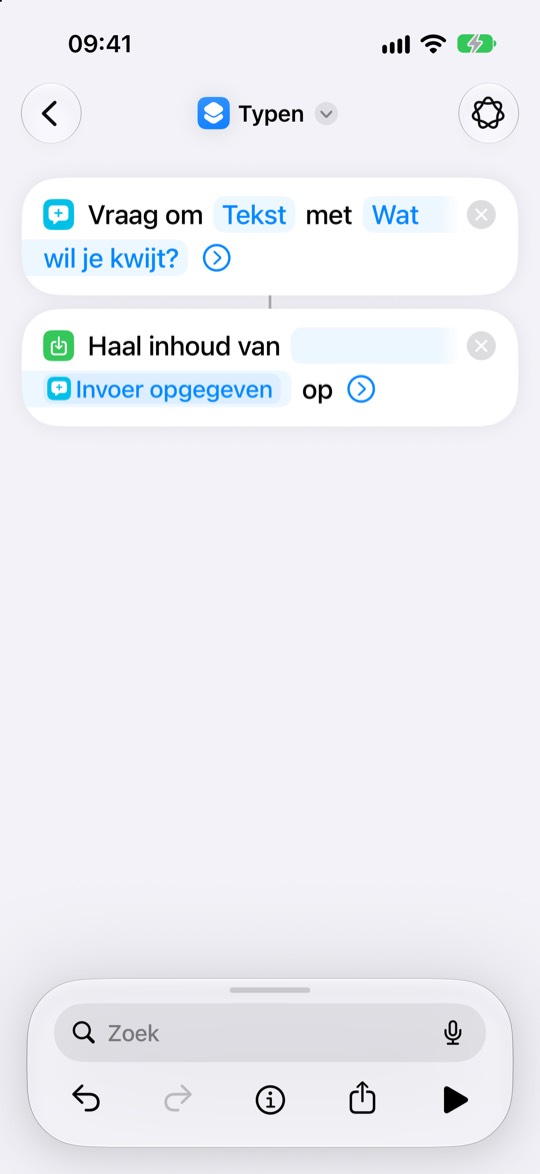
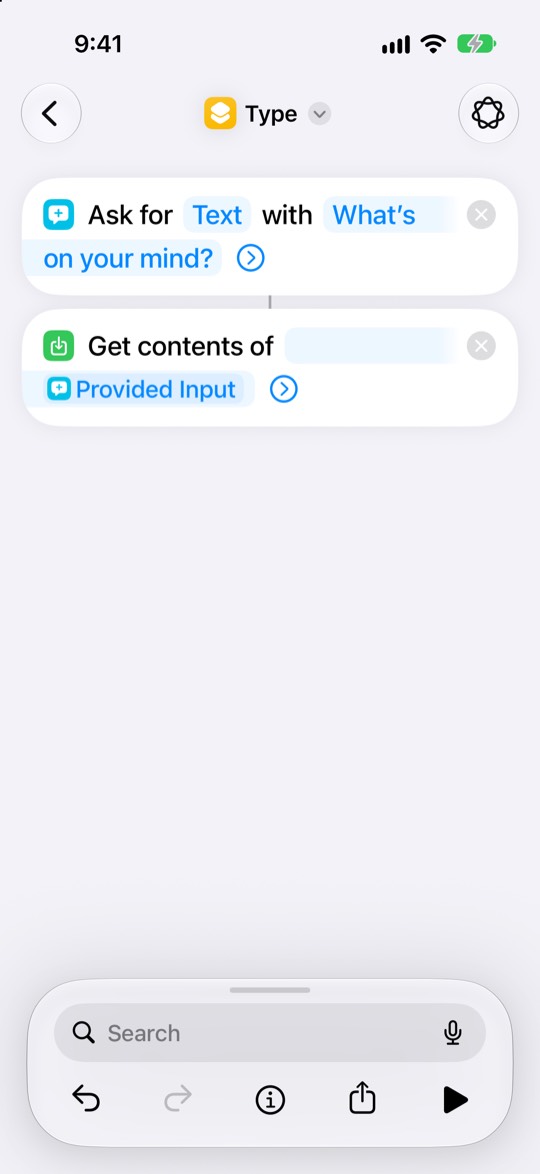
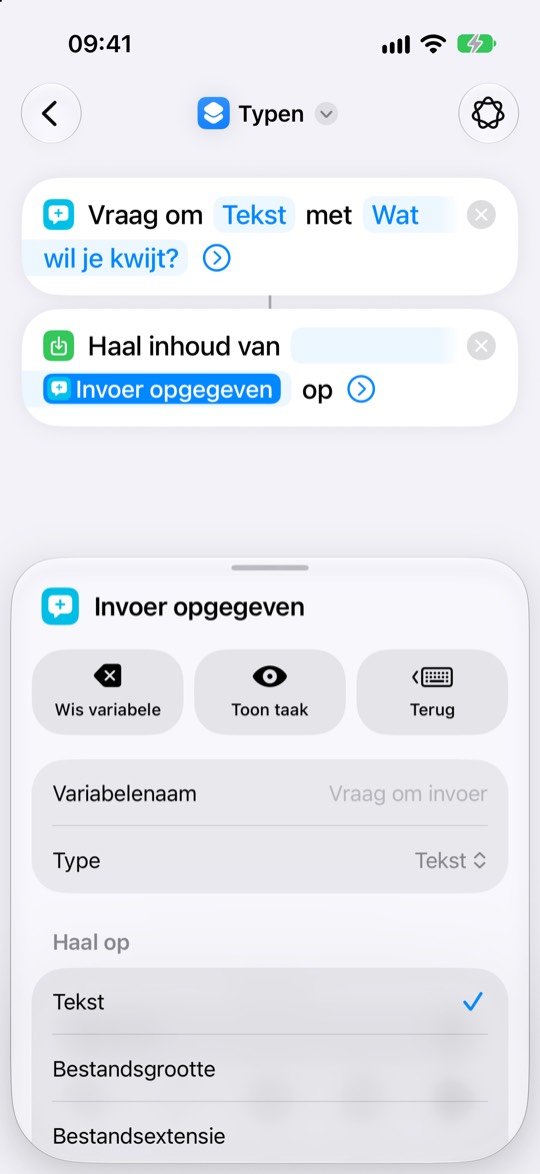
Kijk goed: je iPhone zet er zelf een blauw blokje Invoer opgegeven in, op de plek waar het adres moet komen. Dat blokje moet daar weg.
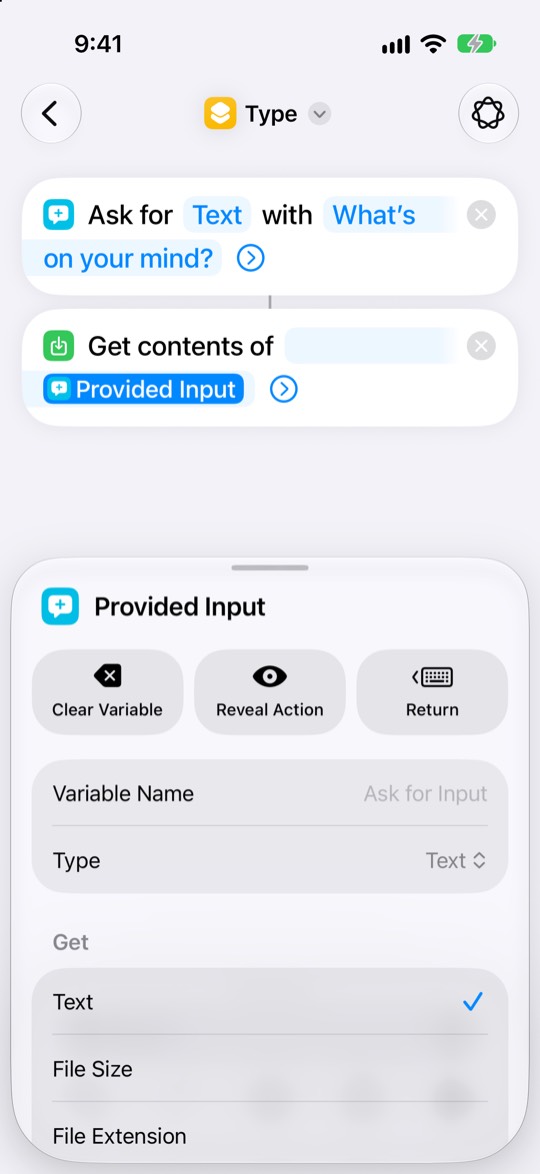
Look closely: your iPhone puts a blue Provided Input block in by itself, where the address should go. That block has to go.
-
Haal het blauwe blokje wegRemove the blue block
Tik op het blokje Invoer opgegeven. Er schuift een venster omhoog. Tik links op Wis variabele.
Tap the Provided Input block. A panel slides up. Tap Clear Variable on the left.
Je hebt dit blokje straks nog nodig, maar op een andere plek (stap 9).
You’ll need this block later, but in a different place (step 9).
-
Plak het adresPaste the address
Tik hieronder op Kopieer. Let op: dit adres is anders dan bij Inspreken.
Tap Copy below. Note: this address is different from the one for Speak.
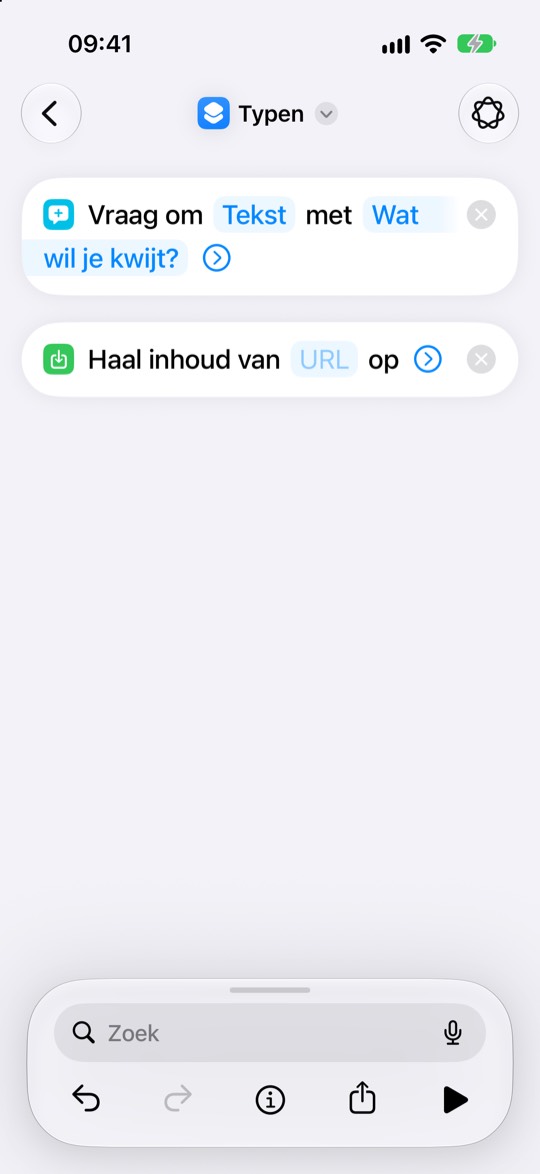
https://assistent-production-4fa5.up.railway.app/api/verwerk-tekstGa terug naar Opdrachten. Tik op het lichtblauwe woord URL, tik er nóg een keer op en kies Plak. Sluit het toetsenbord met ✓.
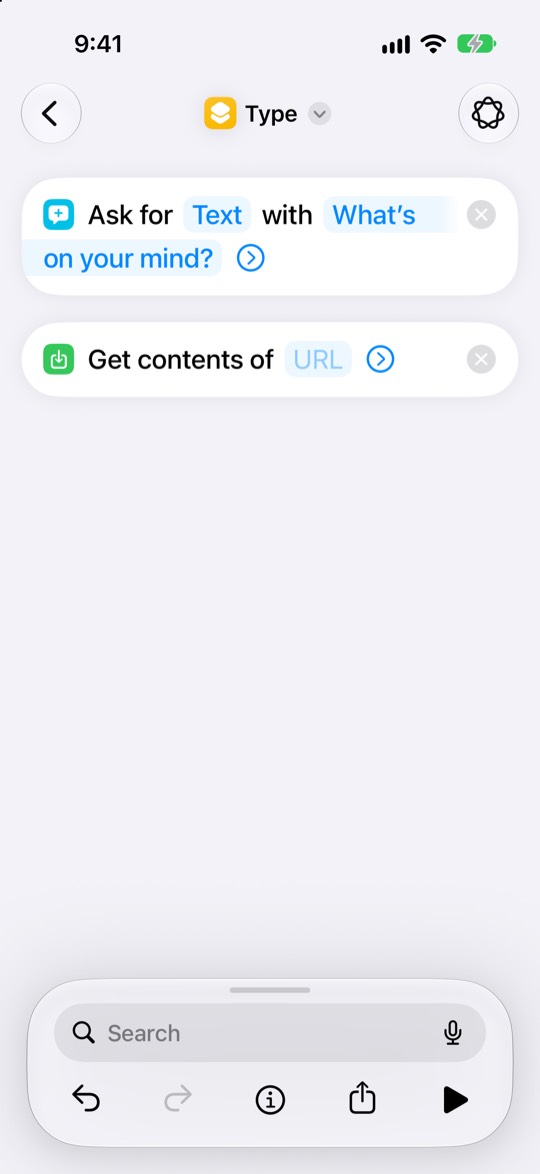
Go back to Shortcuts. Tap the light-blue word URL, tap it once more and choose Paste. Close the keyboard with ✓.
-
Zet Methode op POSTSet Method to POST
Tik op het blauwe rondje met het pijltje ›, helemaal aan het eind van het adres. Tik achter Methode op GET en kies POST. Laat Vraag om hoofdtekst op JSON staan.
Tap the blue circle with the arrow ›, right at the end of the address. Tap GET next to Method and choose POST. Leave Request Body on JSON.
-
Voeg een tekstveld toeAdd a text field
Tik onderaan de taak op Voeg nieuw veld toe en kies Tekst. Er komt een regel met twee vakjes.
Tap Add new field at the bottom of the step and choose Text. A row with two boxes appears.
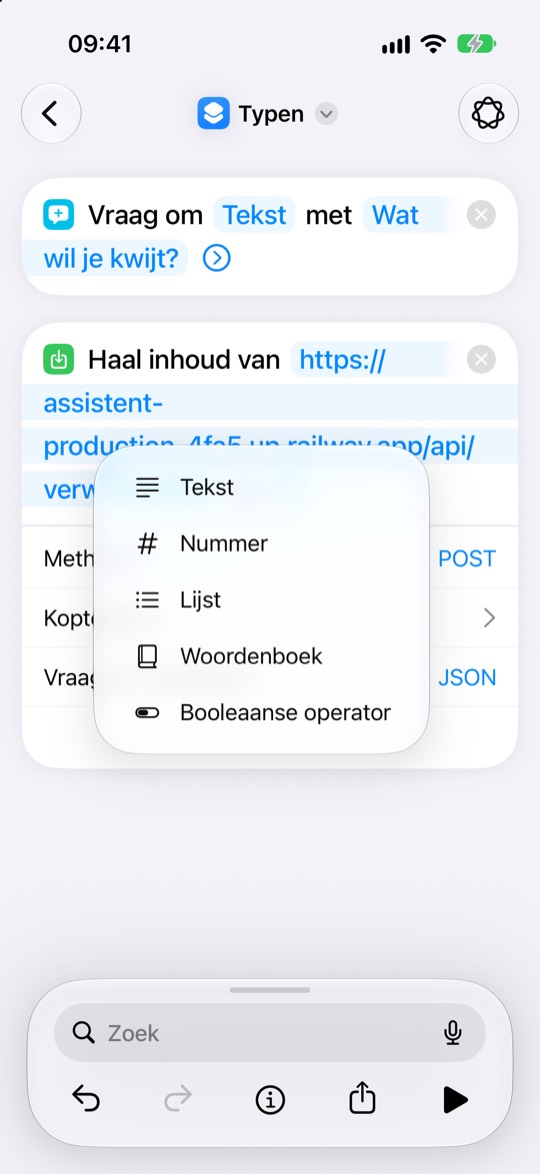
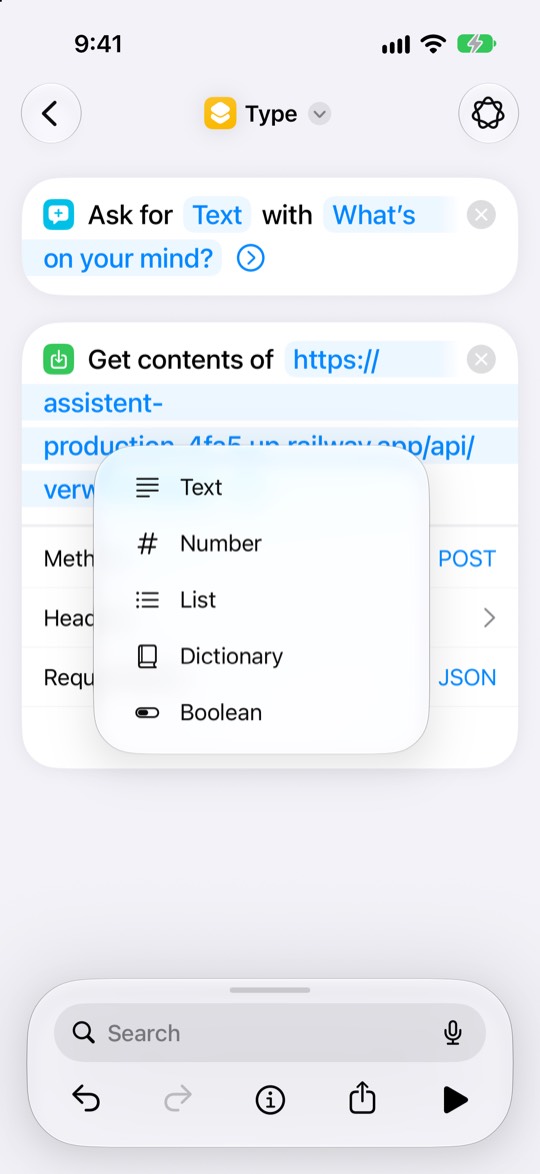
-
Vul het tekstveld inFill in the text field
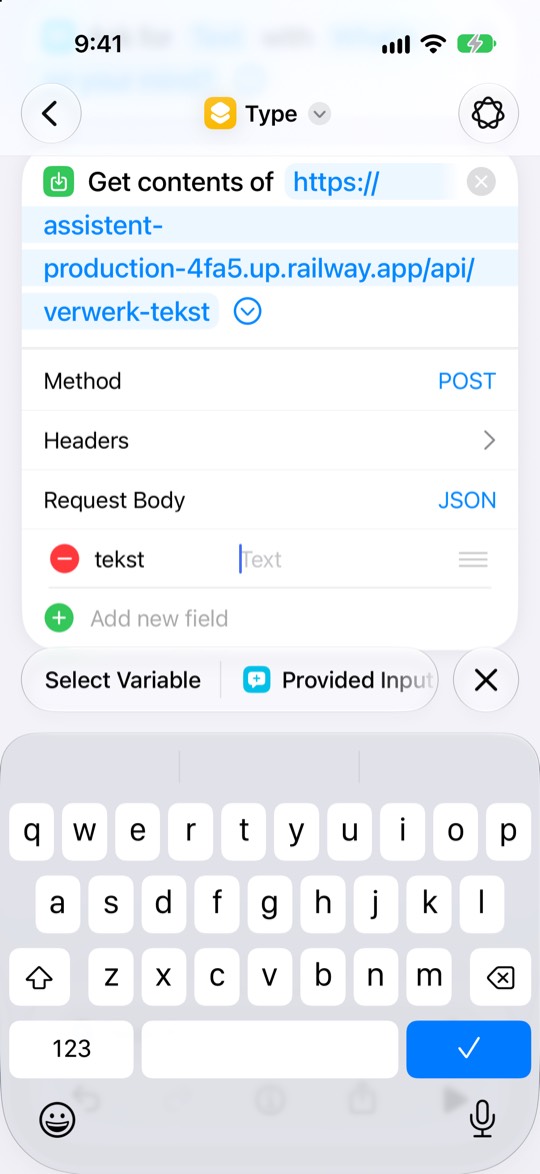
Tik in het linkervak 1 en typ dit woord, met een kleine t:
Tap the left box 1 and type this word exactly as shown. It’s Dutch for “text”, so it’s spelled with a k, and with a small t:
tekstTik daarna in het rechtervak. Typ daar niets: tik boven het toetsenbord op Invoer opgegeven 2. Het wordt een blauw blokje. Sluit het toetsenbord met ✓.
Then tap the right box. Don’t type anything there: tap Provided Input 2 above the keyboard. It turns into a blue block. Close the keyboard with ✓.
Let op: de vakjes hebben verwarrende namen. Links staat in grijs “Sleutel”, rechts “Tekst”. Toch komt het woordtekstlinks, en het blauwe blokje rechts.Watch out: the boxes have confusing names. The left one says “Key” in grey, the right one “Text”. Still, the Dutch wordtekst(with a k) goes on the left, and the blue block on the right. Don’t change it to “text”: then nothing arrives.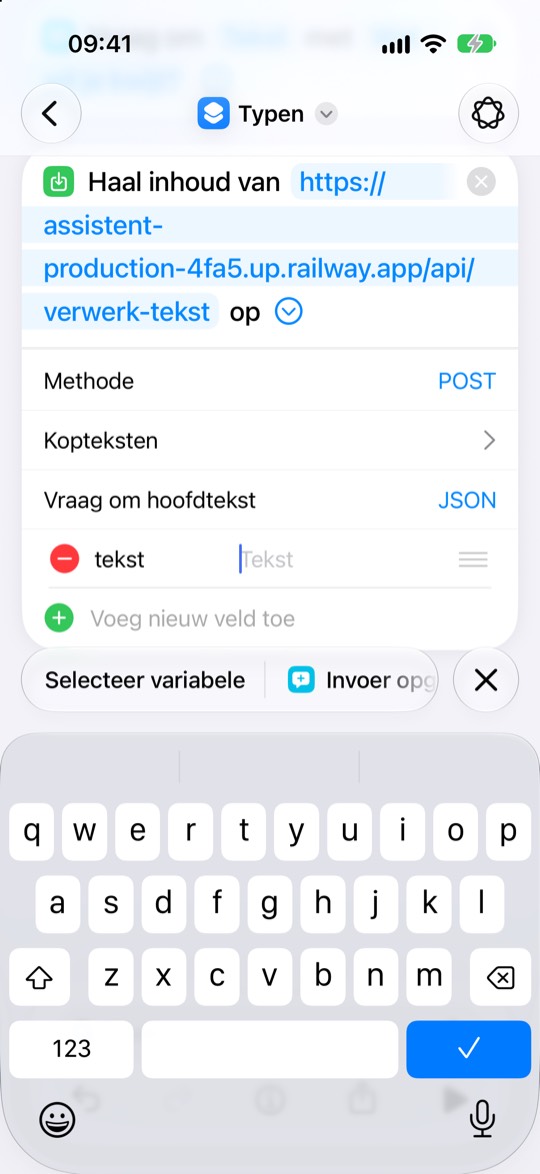
-
Zet een nieuwe sleutel erinAdd a new key
Net als bij Inspreken, met een nieuwe sleutel voor deze opdracht:
Just like for Speak, with a new key for this shortcut:
- Tik op Kopteksten en dan op Voeg nieuwe koptekst toe.
- Tik in het linkervak 1 en typ
x-sleutel. - Ga naar je assistent: tik rechtsonder op Meer, dan op Instellingen en op Microfoon en telefoon.
- Daar staat je sleutel Inspreken al, met een rode knop Intrekken. Tik daar niet op. Tik op Nieuwe sleutel maken, typ Typen, tik op Toevoegen en dan op Bewaard.
- Ga terug naar Opdrachten. Tik in het rechtervak 2, tik er nóg een keer op en kies Plak. Sluit het toetsenbord met ✓.
- Tap Headers, then Add new header.
- Tap the left box 1 and type
x-sleutel. - Go to your assistant: tap More at the bottom right, then Settings and Microphone & phone.
- Your Speak key is already there, with a red Revoke button. Do not tap that. Tap Create a key, type Type, tap Add and then Saved.
- Go back to Shortcuts. Tap the right box 2, tap it once more and choose Paste. Close the keyboard with ✓.
Waarom een tweede sleutel? Je eerste sleutel heb je maar één keer kunnen zien. Twee sleutels mag, en in je assistent zie je dan bij elke sleutel wanneer hij voor het laatst gebruikt is.
Why a second key? You could only see the first one once. Two keys are fine, and your assistant then shows, for each key, when it was last used.
-
Kijk hem naCheck it
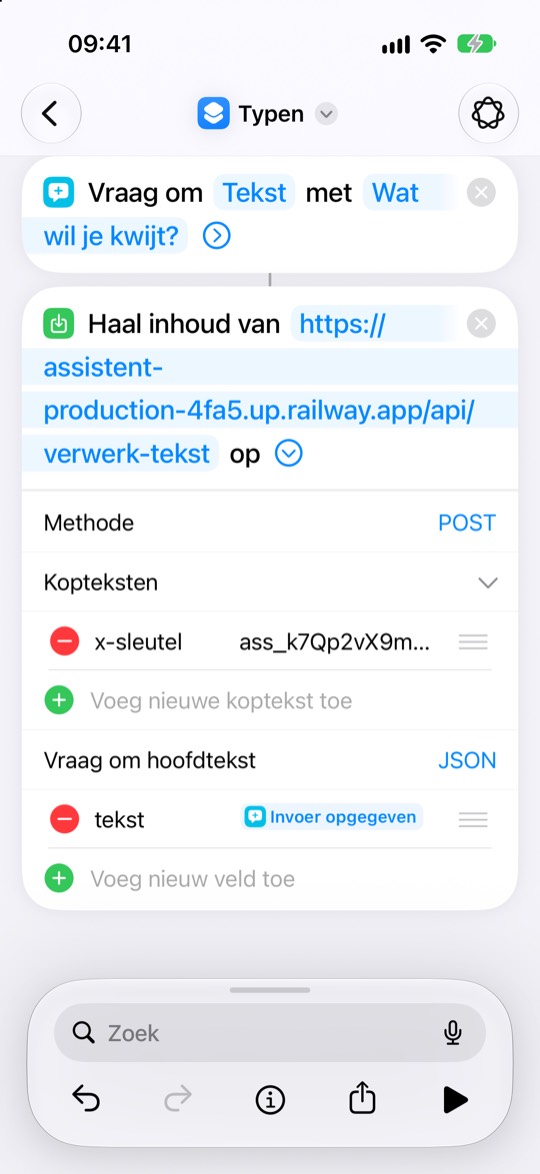
- Vraag om Tekst staat bovenaan, met jouw vraag.
- Daaronder Haal inhoud van met het adres dat eindigt op
/api/verwerk-tekst, en niet het blokje Invoer opgegeven. - Methode is POST.
- Onder Kopteksten: links
x-sleutel, rechts je sleutel. - Vraag om hoofdtekst is JSON, met links
teksten rechts het blauwe Invoer opgegeven.
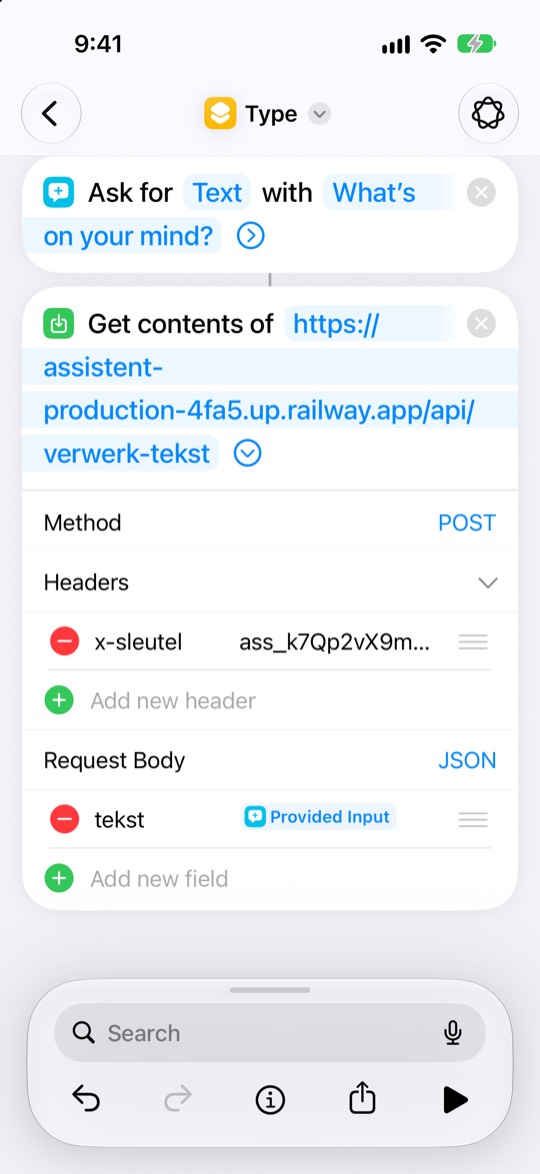
- Ask for Text is at the top, with your question.
- Below it, Get contents of with the address ending in
/api/verwerk-tekst, not the Provided Input block. - Method is POST.
- Under Headers:
x-sleutelon the left, your key on the right. - Request Body is JSON, with
tekston the left and the blue Provided Input on the right.
-
Probeer hem uitTry it
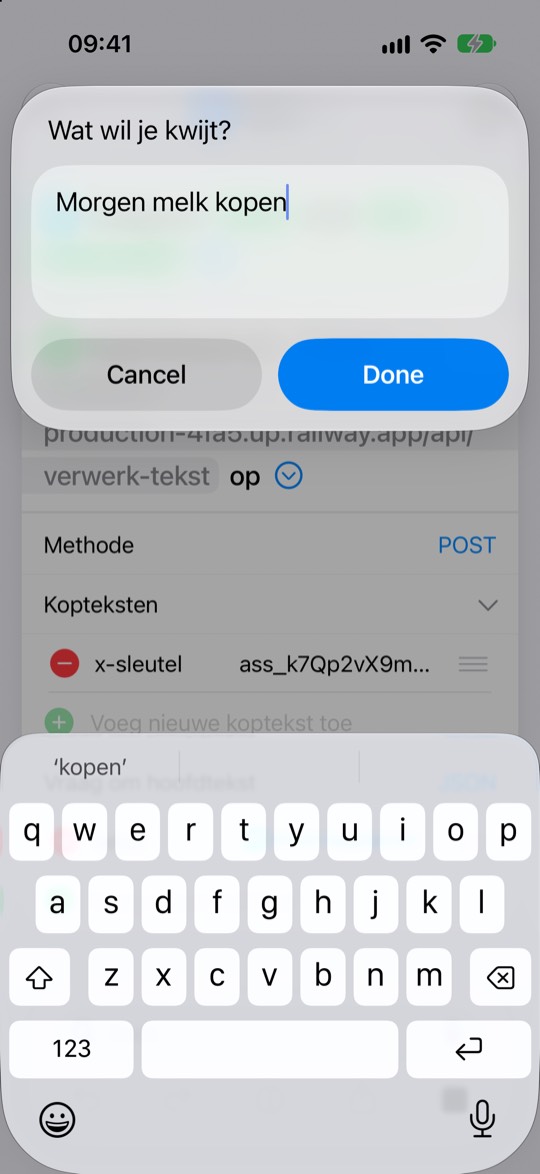
Tik rechtsonder op ▶. Je ziet jouw vraag met een tekstvak. Typ Morgen melk kopen en tik op de blauwe knop rechts (Gereed; op het plaatje staat hij in het Engels, Done).
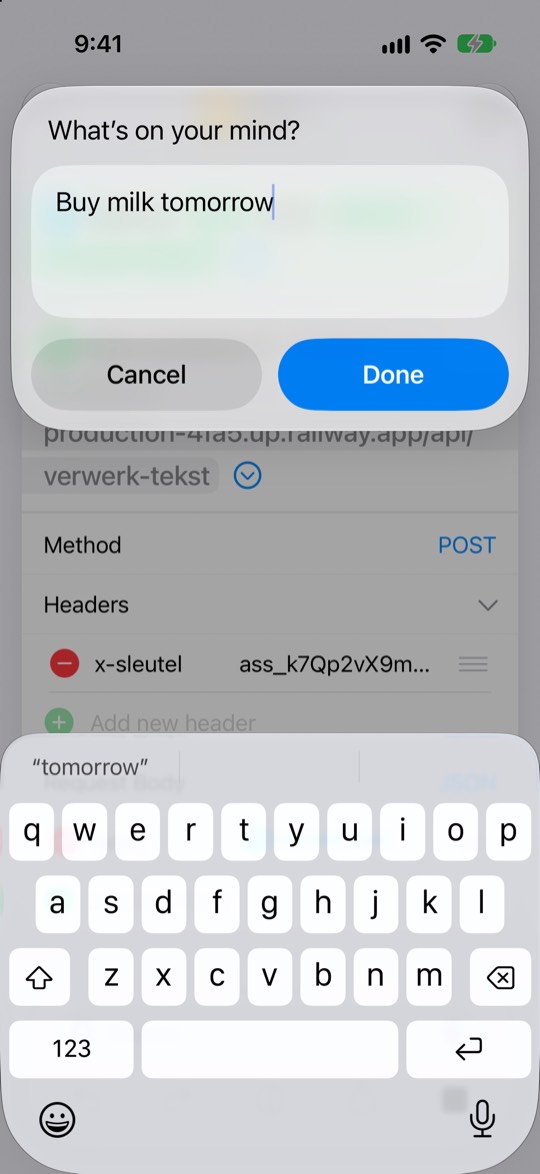
Tap ▶ at the bottom right. You’ll see your question with a text box. Enter Buy milk tomorrow and tap the blue Done button on the right.
-
Geef toestemmingGive permission
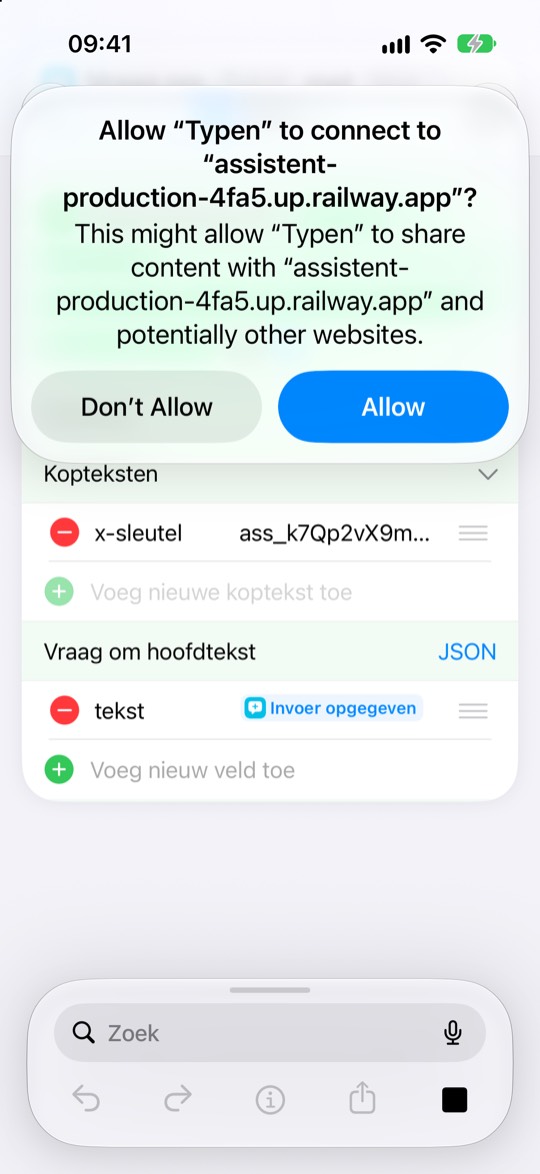
De eerste keer vraagt je iPhone of Typen verbinding mag maken met assistent-production-4fa5.up.railway.app, net als bij Inspreken. Tik op Sta toe: de blauwe knop rechts (op het plaatje in het Engels, Allow).
Er staat ook iets over “andere websites”. Dat zegt je iPhone bij elke opdracht die iets verstuurt; deze stuurt alleen naar je assistent.
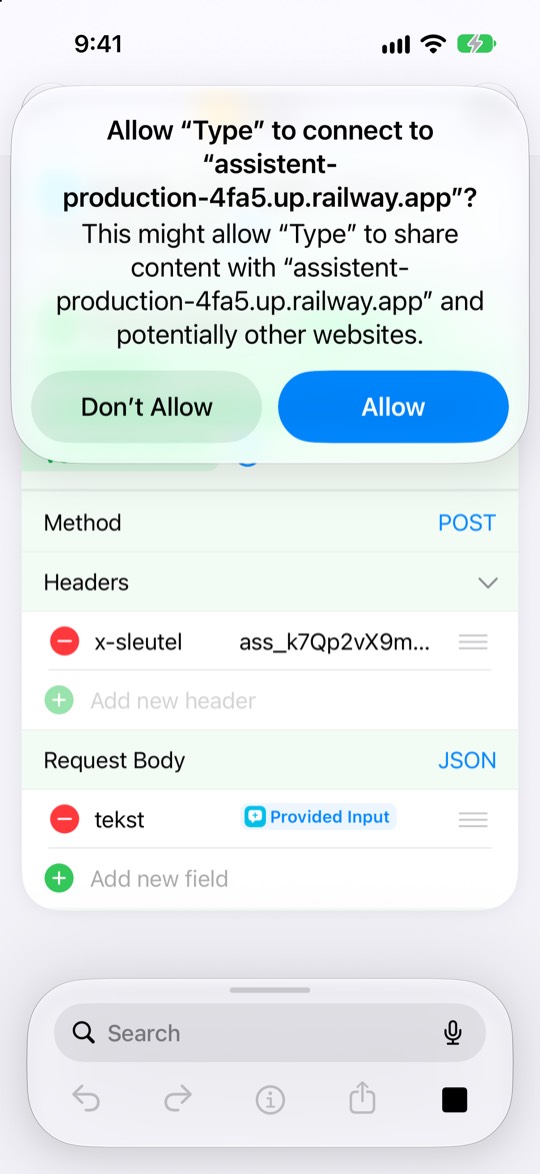
The first time, your iPhone asks whether Type may connect to assistent-production-4fa5.up.railway.app, just like for Speak. Tap Allow, the blue button on the right.
It also mentions “other websites”. Your iPhone says that for every shortcut that sends something; this one only sends to your assistant.
Open je assistent: Melk kopen staat bij je acties, met morgen als datum.
Open your assistant: Buy milk is among your actions, dated tomorrow.
-
Zet hem op je beginschermPut it on your Home Screen
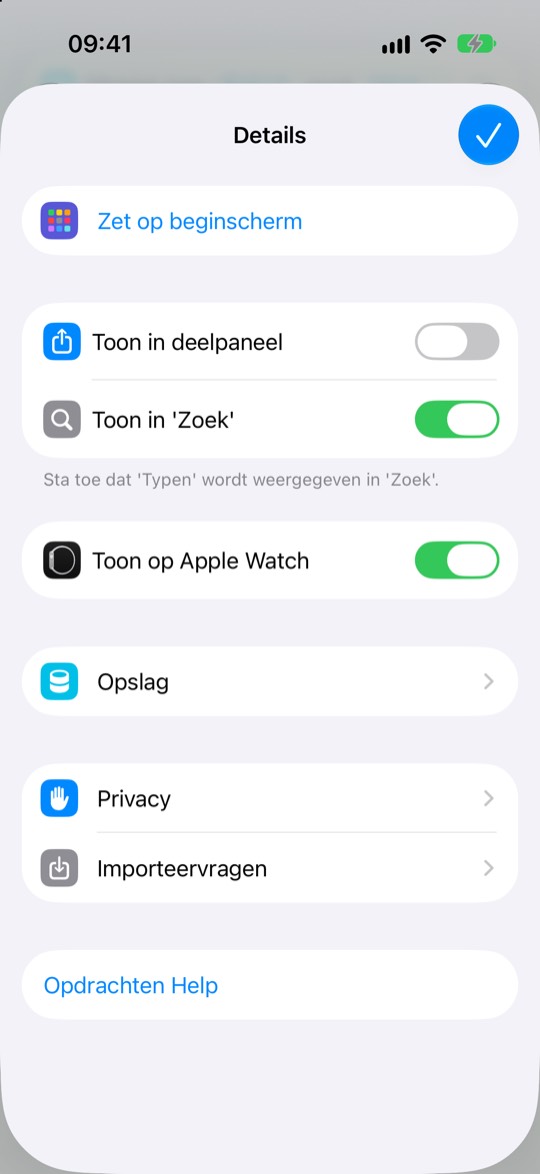
Tik onderaan in de balk op het rondje met de i ⓘ. Er schuift een venster Details omhoog. Tik bovenaan op Zet op beginscherm.
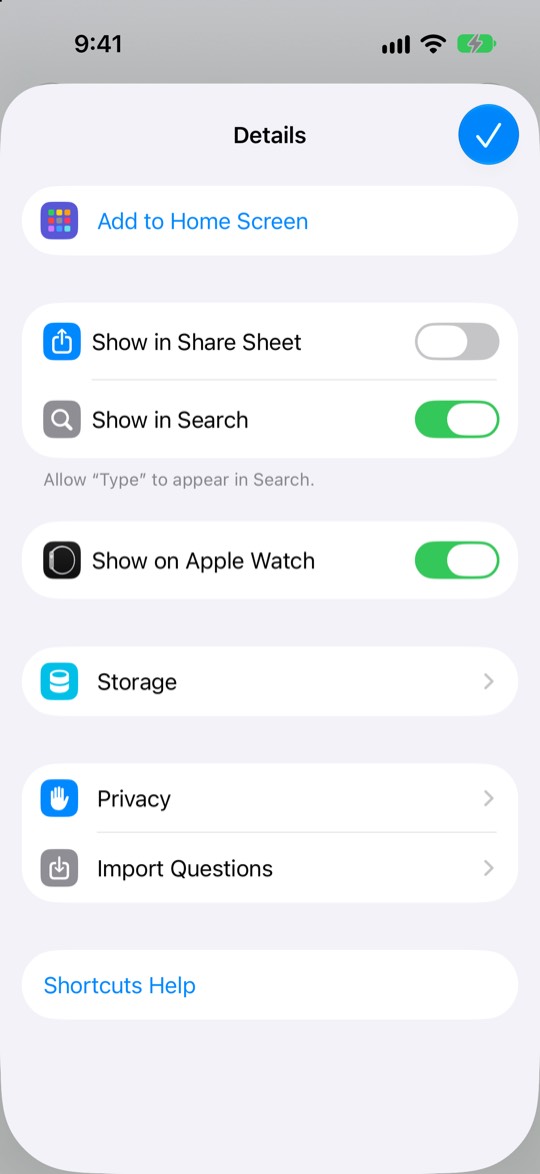
Tap the circle with the i ⓘ in the bar at the bottom. A Details sheet slides up. Tap Add to Home Screen at the top.
-
Bevestig het icoonConfirm the icon
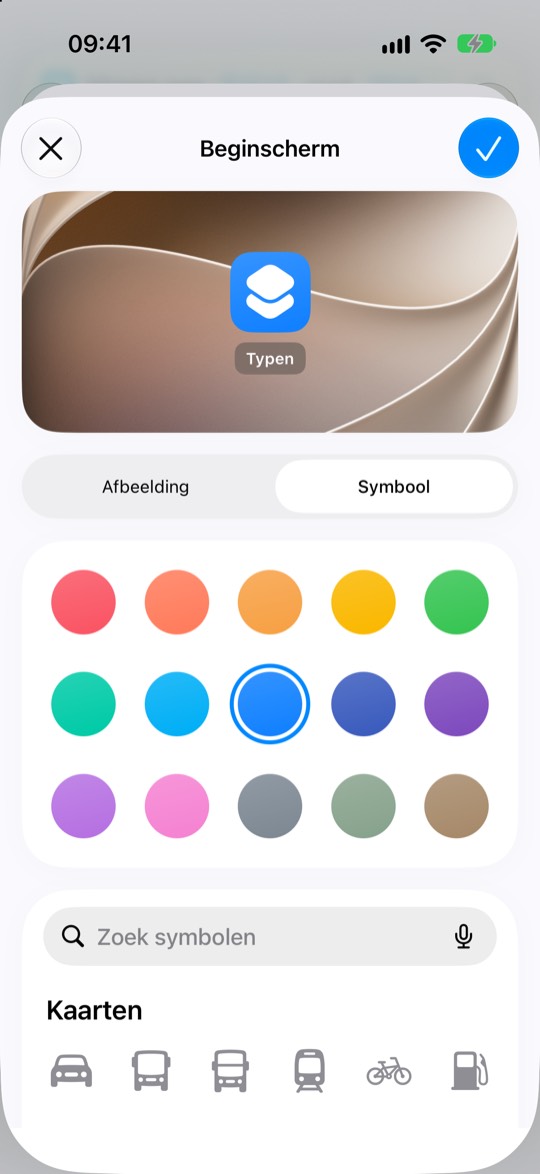
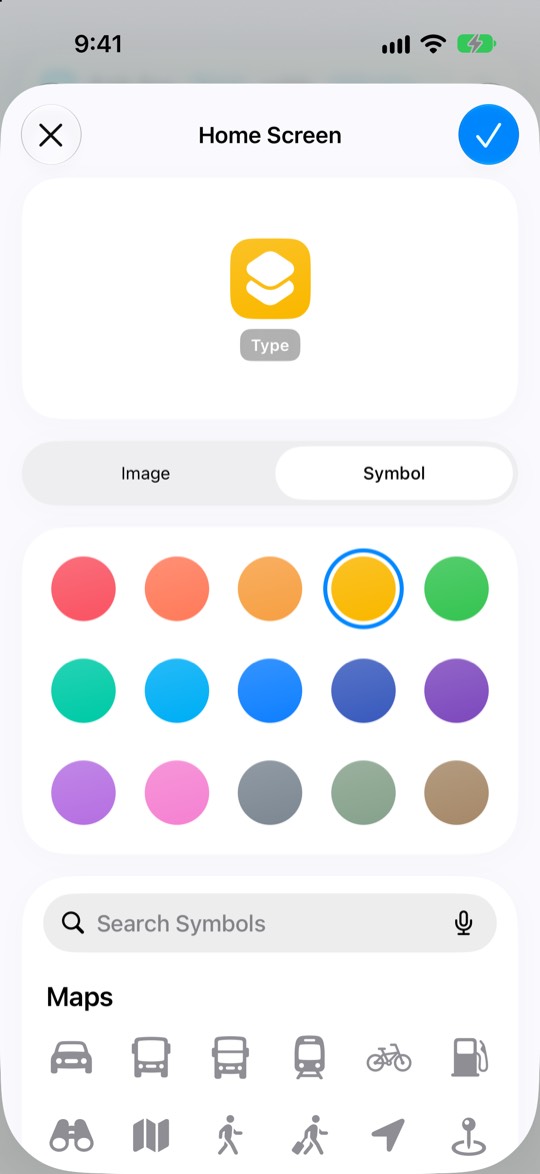
Je ziet hoe het icoon eruit gaat zien. Wil je een andere kleur, tik er dan een aan. Tik rechtsboven op het blauwe vinkje ✓.
You’ll see what the icon will look like. Want a different colour? Tap one. Then tap the blue check mark ✓ at the top right.
-
Klaar: Typen staat op je beginschermAll set: Type is on your Home Screen
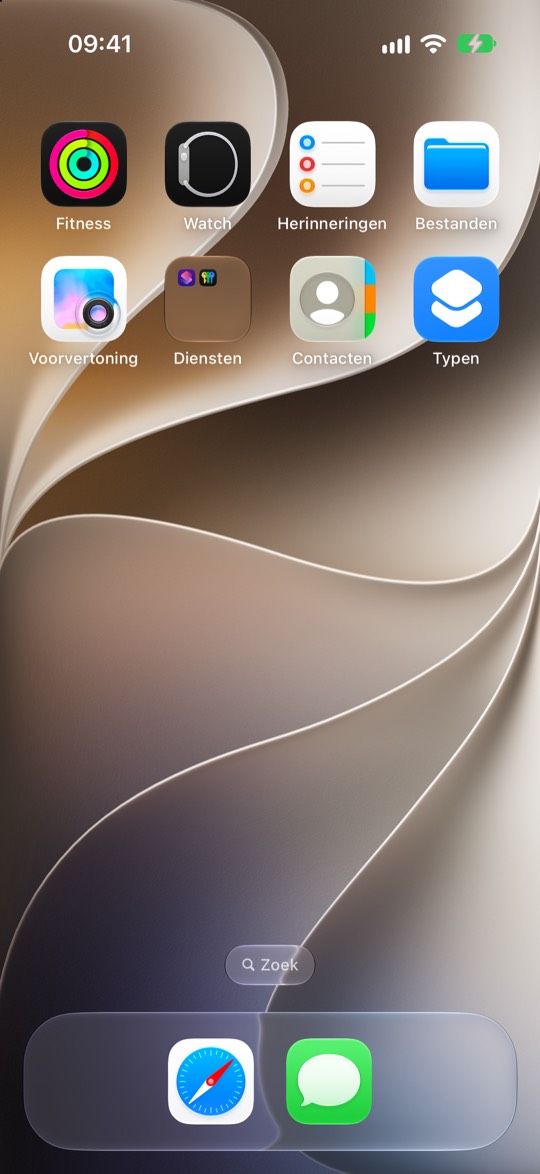
Tik voortaan op Typen, typ wat je kwijt wilt en tik op Gereed. Je assistent maakt er een actie of een notitie van.
Zie je het icoon niet? Veeg op je beginscherm naar de laatste pagina.
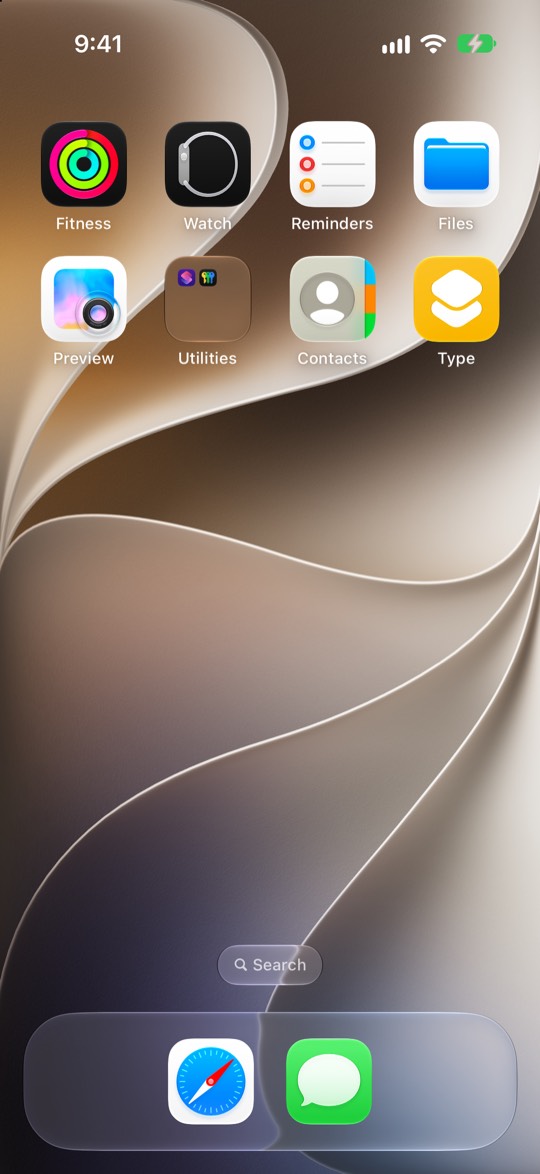
From now on, tap Type, enter what’s on your mind and tap Done. Your assistant turns it into an action or a note.
Can’t see the icon? Swipe to the last page of your Home Screen.
Werkt het niet?Not working?
De kant-en-klare opdrachten laten bovenin zien wat je assistent terugzegt. Een zelfgebouwde opdracht doet dat niet, dus daar valt een fout niet op: kijk na een proef altijd even in je assistent.
The ready-made shortcuts show what your assistant says back, at the top. One you built yourself doesn’t, so a mistake goes unnoticed there: always check your assistant after a test.
- De snelle weg: heet je opdracht Inspreken 2 of Naar Assistent 2? Dan had je het bestand twee keer gedownload. Staat er ook nog een oude zonder 2? Verwijder die eerst: tegel vasthouden → Verwijder. Houd daarna de tegel met de 2 vast, kies Wijzig naam, haal de 2 weg en tik rechtsonder op je toetsenbord op het blauwe vinkje ✓. Stond de oude op je Actieknop of beginscherm? Doe dan stap 11 of 12 opnieuw.
- De snelle weg: reageert Voeg opdracht toe niet? Kijk eerst of je toetsenbord de knop bedekt: tik op het ronde ✕ boven je toetsenbord. Nog steeds niets? Tik op Sla configuratie over. Je komt in een scherm met bovenaan de naam van je opdracht; typ niets in het vak Beschrijf een wijziging. Tik rechtsboven op Wijzig en kijk of bovenaan, in de taak Tekst, je sleutel staat. Staat hij er niet, tik erin, tik er nóg een keer op en kies Plak. Tik daarna linksboven op ‹.
- Blijft je assistent hangen op een scherm met een bestand en Open met Opdrachten? Dan tikte je op de knop in de app van je assistent, niet in Safari. Tik op Open met Opdrachten en ga verder bij stap 7. Je assistent krijg je daarna zo weer normaal: veeg vanaf de onderrand omhoog en houd even stil, veeg je assistent omhoog uit beeld en tik dan weer op zijn icoon. Doe Naar Assistent daarna vanuit Safari.
- Zegt je opdracht dat je je eerst moet aanmelden (Please sign in first)? Dan kent je assistent je sleutel niet (meer): hij is ingetrokken of niet goed geplakt. Zie Twijfel je aan je sleutel? hieronder.
- Zegt je opdracht Deze sleutel kan alleen iets toevoegen, niet lezen? Dan stuurt hij naar een verkeerd adres: controleer het adres (zelf gebouwd) of haal de opdracht opnieuw op.
- Staat Naar Assistent niet in je deelmenu? Hij verschijnt alleen bij tekst, links en webpagina's, niet bij een foto. Tik in het deelmenu op Toon meer en scrol omlaag (Delen, stap 2).
- Staat hij niet op je Watch of je Mac? Kijk of iCloud-synchronisatie aanstaat in de instellingen van Opdrachten, op beide toestellen, en wacht een paar minuten.
- Zelf gebouwd: staat je sleutel rechts? Links hoort
x-sleutel, rechts je sleutel. Dit is de fout die het vaakst gebeurt. - Staat Methode op POST? Een nieuwe taak staat op GET, en dan komt er niets aan.
- Klopt het adres? Inspreken eindigt op
/api/transcribe?snel=1, Typen op/api/verwerk-tekst. Bij Typen: staat er een blauw blokje in plaats van het adres? Tik erop, kies Wis variabele en plak het adres opnieuw. - Inspreken: staat Vraag om hoofdtekst op Bestand, met het blauwe Opgenomen audio?
- Typen: staat links
tekst(met een k en een kleine t) en rechts het blauwe Invoer opgegeven? - Staat de volgorde goed? De taak die opneemt of vraagt hoort bovenaan. Staat hij onderaan? Houd hem vast en sleep hem naar boven.
- Zie je “Deze opdracht heeft geen toegang tot …”? Dan heb je op Sta niet toe getikt. Tik op OK en probeer het nog eens: je iPhone vraagt het opnieuw. Tik dan op Sta toe.
- Zie je “De netwerkverbinding is verbroken”? Kijk of er onder Kopteksten een lege extra regel staat; haal die weg met de rode ⊖. Probeer het daarna nog eens op wifi.
- Twijfel je aan je sleutel? Maak in je assistent een nieuwe (Instellingen → Microfoon en telefoon → Nieuwe sleutel maken → Bewaard) en zet hem in je opdrachten. Via de snelle weg: houd in Opdrachten de tegel Inspreken vast en kies Wijzig. Tik bovenaan in de taak Tekst op je oude sleutel, tik er nóg een keer op, kies Selecteer alles en dan Plak, en tik linksboven op ‹. Doe daarna precies hetzelfde bij Naar Assistent: ze gebruiken allebei deze ene sleutel. Zelf gebouwd: tik onder Kopteksten in het rechtervak, tik er nóg een keer op, kies Selecteer alles en dan Plak. Trek de oude sleutel pas daarna in, bij Instellingen → Microfoon en telefoon → Op je telefoon: het is de onderste met die naam. Een opdracht die nog de oude sleutel heeft, stuurt vanaf dan niets meer aan, en je iPhone zegt dat niet.
- The quick way: is your shortcut called Speak 2 or Add to Assistent 2? Then you downloaded the file twice. Is there also an old one without the 2? Delete that first: press and hold the tile → Delete. Then press and hold the tile with the 2, choose Rename, remove the 2 and tap the blue check mark ✓ at the bottom right of your keyboard. Was the old one on your Action Button or Home Screen? Then redo step 11 or 12.
- The quick way: does Add Shortcut not respond? First check the keyboard isn’t covering it: tap the round ✕ above your keyboard. Still nothing? Tap Skip Setup. You land on a screen with your shortcut’s name at the top; don’t type anything in the Describe a change box. Tap Edit at the top right and check that your key is in the Text step at the top. If it isn’t, tap it, tap it once more and choose Paste. Then tap ‹ at the top left.
- Is your assistant stuck on a screen with a file and Open in “Shortcuts”? Then you tapped the button inside your assistant’s app, not in Safari. Tap Open in “Shortcuts” and continue at step 7. To get your assistant back to normal afterwards: swipe up from the bottom edge and pause, swipe your assistant up and away, then tap its icon again. Do Add to Assistent from Safari after that.
- Does your shortcut tell you to sign in first (Please sign in first)? Then your assistant doesn’t know your key (any more): it was revoked or not pasted right. See Not sure about your key? below.
- Does your shortcut say This key can only add things, not read them? Then it posts to the wrong address: check the address (built yourself) or get the shortcut again.
- Add to Assistent isn’t in the share menu? It only appears for text, links and web pages, not for a photo. In the share menu, tap View More and scroll down (Share, step 2).
- Not on your Watch or Mac? Check that iCloud Sync is on in Shortcuts’ settings, on both devices, and wait a few minutes.
- Built it yourself: is your key on the right? The left box gets
x-sleutel, the right box your key. This is the most common mistake. - Is Method set to POST? A new step starts on GET, and then nothing arrives.
- Is the address right? Speak ends in
/api/transcribe?snel=1, Type in/api/verwerk-tekst. For Type: is there a blue block instead of the address? Tap it, choose Clear Variable and paste the address again. - Speak: is Request Body set to File, with the blue Recorded Audio?
- Type: is
tekston the left (Dutch, with a k and a small t, not “text”) and the blue Provided Input on the right? - Is the order right? The step that records or asks belongs at the top. If it’s at the bottom, hold it and drag it up.
- Seeing “This shortcut can’t access …”? Then you tapped Don’t Allow. Tap OK and try again: your iPhone asks once more. Then tap Allow.
- Seeing “The network connection was lost”? Check for an empty extra row under Headers; remove it with the red ⊖. Then try again on Wi-Fi.
- Not sure about your key? Create a new one in your assistant (Settings → Microphone & phone → Create a key → Saved) and put it in your shortcuts. The quick way: in Shortcuts, press and hold the Speak tile and choose Edit. At the top, in the Text step, tap your old key, tap it once more, choose Select All, then Paste, and tap ‹ at the top left. Then do exactly the same in Add to Assistent: both use this one key. Built it yourself: tap the right box under Headers, tap it once more, choose Select All, then Paste. Only then revoke the old key in Settings → Microphone & phone → On your phone: it’s the lower one with that name. A shortcut that still has the old key sends nothing from then on, and your iPhone won’t tell you.
De app zelf op je beginschermThe app itself on your Home Screen
Dan open je je assistent met één tik, zonder adresbalk, zoals elke andere app. Doe dit in Safari: alleen Safari zet een app op je beginscherm.
Then you open your assistant with one tap, without an address bar, like any other app. Do this in Safari: only Safari puts an app on your Home Screen.
- Open je assistent in Safari en log in.
- Tik op ⋯ in de adresbalk onderaan, en dan op Deel.
- Tik op Zet op beginscherm. Staat hij er niet tussen? Veeg de lijst met opties omhoog, of tik onderaan op de knop die meer opties toont.
- Tik rechtsboven op Voeg toe. Is die nog grijs, wacht dan een paar tellen.
- Tik op het nieuwe icoon op je beginscherm en log nog één keer in: de app op je beginscherm onthoudt zijn eigen aanmelding, los van Safari.
- Open your assistant in Safari and sign in.
- Tap ⋯ in the address bar at the bottom, then Share.
- Tap Add to Home Screen. Not there? Swipe the list of options up, or tap View More.
- Tap Add at the top right. If it is still grey, wait a few seconds.
- Tap the new icon on your Home Screen and sign in once more: the app on your Home Screen keeps its own sign-in, apart from Safari.
Vult je wachtwoordbeheerder in de app op je beginscherm niets in? Kopieer het wachtwoord uit de beheerder en plak het in het veld.
Your password manager fills in nothing in the app on your Home Screen? Copy the password from it and paste it into the field.
Meer wetenGood to know
Altijd een actie, of altijd een notitieAlways an action, or always a note
Normaal beslist je assistent zelf wat het wordt, net als in de app. Eén keer inspreken kan dus allebei opleveren: “bel Petra morgen, en onthoud dat we een tweede leverancier zoeken” wordt een actie én een notitie.
Wil je dat zelf kiezen? Zet bij Inspreken iets achter het adres:
| Achter het adres | Wat er gebeurt |
|---|---|
| (niets) | je assistent kiest |
&doel=acties | altijd acties |
&doel=notities | altijd een notitie |
Bij Typen voeg je een tweede tekstveld toe: links doel, rechts acties of notities.
Normally your assistant decides what it becomes, just like in the app. One recording can give you both: “call Petra tomorrow, and remember we need a second supplier” becomes an action and a note.
Want to choose yourself? For Speak, add something to the end of the address:
| At the end of the address | What happens |
|---|---|
| (nothing) | your assistant decides |
&doel=acties | always actions |
&doel=notities | always a note |
For Type, add a second text field: doel on the left, acties or notities on the right.
Hoeveel detail je assistent bewaartHow much detail your assistant keeps
Inspreken volgt de instelling Niveau in je assistent (Instellingen → AI en tekst: Licht, Normaal of Uitgebreid). Voor deze opdracht kun je dat anders zetten, met iets achter het adres:
| Achter het adres | Wat er gebeurt |
|---|---|
&niveau=kort | Licht: alleen de actie zelf |
&niveau=normaal | Normaal: de actie plus nuttige context |
&niveau=uitgebreid | Uitgebreid: alles wat je erover zei |
Speak follows the Level setting in your assistant (Settings → AI & text: Light, Normal or Extensive). You can set it differently for this shortcut by adding something to the end of the address:
| At the end of the address | What happens |
|---|---|
&niveau=kort | Light: just the action itself |
&niveau=normaal | Normal: the action plus useful context |
&niveau=uitgebreid | Extensive: everything you said about it |
Welke spraakherkenning gebruikt Inspreken?Which speech recognition does Speak use?
Dezelfde als de app: het spraakmodel Whisper, dat je assistent gebruikt via de dienst Groq. Niet die van Apple, want Whisper verstaat Nederlands beter. Daarom gebruik je Neem audio op en niet Transcribeer audio of Dicteer tekst.
Omdat je opname via je assistent gaat, werkt ook je eigen woordenlijst: namen en vaktermen uit je instellingen worden herkend, net als in de app.
Achter het adres staat ?snel=1. Daardoor krijgt je iPhone meteen antwoord, en werkt je assistent de opname daarna af. Na een paar seconden staat het in de app.
Foto’s blijven niet bewaard — alleen je woorden.
The same as the app: the Whisper speech model, which your assistant uses through the Groq service. Not Apple’s, because Whisper is better with Dutch and uses your own word list. That’s why you use Record Audio and not Transcribe Audio or Dictate Text.
Because your recording goes through your assistant, your own word list works too: names and terms from your settings are recognised, just like in the app.
The address ends in ?snel=1 (snel is Dutch for fast). That makes your iPhone get an answer straight away, while your assistant finishes the recording. After a few seconds it’s in the app.
Photos are not kept — only your words.
De verbinding testen (voor gevorderden)Testing the connection (advanced)
Blijft het misgaan, maak dan een piepkleine opdracht die alleen kijkt of je iPhone je assistent kan bereiken met jouw sleutel:
- Nieuwe opdracht, één taak: Haal inhoud van URL op.
- Adres:
https://assistent-production-4fa5.up.railway.app/api/ping - Methode blijft GET. Onder Kopteksten: links
x-sleutel, rechts je sleutel. - Voeg eronder de taak Toon content toe en tik op ▶.
Zie je ok en true, met de zin dat je sleutel werkt? Dan kloppen de verbinding en je sleutel, en zit het probleem in de opdracht zelf. Zie je een melding dat je je eerst moet aanmelden (Please sign in first)? Dan klopt de sleutel niet.
Blijft Inspreken “De netwerkverbinding is verbroken” geven terwijl deze test werkt? Zet dan tussen je twee taken de taak Codeer Base64 (invoer: Opgenomen audio), en stuur het resultaat als JSON met één tekstveld: links audio, rechts het blauwe blokje Gecodeerd met Base64. Het geluid komt precies hetzelfde aan.
Still failing? Make a tiny shortcut that only checks whether your iPhone can reach your assistant with your key:
- New shortcut, one step: Get Contents of URL.
- Address:
https://assistent-production-4fa5.up.railway.app/api/ping - Method stays GET. Under Headers:
x-sleutelon the left, your key on the right. - Add the Show Content step below it and tap ▶.
See ok and true, with a sentence saying your key works? Then the connection and your key are fine, and the problem is in the shortcut itself. See a message that you need to sign in first (Please sign in first)? Then the key is wrong.
Does Speak keep saying “The network connection was lost” while this test works? Put a Base64 Encode step between your two steps (input: Recorded Audio), and send the result as JSON with one text field: audio on the left, the blue Base64 Encoded block on the right. The sound arrives exactly the same.
Over je sleutelAbout your key
- Een sleutel werkt alleen voor de snelkoppeling op je telefoon: iets toevoegen met deze opdrachten, en de test hierboven. Je notities, je bord en je account zijn er niet mee te openen. Dat is met opzet zo.
- Deel je sleutel met niemand. Wie hem heeft, kan wel dingen aan jouw assistent toevoegen.
- Wij bewaren je sleutel niet, alleen een onleesbare afdruk. Kwijt is dus echt kwijt; maak dan een nieuwe.
- Kwijtgeraakt of niet meer nodig? Trek hem in bij Instellingen → Microfoon en telefoon → Op je telefoon. Bij elke sleutel zie je wanneer hij voor het laatst gebruikt is.
- Eén sleutel werkt op al je toestellen, en hij kan alleen iets toevoegen — niets lezen. Intrekken in je assistent zet hem overal tegelijk uit.
- Deel je opdracht niet met anderen: je sleutel zit erin. Stuur ze deze pagina; ze maken hun eigen sleutel.
- A key only works for the shortcuts on your phone: adding things, and the test above. It can’t open your notes, your board or your account. That’s on purpose.
- Don’t share your key. Whoever has it can add things to your assistant.
- We don’t store your key, only an unreadable fingerprint of it. Lost means lost: just create a new one.
- Lost it, or no longer need it? Revoke it in Settings → Microphone & phone → On your phone. Each key shows when it was last used.
- One key works on all your devices, and it can only add things — not read them. Revoking it in your assistant switches it off everywhere at once.
- Don’t share your shortcut with others: your key is inside. Send them this page; they make their own key.